AutoCAD and AutoCAD LT are similar but not identical. There are some distinct differences between AutoCAD LT and the full version, AutoCAD. With this article, we have noted the top differences between both.
This article will also include the top features to consider when evaluating the AutoCAD and AutoCAD LT software or check out this comparison chart here. This list of differences applies to both the Windows and Mac versions.
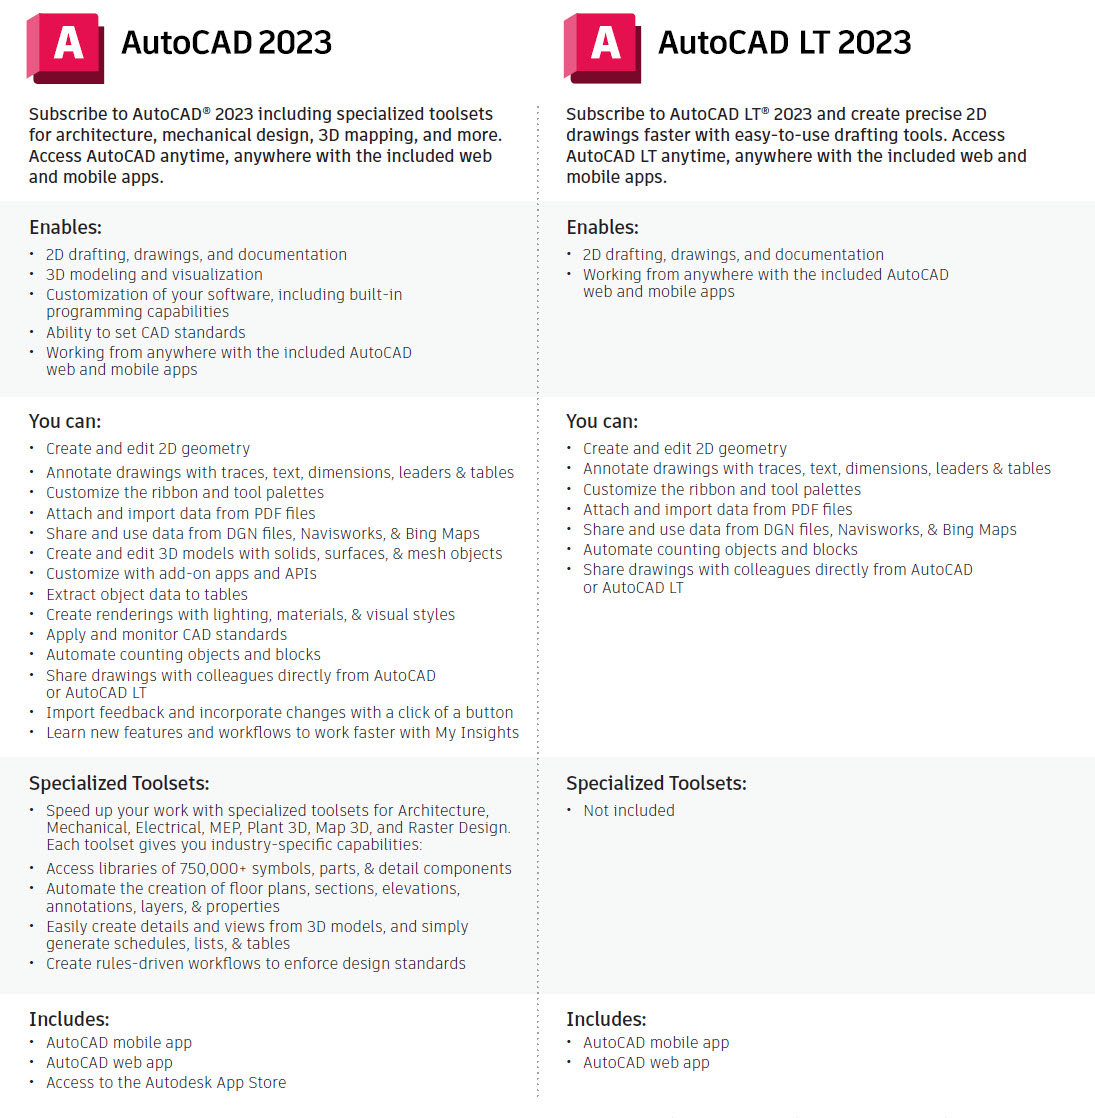
AutoCAD LT is the more economical version of AutoCAD, and therefore just has all the basic features, like tool palettes, external referencing, and printing/plotting in 2D. It works with layers, and you can create and edit blocks, use PDFs as underlays, and upload documents to AutoCAD WS for mobile viewing. The block creation and editing are only available on the Windows version of AutoCAD and are not available for Macs. Another feature that is only available for Windows is the DWG converter, allowing drawings done in other AutoCAD-based applications to be translated to AutoCAD.
3D Modeling
The 3D modeling and visualization features may be the most significant difference for some users. If you want to model in 3D, you have to use the full version of AutoCAD. In AutoCAD LT, you can open and view 3D models created in the full version of AutoCAD, though you can’t create new ones or edit them, other than to move, copy, or delete them.
AutoCAD LT is a 2D drafting program, it doesn’t have much visualization or presentation capabilities. Whereas you can create and edit 3D models with solids, surfaces, and mesh objects on the full version of AutoCAD but not on LT. You can use 3D navigation (orbit, Viewcube, wheel), display 3D models in several built-in visual styles ranging from a simple wireframe model to full, photorealistic rendering complete with shadows, reflections with a version of AutoCAD which you cannot do on LT.
When you move to AutoCAD, you add a whole new dimension. Literally. AutoCAD has 3D drawing capabilities, enabling camera views, walkthrough navigation, and model documentation. One of the cool 3D capabilities is free-form design, where you can use robust, mesh, and solid modeling tools to investigate and refine your ideas. There is also a context-sensitive press/pull tool, where you can extrude and offset curves, creating surfaces and solids, and select multiple objects within a single PressPull operation. With the Surface Curve Extraction tool, you can extract isoline curves through a specified point on a surface or face of a solid to determine the contour lines of any shape. There are so many things you can do when you add the 3D capabilities of AutoCAD. When you need to, you can flatten your 3D geometry to 2D for easier documentation.
Some of the additional features you get with the standard AutoCAD are pretty important, and AutoCAD users will agree that they use them frequently and make their lives much easier. These tools include AutoLISP and Express Tools and are big time-savers. Access to CAD standards tools is also pretty cool. It is also very important to note that LT is a standalone product, and cannot be deployed on a network as the standard AutoCAD can.
Rendering
Now let’s talk about rendering. Most people don’t think that AutoCAD is capable of creating presentation-worthy images because Autodesk makes products specifically for visualization. If you are using AutoCAD LT, you can’t do any sort of presentation-worthy images except line drawings. However, in your 3D AutoCAD model, you can add lights, make objects transparent, or add materials and real-time shadows to make your model look realistic. If you do have more advanced visualization products like 3D Studio Max, the great thing about a 3D AutoCAD model is that you can import it directly into Max and add lights and materials to create a photorealistic rendering.
This was just a general overview, if you have more questions feel free to give us a call!
New York, NY, February 3, 2021 – Microsol Resources, an Autodesk Platinum Partner with offices in New York, Boston and Philadelphia, is pleased to announce that Jim Stephen has joined the company’s New York office as an Account Executive for Construction Solutions.
Based in Brooklyn, NY, Jim will be focusing on delivering the Autodesk Construction Cloud portfolio to help general contractors, subcontractors, and large construction groups across the US, refine their workflows, reduce risks, and maximize their profit margins. Prior to joining Microsol Resources, Jim has experience in selling software solutions to award-winning architecture and design firms and has developed a strong passion for design, real estate, and construction. Jim holds an Associate’s Degree for International Business from Concordia University.
“Not only does Jim have a great sales background, but also a wealth of customer service experience.” said Emilio Krausz, President of Microsol Resources, “His experience speaks directly to the needs of our clients and I am delighted that we were able to find someone like Jim to fill this crucial position in our firm.”
The first step of any Revit Model Maintenance process is Detach from Central with Audit. However, there is more to cleaning a project than this. This article is a cumulation of thousands of tech support cases, solved and logged in our CRM system.
When a model is not maintained, it takes more system resources, performance is reduced, packets of information lost and corruption in the data is the result. I’ve organized them in the best order possible, but it takes a team to get it all done, while in production.
Here are our recommended procedures for a terrestrial and cloud project.
Sync with Central
Close all local and central files
Detach from Central
Check the Revit Journal
Purge Unused
Export Families to review and audit
Check Worksets
Review and address Warnings
Delete Backup and Temp Folders
Create a new Central Model
Create new Local files
Have all users Sync with Central, SWC, and relinquish all borrowed or owned worksets.
Tip: I believe no one should own a workset, only borrow from them.
Close all Local Files. In the BIM 360 world, we have no local files, other than the local cache in APPDATA
The BIM Manager will open the Central model, by selecting “Detach from Central” along with “Audit”. In BIM 360 we can select the project we want to open on the Revit Home page. choose “Open and Audit” at the ellipsis, ” . . . “.
When the BIM manager works in the Central Model. No one should attempt to open or create a new local.
All work is stopped at this point.
Check the Revit Journal.
Journal review can help determine corruption, We can use the Journal to check the Revit build version, locate errors, and even identify bad work habits.
I will create a separate blog for this.
The BIM Manager should use the “Purge All Unused” tool.
Why not create seed projects that the team can open, browse and copy elements from?
Export Families to review and audit. Use “Save As / Library / Family”. This tool will add all the families from the project to the folder you select. Careful, this could take a while. Don’t drop them on your or your client’s desktop. ;-). Note any warnings and the family name if any errors occur. The warning will pop up and interrupt the Save As process. The Status Bar will have the name of the Family, Revit is exporting.
Check that the worksets are being utilized properly.
I create a 3D view for each workset in the project. I then isolate the workset in each view. This allows me to review the project and ensure elements are on the right Workset.
I’ve seen elements on the Shared Level and Grid workset. How did that happen?
Be sure to create worksets for links and to utilize the opportunity to close worksets when creating new locals.
I recommend we use worksets to allow a local user to close the worksets they do not need to be loaded in their local file. Experience has proven this is an enormous opportunity to increase project performance.
Check and resolve all Warnings.
Easier said than done. It’s best to address every warning as it happens. This should be an ongoing effort from the start of any project.
Microsol Resources offers a Revit Model Health Check service. Contact me for more info.
At this point the Backup and Revit Temp folders related to the Central Model are useless at this point, they should be deleted.
.slog file, Worksharing Log File, is part of the _backup folder for the central model. It is found inside the folder Central_File_backup where the Central_File.rvt is located. This file contains information on the Sync with central progress, element borrowing, and users accessing the central file.
An example of a permission issue is when someone can’t edit the element because it is being edited by another user, but this user is not currently in the model.
The Revit SLOG file could be corrupt and will be re-created after performing these maintenance steps.
The backup folder is useful only when the project is in production and the team wants to Roll Back the project to a previous date, indication in the project history.
BIM 360 does not have a .slog file.
Once the backup and Revit folders are deleted the BIM Manager can create a new Central Model by performing a save-as and choosing “Make this a Central Model after save” in the options dialog with “Compact Central” checked. While in this dialog always ensure the following
Indicate the “Maximum” number of backups. 20 is the default. These backups are usable when the team chooses to Roll Back the project. Not my first choice.
Choose the option of “Specify” under the section called “Open Workset Default” This gives each local user the option to close worksets when creating their new local file.
When we close DWG Links worksets we see an enormous performance benefit.
Choose a simple drafting view, “Bulletin Board” as the source for the “Thumbnail Preview” section.
Lazy parsing plays a role in this performance gain.
“Lazy parsing” means that the data for each element isn’t converted until it is actually needed. The main uses for the data in an element are to display that element or to regenerate it when there are changes to other elements it depends on. Thanks to Irwin Jungreis and their forum contributions
All users can now Create new Local files.
BIM 360 Model Maintenance
When a project in the cloud, in BIM 360, is seeing signs of possible corruption we should use the same maintenance procedures on these files as well. First, one would need to take it down, or copy the RVT to a local computer and preform these maintenance procedures. But we shouldn’t just copy and paste.
There are many instances of the model in the BIM 360 project. We have the version we open and edit while using Revit. We have the published version in BIM 360 Document Management, which is viewable when using the browser via docs.b360.autodesk.com. We even have copies of the file in various shared folders or even within coordination spaces.
Because it is sometimes difficult to determine what has been published most recently and what sets are included. It is our recommendation to open the RVT via Revit. Open your model, Sync with Central, and Relinquish all editable items. use the “Save As” function to save a copy of the file to your desktop or the local machine. Make sure you check the options in the File Save As dialog, choose “make this a central file after save”. Perform maintenance starting from step #3 above.
Let me know your thoughts on this process. You may have another tip I can add to this resource.
Features the latest informative and technical content provided by our industry experts for designers, engineers, and construction firms and facility owners.


 Based in Brooklyn, NY, Jim will be focusing on delivering the Autodesk Construction Cloud portfolio to help general contractors, subcontractors, and large construction groups across the US, refine their workflows, reduce risks, and maximize their profit margins. Prior to joining Microsol Resources, Jim has experience in selling software solutions to award-winning architecture and design firms and has developed a strong passion for design, real estate, and construction. Jim holds an Associate’s Degree for International Business from Concordia University.