More than ever, the construction industry is embracing digital transformation, and at the heart of this change is building information modeling (BIM). As projects become more complex and the demand for efficiency grows, understanding the BIM process is essential for professionals working in architecture, engineering, and construction (AEC). This article will break down the essentials of the BIM process, explore its key components, and highlight how it is revolutionizing project management.
What is The BIM Process?
Building Information Modeling (BIM) is a complex 3D modeling tool that helps streamline every aspect of design and construction. However, using it effectively requires a strong strategy and extensive planning. This is where a BIM process comes in.
The BIM process involves creating, managing, and sharing digital representations of a building’s physical and functional characteristics throughout its lifecycle. This methodology defines workflows, decision-making, and project management in the AEC industry by providing stakeholders with real-time access to critical information.
Key Components of a BIM Process
There is no one correct way to use BIM. Every firm will vary in its approach to a BIM process. However, there are four essential components to any essential strategy: a capable BIM software platform, a shared data environment, effective collaboration, and good communication,
BIM Software
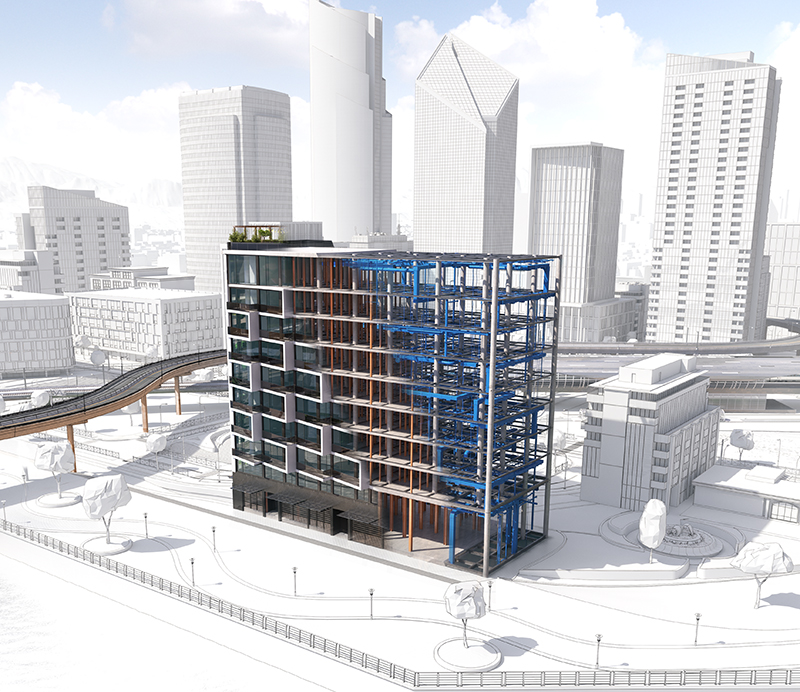
BIM software, such as Autodesk Revit, is at the heart of the BIM process. These tools enable the creation of detailed 3D models that serve as digital representations of a building. The BIM model incorporates data from various disciplines, including architectural, structural, and MEP (mechanical, electrical, and plumbing), allowing for a more complete view of the building design. BIM software allows project teams to run simulations, perform clash detection, and generate cost estimations, all within a single platform.
Access to BIM Information
Another essential component of an effective BIM process is information accessibility. A common data environment (CDE) ensures that all project team members have access to the same data, reducing the risk of errors and rework. This “single source of truth” provides a comprehensive view of the project at any stage of the construction process, from pre-design to facility management. The ability to exchange information efficiently among stakeholders also improves the overall efficiency and accuracy of the project.
Effective Collaboration
A good BIM process is centered around collaboration among all team members involved in a construction project. Whether it’s architects, civil engineers, or construction teams, BIM standards ensure that everyone is on the same page. The digital model created in the design phase acts as a central reference point, enabling seamless communication and coordination among team members. This collaborative approach is particularly beneficial in complex projects where integrating various disciplines is crucial for success.
Good Communication
Communication is vital in any project, and the BIM process enhances this by providing clear and accessible information to all stakeholders. Through BIM, everyone involved in the project can visualize the building design and see how changes in one area affect the overall project. This transparency helps firms make informed decisions, minimize delays, and ensure the project stays on track.
BIM Process Management Steps
1. Pre-design Phase
The pre-design phase is the foundation of the BIM process. Project requirements are defined during this stage, and initial concepts are developed. BIM technology is used to create early models that help stakeholders visualize the building design and explore various options. This phase is critical for establishing the project’s goals, budget, and timeline.
2. Design Phase
In the design phase, the BIM model evolves into a detailed digital representation of the building. Autodesk Revit and other BIM tools are used to create comprehensive 3D models that incorporate architectural, structural, and MEP elements. This phase involves iterative design and real-time collaboration, allowing for adjustments and refinements as needed. The design phase is where simulations, clash detection, and sequencing are performed to ensure that the building design is feasible and efficient.
3. Construction Phase
The construction phase is where the digital model really comes to life. Engineers use BIM models to guide on-site construction, ensuring the building is built according to the design specifications. The use of BIM in construction management allows for better sequencing, coordination, and progress monitoring. Any issues that arise on-site can be quickly addressed by referring to the BIM model, reducing the likelihood of costly delays and rework.
4. Facility Management Phase
BIM extends beyond the construction phase into facility management as well. The BIM model serves as a valuable resource for maintaining and operating the building throughout its lifecycle. Information related to maintenance schedules, renovations, and future upgrades is stored in the BIM model, providing a comprehensive record for facility managers. This phase highlights the sustainability benefits of BIM, as it enables more efficient resource management and reduces the building’s environmental impact.
Benefits & Challenges of Implementing BIM
Benefits of Implementing BIM
Taking advantage of a BIM process brings many benefits, making it a game changer in the AEC industry. Some of these benefits include:
Precision in Design and Engineering: BIM allows architects and engineers to create highly accurate digital models that integrate various aspects of the building, such as structural elements, MEP systems, and architectural details. This precision reduces the likelihood of design conflicts and ensures all elements work together seamlessly.
Streamlined Coordination Among Disciplines: BIM provides a common platform where architects, structural engineers, MEP professionals, and construction teams can collaborate effectively. This coordination minimizes errors, reduces rework, and ensures that all disciplines are aligned from the early stages of the project.
Advanced Clash Detection: One of the standout benefits for engineers and construction professionals is BIM’s ability to identify clashes between different systems before construction begins. This early detection of potential conflicts in the design phase prevents costly on-site modifications and delays.
Accurate Quantity Takeoffs and Cost Estimation: BIM enables precise quantity takeoffs and cost estimation by integrating material data directly into the 3D model. This accuracy helps construction managers and estimators develop more reliable budgets and minimize the risk of unexpected costs during construction.
Improved Construction Sequencing and Scheduling: Construction teams benefit from BIM’s ability to simulate construction sequencing and develop more efficient schedules. By visualizing the construction process in advance, project managers can identify potential bottlenecks and optimize workflows, leading to smoother project execution.
Efficient Facility Management Post-Construction: For facility managers, BIM provides a comprehensive digital record of the building’s systems and components. This detailed information is invaluable for ongoing maintenance, renovations, and upgrades, ensuring that the building operates efficiently throughout its lifecycle.
Enhanced Safety Planning: BIM allows for the simulation of construction activities, which helps in planning safety measures more effectively. By identifying potential hazards before construction begins, safety managers can implement strategies to mitigate risks on-site.
Challenges of Implementing BIM
While the benefits of BIM are many, implementing BIM certainly comes with its challenges, Including:
Initial Investment Costs: The upfront investment in BIM software and training can be significant, especially for smaller firms.
Complexity: The learning curve for mastering BIM tools like Revit can be steep, requiring dedicated time and resources.
Resistance to Change: Some stakeholders may hesitate to adopt new technologies and workflows, making implementing BIM across the entire project team difficult.
Data Management: Ensuring the BIM model is up-to-date and accurate throughout the project lifecycle can be challenging, especially in large, complex projects.
Conclusion
Understanding the BIM process is crucial for AEC professionals looking to stay competitive in a rapidly changing industry. From the pre-design phase to facility management, BIM offers a comprehensive approach to managing construction projects more efficiently and sustainably. While implementing BIM comes with its challenges, its benefits in terms of collaboration, visualization, and overall project management make it a valuable tool for the future of design and construction.
Revit 2025: Streamlining Design and Documentation Workflows
Welcome architects, engineers, and BIM enthusiasts! Are you excited to dive into the latest features of Revit 2025?
This update brings a wave of enhancements designed to supercharge your design productivity, elevate your sustainability efforts, and empower you to create clear, well-organized documentation.
Let’s explore some of the most architecturally significant improvements across these key areas.
Design with Efficiency at Your Fingertips
Revit 2025 streamlines your modeling process, freeing you to focus on creative problem-solving. Here are some highlights:
Effortless Wall Creation: Imagine walls that practically build themselves! The new “Create Walls with Auto Join and Lock” feature automates the joining of adjacent walls, even those with openings, ensuring seamless connections and saving you valuable time.
Enhanced Wall Wrapping Control: Take control of wall wrappings with in-canvas controls. This intuitive feature allows you to easily define which elements wrap around walls, leading to a more refined and realistic design representation.
Flexible Family Creation: Empower your families with the ability to include single-element or even empty arrays. This expanded flexibility allows you to create more versatile families that adapt to diverse design scenarios.
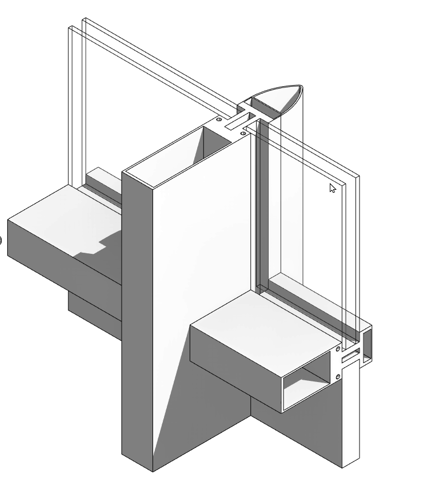
Multiple Loop Mullion Profiles: This allows for the creation of window mullions with more complex profiles, improving the visual representation of windows in the model.
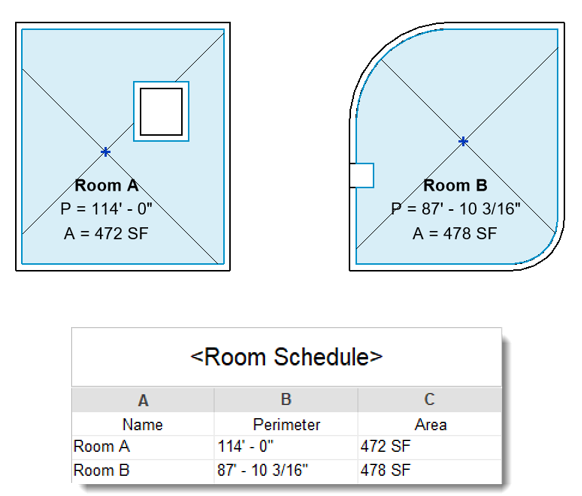
Room Perimeter Accuracy Improvements: The method used to calculate room perimeter values has been updated in Revit 2025 resulting in improved accuracy. The room perimeter now accounts for inner loops within rooms.Additionally, the method for calculating the perimeter of round rooms or room with arc segments has been enhanced. Users may notice changes in the room perimeters when a project is upgraded to Revit 2025.
Sustainable Design Made Easier
Revit 2025 equips you with the tools to make informed decisions for a greener future:
Autodesk FORMA’s Embodied Carbon Analysis: Allows architects to better understand the carbon impacts of their projects from Day 1 in a typical project planning process and offers real-time feedback regarding façade and structural system selections, among other factors.
Autodesk Insight Improvements: Insight leverages the EC3 database to apply material averages for embodied carbon, providing default carbon factors for these calculations. Users can always override these default factors with their own material carbon factor inputs
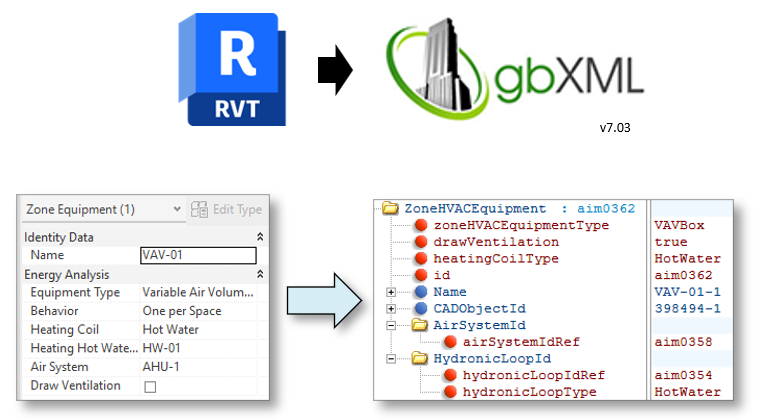
gbXML 7.03 Support: Stay ahead of the curve with support for the latest gbXML schema. This enables seamless data exchange of building energy models, facilitating collaboration with sustainability consultants and optimizing energy efficiency in your designs.
New GIS Coordinate Systems: Revit has added support for five new horizontal coordinate systems: CGCS2000, UK GG951, Amtrak Northeast Corridor, US Albers NAD83, and ISN2016, all of which users can now acquire the coordinates from linked DWG files.
Forma Add-In Updates: The Forma Add-In for Revit receives a significant upgrade, introducing features like embodied carbon analysis and solar analysis capabilities. These tools empower you to analyze the environmental impact of your design choices and make data-driven decisions for a more sustainable built environment.
Effortless Documentation Sets
Creating clear and organized documentation just got easier with Revit 2025’s documentation efficiency enhancements:
Organized Sheet Collections: Group your project sheets into logical collections using the new Sheet Collections feature. This improves navigation within the project browser and streamlines the publishing process.
Material Management Made Simple: Batch deletion and library addition of materials becomes a breeze with the new functionality. This allows you to efficiently manage your project materials, saving time and effort.
Background PDF Export: No more waiting! The background PDF export feature allows you to continue working on your model while the export process runs in the background. This multitasking capability enhances your overall workflow efficiency.
Enhanced Collaboration and Interoperability
Revit 2025 strengthens collaboration throughout the project lifecycle with improved interoperability features:
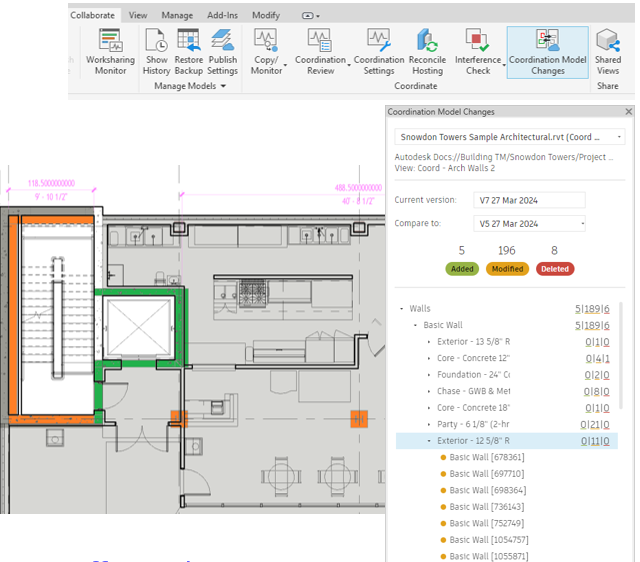
Coordination Model Improvements:Linking Coordination Models from Autodesk Docs was released last year in Revit 2024, it enabled a whole new coordination workflow for Revit users. The Reference Coordination Model keeps project files light (doesn’t load unnecessary data ) and your work in synch with your collaborators. It can serve as reference data as you can snap to it and perform basic dimensioning. In Revit 2025, you can now automatically check the latest consecutive versions of a linked coordination model using the Coordination Model Changes palette.
Fine-tuned IFC Export Mapping: Customize Revit category mapping with templates for a more streamlined IFC export process. This ensures smoother collaboration with partners using different software.
STEP File Import/Export: Expand your collaboration horizons with the ability to import and export STEP files, a universal format compatible with most CAD software. This fosters seamless data exchange with a broader range of stakeholders.
Embrace the Future of BIM
Revit 2025 offers a compelling array of architectural and platform improvements designed to empower you to design more efficiently, sustainably, and collaboratively. From the effortless creation of complex models to the seamless generation of clear documentation sets, Revit 2025 is poised to revolutionize the way you approach BIM projects.
What’s New in Revit 2025
If this blog post has piqued your interest in the exciting possibilities offered by Revit 2025, you can also watch this video recording of our webinar about the latest features!
Stay tuned for future posts where we delve deeper into specific features and showcase their practical applications in real-world design scenarios. Happy designing!
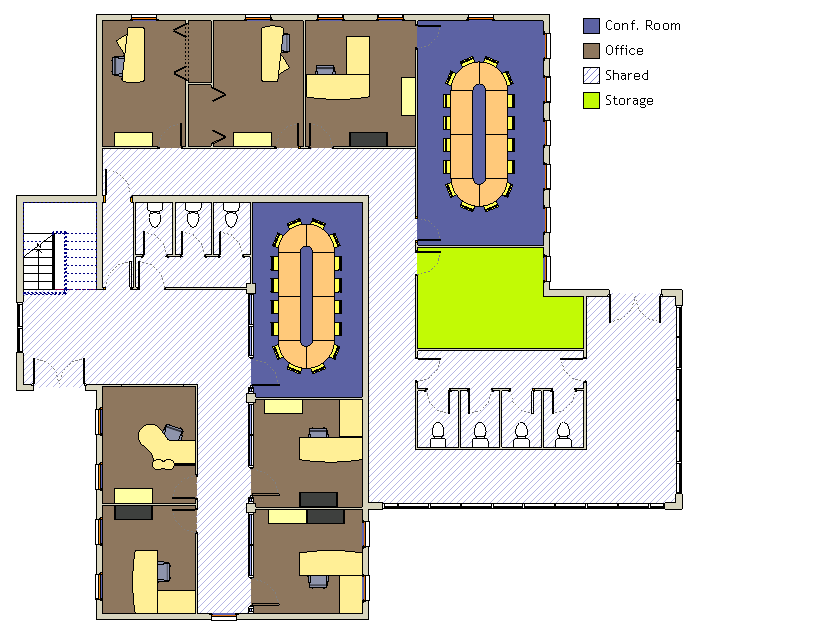
Revit is anexcellent tool for creatingdetailed architectural models, and one of its key features is the ability to apply a color scheme to your project. A well-designed color scheme can make your model look more visually appealing and help communicate design intent to clients and stakeholders.
By applying custom color schemes to the rooms, walls, and other elements of your model, you can easily differentiate between different types of spaces, such as living areas or utility rooms.
I often use this feature to swiftly color-code different rooms in a floor plan based on their area or name. In this blog post, I will show you how to create a Revit color scheme that will enhance your architectural models.
Adding the building components
Your first step is to create the area where you want to apply the color scheme. This can be done by using bounding elements, which are building components such as walls or floors that enclose a space.
If you already have an enclosed space, bounded by walls or columns, you can simply select the Room tool in Revit and click on the space to create a room. This will automatically create a room that fits into the bounding elements. If you do not have any bounding elements, you will first need to create them before proceeding.
Once you have the bounding elements and rooms in place, you can further delineate the space using room separation lines, which will allow you to delimit areas without a physical element. For example, you can use a room separation line to create a divider between the living and dining areas in an open-concept space.
Room separation lines allow you to create different color schemes for each room or section within a larger space, making it easier to distinguish between different areas visually.
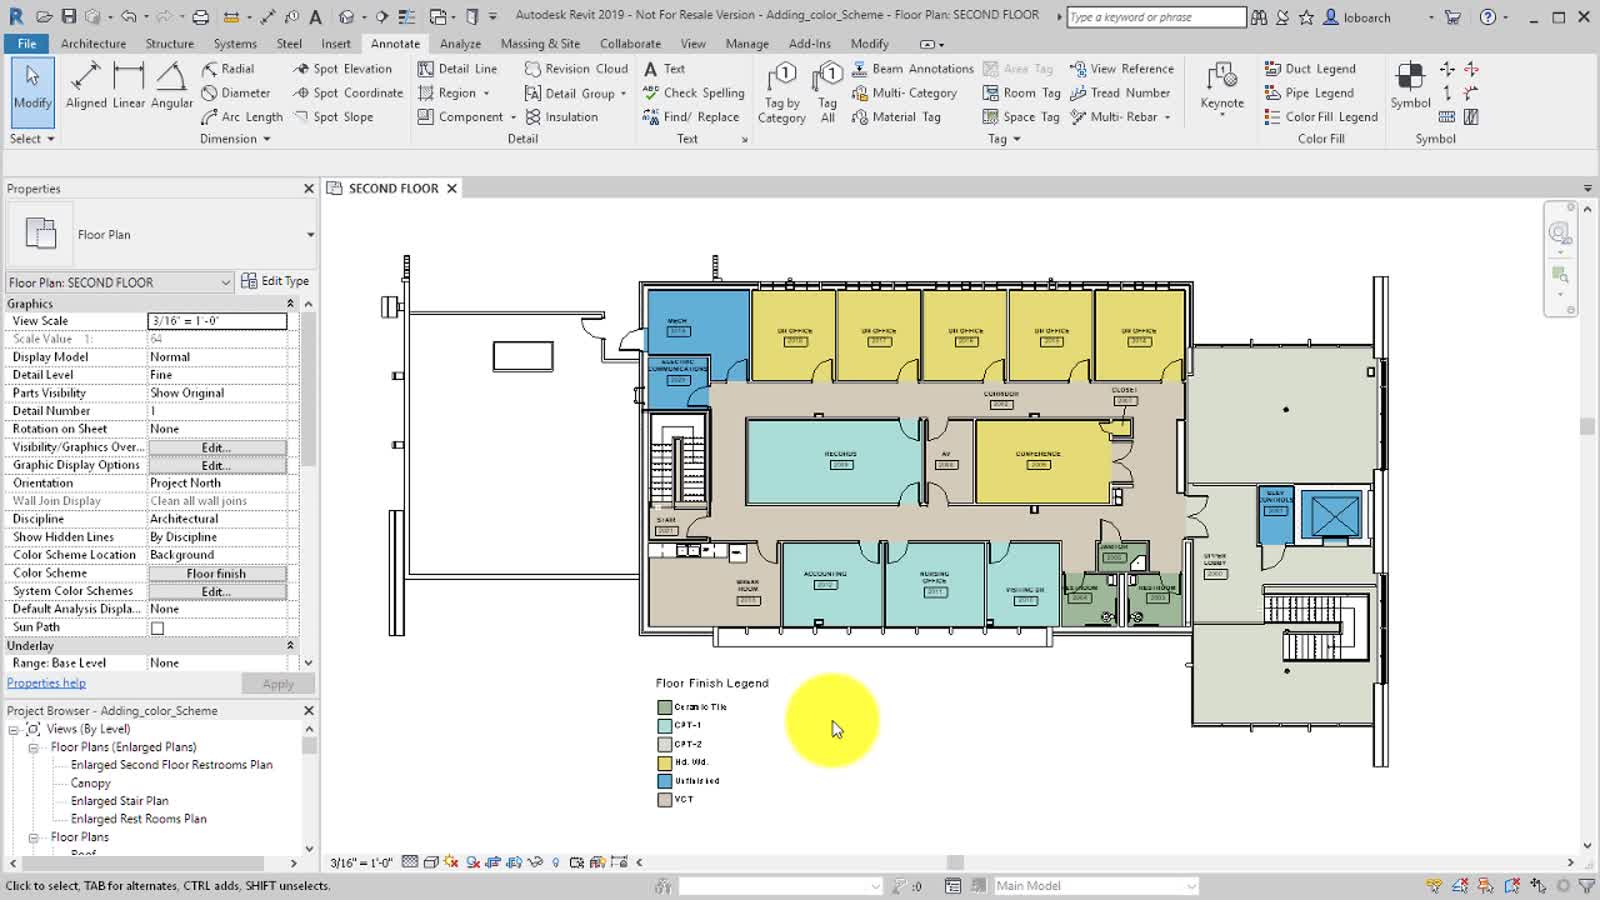
Set the visualization to “Color Fill”
Once you have your rooms and room separation lines in place, you can start setting up the color scheme. In the Categories tree, under the Visibility tab, make sure the Color Fill option is selected. This will allow you to see the Revit color scheme applied to your model.
Steps for creating a Revit color scheme
Now that you’ve set up the basic elements, you can follow these steps to create your custom color scheme:
Select a color-fill legend
The first step in creating a color scheme is to select a color-fill legend. This will act as the base for your color scheme and determine the overall color palette for your model.
Click on the Architecture tab> Room & Area panel drop-down> (Color Schemes) and then click on the Edit Scheme option to create a new scheme or modify an existing one.
Select a color scheme category
In the Edit Color Scheme dialog, you’ll be asked to select a color scheme category. This will determine which categories of building components you want to apply the color scheme to.
You’ll need to pick from the following options:
Rooms: applies the color scheme to rooms bounded by walls or columns
Areas (Rentable): This option is useful for commercial spaces, where different tenants may have different color schemes.
Areas (Non-Rentable): This applies the color scheme to areas that are non-rentable, such as hallways or stairwells.
Ducts, HVAC Zones, Pipes, and Spaces: These options allow you to apply the color scheme to mechanical or electrical components.
Select an existing scheme to modify
If you already have an existing color scheme, you can select it from the list and modify it according to your needs. This is useful if you want to make small changes or add new colors without starting from scratch.
You can also right-click and click Duplicate to create a copy of the existing scheme and make changes to it without affecting the original. Or you can create a new scheme by clicking on the New option and naming your scheme.
Create a title for the color-fill legend
Under the Scheme Definition field, you can add a title for your color-fill legend. This will help identify the scheme and its purpose. You’ll see this title above the legend when you apply the color scheme to your model.
Select the parameter to use as the basis of the color scheme
Under the Color list, you can choose a parameter to base your color scheme on. You can add to or change these parameters later via the Properties Palette.
If you want to color by a specific parameter value or by a range of values, you can select the By Value or By Range options.
Modify your color scheme definition values
There are nine values that define how a color appears in the scheme, including:
At least: Sets the low-end range value.
Less than: Sets a read-only value.
Caption: Edits the legend text.
Value: This value appears when you select By Value.
Visible: This indicates if the value is displayed with color in the legend for color fill.
Color: Allows you to select the color option for the value.
Fill Pattern: Allows you to specify the fill pattern for the value
Preview: This option shows a preview of the color and fill pattern if selected.
In Use: This indicates whether the value is in use in this specific project.
Modifying these values will allow you to customize the color and appearance of each value in your color scheme.
Click Ok
With all your color scheme values set, click OK to save your changes and create your custom color scheme.
Apply the newly created color-fill legend
Once you’ve created a color fill legend, you can apply it to your model by following these steps:
Right-click the floor plan view or section view in the Project Browser and select Properties.
Click on the Color Scheme cell. This will open the Edit Color Scheme dialog.
Under the Schemes tag, you will be able to select a category and the color scheme you just created.
Click OK
Back on the Properties palette, click on Color Scheme Location and select either Background or Foreground. This will determine whether the color scheme is applied to the background or foreground of your model.
Click OK to apply the color scheme.
Your model should now be visually enhanced with your custom Revit color scheme, making differentiating between different areas and sections easier.
Features the latest informative and technical content provided by our industry experts for designers, engineers, and construction firms and facility owners.