


What is the PlanGrid Build App?
By Jim Stephen | BIM, Collaboration, Data Management
The PlanGrid Build mobile app is available for members who subscribe to any of the following Autodesk Construction Cloud offerings:
Data syncs to the PlanGrid Build mobile app to ensure that members can complete tasks from anywhere on the job site with access to project data even when offline.
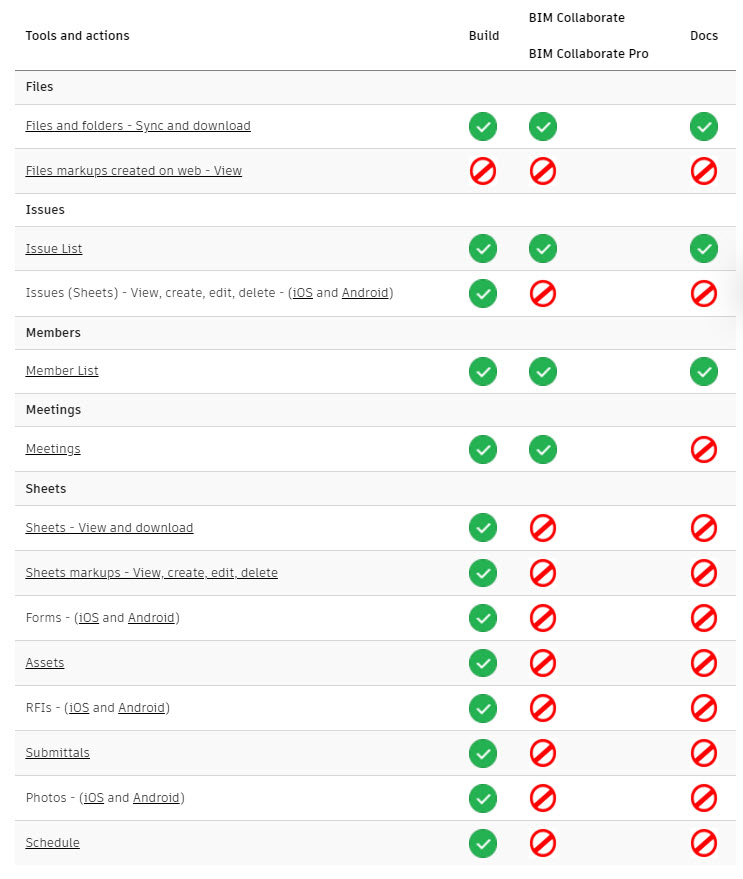
The following table details the mobile app capabilities for each offering:
How do you install the PlanGrid Build App?
The PlanGrid Build app is available to install on both android and iOS devices. That way you can use your preferred device, and still access your project information anywhere you go. To ensure best performance, you will want to make sure that your device is able to run the minimum version of the operating system that PlanGrid Build app supports.
PlanGrid Build app supports the following mobile operating system versions:
- Android: 7.0 or later.
- iPhone: iOS 15.0 or later.
- iPad: iPadOS 15.0 or later.
- iPod touch: iOS 15.0 or later.
Here are the steps to install the PlanGrid Build App:
- Open up the App Store on your iOS device, or the Google Play Store on your Android device.
- Search for plangrid (all one word).
- Tap the PlanGrid Build App result.
- To install:
- iOS – Tap the cloud icon
- Android – Tap Install
Once the PlanGrid Build app is installed you are ready to get started. This includes either creating an account (or signing in if you have an existing account), and switching the data center to access information in different locations.
How do you get started using the PlanGrid mobile app?
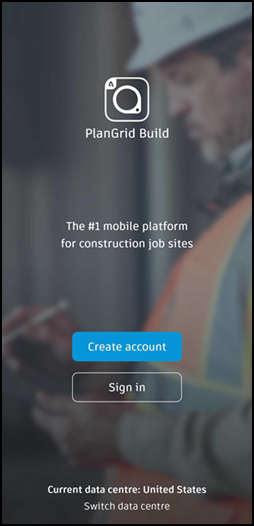
When you first open the PlanGrid Build mobile app you have the following options:
- Create an account
- Sign in to an existing account
- Switch between the different data centers.
Create Account
If you don’t have an existing Autodesk Account, you can create an account using the app.
- Tap Create account.
- Enter your name, email address, and create a password.
- Tap Create Account.
- Verify your account using the verification email sent to your inbox.You are redirected to the app and signed in.
- Fill in the required details about your company and job.
Sign In
If you already have an Autodesk Account, sign in to start using the app.
- Tap Sign in.
- Enter your email address and password.
- Tap Sign in.
- Optionally, set up 2-step verification to protect your account.
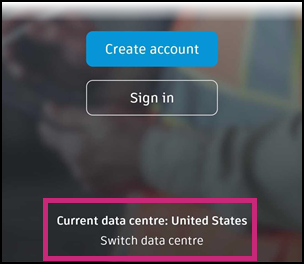
Switch Data Center
Projects on the ACC platform can be created in different data centers. You can switch between these data centers on the app, to access data stored in different locations.
- Tap Switch data center at the bottom of the screen:
- Use the menu to choose which data center you want to switch to:
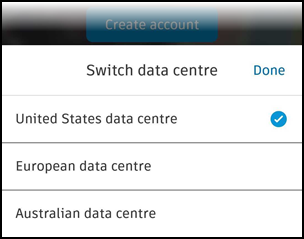 Note: The Australian data center is currently available for PlanGrid projects only.
 - Tap Done.
- Sign in or Create an account to start using the app.
INDUSTRIES: Architecture, Buildings, Civil Engineering, Construction, MEP Engineering, Structural Engineering