As of April 30, 2025, we’re proud to announce our exciting new chapter. | Read more here.
Sustainable design has become a cornerstone of modern architecture and urban planning, emphasizing resource efficiency, environmental responsibility, and long-term resilience. As the construction industry faces increasing pressure to reduce carbon footprints and optimize energy performance, digital tools like Autodesk Forma are revolutionizing the way architects and engineers approach sustainability.
By leveraging data-driven insights and predictive modeling, Autodesk Forma enables professionals to design buildings that minimize environmental impact while maximizing efficiency and functionality.
This article explores the role of Autodesk Forma in promoting sustainable design, its benefits, and the challenges it helps overcome in the pursuit of greener, more efficient buildings.
Sustainable design focuses on reducing resource consumption, minimizing waste, and creating buildings that enhance human well-being while mitigating their impact on the planet. Because buildings account for nearly 40% of global energy consumption and 30% of greenhouse gas emissions, it is no wonder why sustainability in building design is of paramount importance. Key aspects of sustainable design include energy efficiency, water conservation, material sustainability, and indoor environmental quality.
As sustainability becomes a global priority, digital tools like Autodesk Forma are playing a pivotal role in enabling teams of architects and engineers to integrate sustainable principles into their designs from the earliest stages. By utilizing advanced simulations and real-time data, these tools can empower your team to make informed decisions that align with sustainability goals.
Autodesk Forma is a powerful cloud-based design tool that integrates sustainability analysis into the early stages of architectural planning. With AI tools and real-time environmental data, Forma enables architects, urban planners, and engineers to make data-driven decisions that optimize energy efficiency, reduce carbon footprints, and enhance overall building performance.
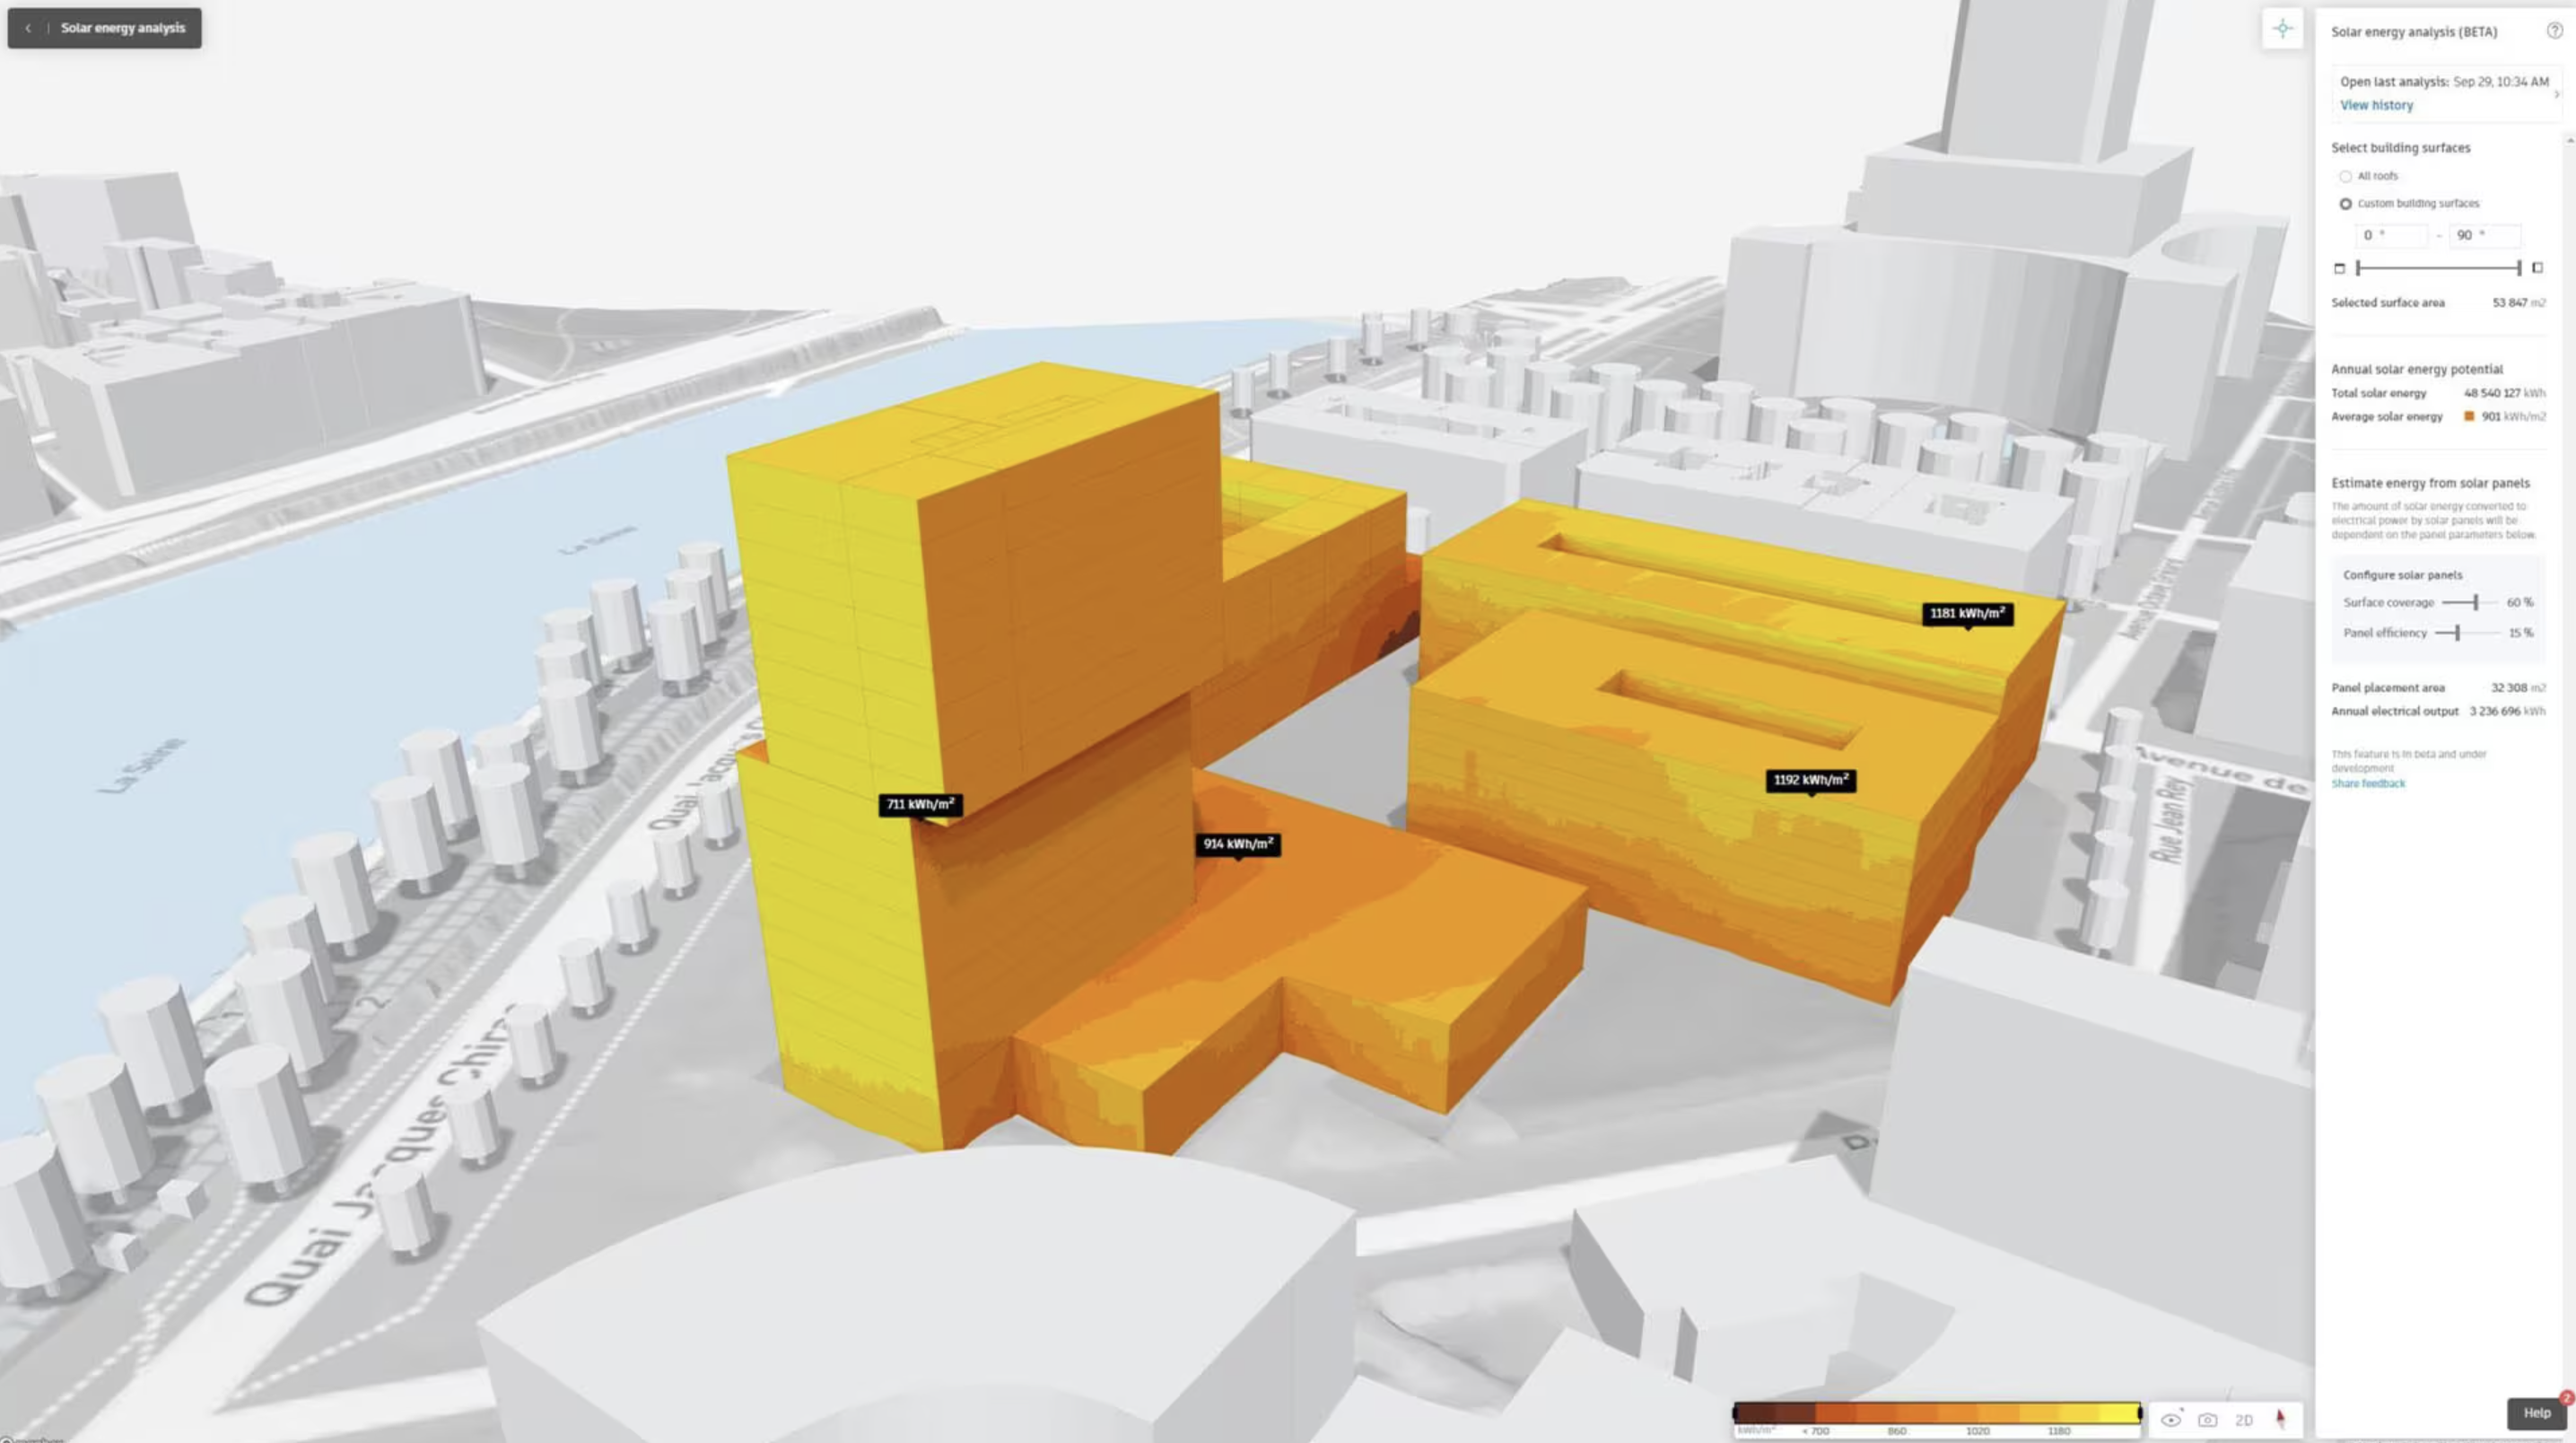
One of Forma’s key strengths is its ability to analyze site-specific conditions such as sunlight exposure, wind flow, and energy consumption patterns. These insights allow designers to adjust building orientations, facade designs, and material selections to maximize sustainability.
For example, Forma can simulate how different design choices impact daylight utilization and solar heat gain, helping architects optimize passive heating and cooling strategies. Additionally, Forma supports carbon impact assessments, allowing users to evaluate and reduce the embodied carbon of materials and construction processes. This feature is crucial as the industry shifts toward net-zero energy and carbon-neutral buildings.
Incorporating Autodesk Forma into the design process offers numerous benefits that enhance both environmental sustainability and project efficiency. By providing real-time data analysis and predictive simulations, Forma can help your cross-functional teams make informed decisions that lead to more sustainable outcomes.
Forma enables designers to assess solar exposure, wind patterns, and thermal performance, allowing them to optimize building orientation, glazing, and shading strategies to reduce energy consumption.
With real-time simulations and AI-driven analysis, Forma allows professionals to test multiple design scenarios and select the most sustainable option. This reduces guesswork and ensures that buildings meet energy performance and sustainability benchmarks.
Forma helps designers evaluate the embodied carbon of materials and explore low-impact alternatives, contributing to the creation of carbon-neutral structures. By integrating lifecycle analysis early in the process, projects can reduce long-term environmental effects.
Autodesk Forma provides insights into rainwater management, green infrastructure, and passive design strategies, helping architects incorporate features like green roofs, permeable surfaces, and efficient water systems.
Forma simplifies the process of meeting sustainability standards such as LEED, BREEAM, and WELL certifications. This ensures designs remain compliant with different sustainability standards.
Sustainable design is guided by a set of core principles that prioritize environmental responsibility, resource efficiency, and occupant well-being. By incorporating these principles into the design process, architects and engineers can create buildings that minimize negative environmental impacts while maximizing long-term benefits.
A key strategy in sustainable design is optimizing energy use through passive design techniques. This includes maximizing natural daylight, optimizing building orientation, and leveraging thermal mass to reduce reliance on artificial heating and cooling. Autodesk Forma helps designers simulate these factors, ensuring that buildings achieve optimal energy performance from the start.
Selecting low-impact, locally sourced, and recyclable materials is essential for reducing a building’s embodied carbon. Forma’s carbon impact assessment tools allow designers to evaluate materials based on their environmental footprint, helping them choose options that align with sustainability goals.
Sustainable design incorporates rainwater harvesting, efficient plumbing fixtures, and drought-resistant landscaping to minimize water waste. Forma provides climate and site analysis data, enabling architects to integrate water-efficient solutions tailored to specific geographic conditions.
With climate change increasing the frequency of extreme weather events, buildings must be designed to withstand environmental stresses. Forma’s climate analysis capabilities help professionals assess factors such as flood risks, wind loads, and temperature variations, allowing them to develop resilient, adaptable structures.
Sustainable buildings enhance occupant well-being by incorporating green roofs, vertical gardens, and outdoor communal spaces. These features improve air quality, regulate temperatures, and contribute to urban biodiversity. Forma’s urban analysis tools support the planning of these elements, ensuring they are integrated effectively.
Sustainable buildings aim to reduce environmental impact and enhance efficiency. Autodesk Forma supports this by optimizing energy use through strategies like solar orientation and passive cooling. It helps select low-carbon materials and improve indoor air quality by simulating natural lighting and ventilation.
Forma also facilitates water efficiency and the integration of renewable energy sources like solar panels, ensuring buildings are both eco-friendly and resilient. Additionally, Forma streamlines the incorporation of smart technologies, making buildings future-ready and energy-efficient.
The characteristics outlined above can be seen in examples of sustainable architecture all over the world. With green architecture gaining popularity as countries such as the United States attempt to reach its net-zero emissions goal by 2050.
Sustainable design faces several challenges, including high initial costs, complex regulations, late-stage sustainability integration, and industry resistance to change. Many stakeholders hesitate due to the upfront expenses of eco-friendly materials and renewable systems, even though these investments lead to long-term savings. Additionally, meeting sustainability standards like LEED and BREEAM requires extensive data tracking, and many projects struggle with accurately predicting energy performance and carbon impact.
Autodesk Forma helps overcome these barriers by integrating sustainability analysis from the conceptual stage, allowing designers to optimize energy efficiency, material selection, and carbon impact early in the process. Its AI-driven simulations and real-time performance metrics simplify compliance with regulations and provide cost-benefit analyses to justify sustainable investments.
Additionally, Forma’s user-friendly interface and integration with Autodesk’s ecosystem make it easier for firms to adopt sustainable practices without disrupting existing workflows. By addressing these challenges, Forma empowers architects and engineers to create sustainable, cost-effective, and high-performance buildings.
Autodesk Forma is transforming sustainable design by enabling data-driven decisions that optimize energy efficiency, reduce environmental impact, and enhance building performance.
As the industry continues to prioritize sustainability, tools like Forma will play a crucial role in shaping the future of architecture, making it easier for professionals to create buildings that are not only environmentally responsible but also cost-effective and resilient. With ongoing advancements in AI and real-time analytics, the future of sustainable design looks promising, with greater integration of technology to meet global sustainability goals.
Microsol Resources. (n.d.). Autodesk Forma. Retrieved March 17, 2025, from https://microsolresources.com/software/autodesk/autodesk-forma/
Microsol Resources. (n.d.). What is Autodesk Forma & why is it important to the AEC workflow? Retrieved March 17, 2025, from https://microsolresources.com/tech-resources/article/what-is-autodesk-forma-why-is-it-important-to-the-aec-workflow/
Microsol Resources. (n.d.). Enscape impact: Real-time insights for sustainable design. Retrieved March 17, 2025, from https://microsolresources.com/tech-resources/article/enscape-impact-real-time-insights-for-sustainable-design/
Microsol Resources. (n.d.). 7 examples of green architecture around the world. Retrieved March 17, 2025, from https://microsolresources.com/tech-resources/article/7-examples-of-green-architecture-around-the-world/
Farrelly, L. (2023, October 4). What is sustainable architecture? In The Spruce. Retrieved March 17, 2025, from https://www.thespruce.com/what-is-sustainable-architecture-4846497
Understanding and effectively using the Revit View Range is essential for producing clear, accurate drawings and models. This powerful tool determines what elements are visible in a plan view, based on specific height parameters. While it may seem straightforward, mastering its nuances can significantly enhance the readability of your drawings, especially as drawing complexity increases.
In this article, we’ll break down the basics of the View Range, including its components, accessibility, and modifications, and some tips on how to make the most out of this necessary tool.
The Revit View Range is a set of parameters in Autodesk Revit Software that controls the visibility of elements in a plan view by defining specific height ranges. It determines what parts of the model are visible based on their vertical position relative to a defined “cut plane.” We will cover the cut plane as well as the other components in the next section.
This allows users to focus on the most relevant elements for a particular vie,w such as walls, doors, windows, or other necessary features. Elements outside of the View Range, unless specified, will not be visible, which helps to declutter the resulting view field.
The Revit View Range comprises two main sections. The Primary Range contains the top plane, cut plane, and bottom plane; and the View Depth, which allows for viewing items below the primary range (i.e. foundation elements).
Accessing and modifying the view range is simple when following these steps:
Now that we have accessed and modified the View range, let’s discuss what you can expect to see. Depending on the category of the element and where it falls in the view plane, the drawing elements will be displayed with either a thicker “cut line weight” or a thinner “projection line weight.”
I’d now like to go over some helpful tips for enhancing your experience while using the Revit View Range.
Mastering the Revit View Range is essential for creating clear and precise plan views. By understanding how the Top Plane, Cut Plane, Bottom Plane, and View Depth interact, you can fine-tune visibility to suit your project’s needs. Accessing and adjusting these settings through the View Properties Panel ensures that critical elements appear correctly and legibly.
Additionally, using tools like Plan Regions, View Depth adjustments, and Visibility Graphics Overrides can help refine your views for complex layouts. With these strategies, you can take full control of your Revit workflows, improving both efficiency and clarity in your designs.

Sunlight and wind play a crucial role in architectural design, influencing everything from energy efficiency to occupant comfort. Thoughtful consideration of these natural elements can reduce reliance on artificial lighting, heating, and cooling, ultimately leading to more sustainable buildings.
Architects and designers leverage sunlight and wind analysis to optimize building orientation, facade design, and ventilation strategies, ensuring structures harmonize with their environment. By integrating these factors early in the design process, professionals can create spaces that are not only functional but also resilient and energy efficient. In this article we will review sunlight and wind analysis specifically through the use of tools in Autodesk Forma.
Environmental analysis in architecture involves evaluating natural factors such as sunlight, wind patterns, temperature, and humidity to inform design decisions. By analyzing site-specific conditions, designers can optimize building orientation, window placement, and ventilation strategies to reduce energy consumption and improve occupant well-being. Modern CAD tools (Forma) and simulation software (building information modeling – BIM) further refine this analysis, allowing architects to test different design scenarios and make data-driven decisions for optimal performance.
Wind analysis is essential in architecture, influencing energy efficiency, structural stability, and occupant comfort. Poorly managed wind conditions can create safety hazards, increase heat loss, or cause discomfort in outdoor spaces. Architects use wind analysis to optimize natural ventilation, reduce reliance on mechanical cooling, and design aerodynamic structures that minimize wind resistance. In urban settings, strategic building placement can prevent wind tunnels, while in high-wind areas, windbreaks like trees or barriers help improve comfort. By integrating wind analysis early, architects ensure buildings are both resilient and environmentally efficient.
From the above section, you can see where wind analysis can be useful in architecture. To further emphasize, a case study in wind analysis using Forma can be seen in The Marina Bay Sands Resort in Singapore. Situated in a tropical climate, the development required careful wind studies to balance natural ventilation with structural stability. Wind engineering firm CPP, Inc. conducted extensive wind tunnel testing on scaled models of the property to assess both normal and extreme wind conditions and their effects on the SkyPark. This analysis informed the design of an effective supplemental damper system, reducing motion and enhancing occupant comfort.
Autodesk Forma uses real-time environmental analysis features that allow you and your team to assess wind speed, pressure distribution, and airflow patterns around buildings and urban landscapes. By integrating CFD (Computational Fluid Dynamics) principles, Forma helps architects visualize how wind interacts with built environments, identifying potential problem areas such as high-pressure zones or wind tunnels. Designers can use this data to refine building shapes, adjust orientations, or incorporate ventilation strategies that enhance comfort and energy efficiency.
Forma helps architects develop wind-responsive design strategies by identifying pressure zones and airflow patterns early in the design process. In high-rise buildings, Forma can guide your architects to proper placement of setbacks or voids to reduce wind turbulence, while perforated facades and wind baffles can help control airflow. Urban planners also use Forma to assess pedestrian wind comfort, optimizing street layouts, building heights, and landscaping elements like trees or windbreaks to create more walkable environments. Incorporating these design considerations for wind analysis using Forma elevates the final product to new heights.
Effective sunlight analysis is essential for optimizing building performance, energy efficiency, and occupant comfort. Autodesk Forma provides architects with powerful tools to assess solar exposure, shadow patterns, and daylight penetration throughout different seasons.
Sunlight analysis is critical in several sectors of design. Proper daylighting reduces reliance on artificial lighting, lowering energy costs and enhancing sustainability. Sun exposure also affects thermal comfort, requiring architects to balance natural light intake with shading strategies to prevent overheating or glare. Additionally, sunlight plays a vital role in urban planning, impacting factors like shadowing on neighboring buildings and public spaces.
Gund Hall, the main building of the Harvard Graduate School of Design, underwent a daylighting study to enhance its interior lighting conditions. Lam Partners collaborated with Bruner/Cott Architects and Vanderweil Engineers to analyze the building’s “trays” (tiered studio spaces). Through comprehensive daylighting studies, the team developed design solutions that improved natural light distribution, enhancing the functionality and comfort of the studio spaces.
Autodesk Forma offers powerful tools for evaluating solar exposure, shadow impact, and daylight distribution throughout a building’s design. Its real-time solar analysis allows architects to assess how sunlight interacts with structures across different times of the day and seasons. Additionally, its daylighting analysis enables precise placement of windows, skylights, and shading devices to balance natural light and energy efficiency.
Autodesk Forma offers solar mapping, shadow analysis, and daylight simulations to optimize building performance. Its tools help architects refine orientation, assess shading impacts, and adjust glazing or materials for better daylight distribution. By leveraging these techniques, designers can enhance energy efficiency, sustainability, and occupant comfort.
Autodesk Forma helps architects evaluate how materials interact with sunlight to optimize energy efficiency and comfort. Its analysis tools assess factors like solar reflectance, heat absorption, and glare, guiding material choices for facades, roofing, and glazing. Designers can test different materials to reduce heat gain, enhance daylight distribution, and improve thermal performance.
While wind and sunlight analysis are essential for creating energy-efficient and comfortable buildings, several challenges can arise during the process. One challenge is accurately predicting environmental factors in complex urban settings, where surrounding buildings and topography can significantly influence wind patterns and sunlight exposure. Variability in weather conditions, seasonal changes, and the unpredictable nature of climate also complicate precise forecasting. Additionally, integrating these analyses with other design considerations, such as structural integrity or aesthetic preferences, can create design conflicts. Overcoming these challenges requires advanced simulation tools, iterative testing, and collaboration between architects, engineers, and environmental consultants to ensure that both wind and sunlight are effectively managed in the final design.
Wind and sunlight analysis are crucial for creating energy-efficient, comfortable buildings. Tools like Autodesk Forma enable architects to make informed design decisions that optimize environmental conditions and reduce energy use. While challenges remain, advancements in simulation technology and the integration of AI will improve the accuracy and adaptability of these analyses. As sustainability becomes a priority, the role of environmental analysis in architecture will continue to grow, fostering more resilient and eco-friendly buildings.
Microsol Resources. (n.d.). What is Autodesk Forma and why is it important to the AEC workflow? Retrieved March 17, 2025, from https://microsolresources.com/tech-resources/article/what-is-autodesk-forma-why-is-it-important-to-the-aec-workflow/
Microsol Resources. (n.d.). Autodesk Forma. Retrieved March 17, 2025, from https://microsolresources.com/software/autodesk/autodesk-forma/
CPP Wind. (n.d.). Understanding wind effects on ground-breaking architecture. Retrieved March 17, 2025, from https://cppwind.com/portfolios/understanding-wind-effects-on-ground-breaking-architecture/
Lam Partners. (n.d.). Sunlighting the trays: Gund Hall daylighting case study. Retrieved March 17, 2025, from https://www.lampartners.com/case-studies/sunlighting-the-trays-gund-hall-daylighting-case-study/

Features the latest informative and technical content provided by our industry experts for designers, engineers, and construction firms and facility owners.
LEARN MORESTAY IN TOUCH
