


Understanding Issues, Forms, Submittals, & Cost Management in Autodesk Build
By Microsol Resources, Graitec Group | BIM, Collaboration
Autodesk Build provides a toolset for managing, sharing, and accessing project documents that result in streamlined workflows between the office, trailer, and jobsite. You can track the quality and safety of the project with issues and forms. Use RFIs, submittals, and meetings to manage the flow of information in the project. You can even track progress as the project evolves.
Autodesk Build also connects to preconstruction workflows in Autodesk BIM 360, BIM Collaborate, BIM Collaborate Pro (Design Collaboration and Model Coordination), and Cost Management for collaborating on designs, coordinating models, and managing costs.
Interested in learning more? Here are Top Things to Know about Autodesk Build.
Issues in Autodesk Build
The Issues tools in Autodesk Build allow you to track work across the construction lifecycle and create references to photos, files, RFIs, assets, and more.
Once you configure the Issues tool, your team will be able to create issues quickly and easily from the field. This makes it simple to identify problems, prevent delays, and manage work on your project. With greater visibility and the ability to track progress, you’ll be able to deliver quality work on time.
How to Use Issues
The Issues tool provides a set of preconfigured categories and types under those categories to organize the issues on your project. You can get started right away or configure the categories and types to your project’s needs.
To configure, customize your issue settings. You can create custom types and categories. Issues have default attributes that you can fill out to provide details on the issue, but custom fields can be added. Adding a root cause can also help to understand how to prevent issues from recurring. You can also manage permissions to issues so that your team has access as needed.
You can create issues within the Issues tool or from markup in the Sheets and Files tools. Once issues have been created, they can be viewed in the Issues log, managed, and exported.
Forms in Autodesk Build
The Forms tool in Autodesk® Build enables your team to fill out, review, and manage project forms. This provides a single secure point to coordinate data collection, photos, and follow-up documents.
How to Use Forms
Create templates for checklists, daily logs, or other forms for your team, and anyone can complete the forms on-site through our PlanGrid Build a mobile app or at the office on the web.
To help you get started right away, Autodesk® Build comes with a set of preconfigured form templates. However, you can also import templates or create a brand new template. Here is a basic workflow for using the Forms tool:

Roles within Forms
The Forms tool uses three roles for the forms on your project:
- Contributors
- Reviewers
- Managers
Each role can be assigned in the form templates, and the roles will apply to any form created from that template. See Setting Up Templates for more details.
- Contributors are anyone who needs to fill out and submit a form. Contributors edit a form in draft mode and then submit it to reviewers.
Contributors can fill out forms individually or in collaboration with others, depending on how the form template was configured.
- Reviewers are in charge of reviewing forms once they’ve been submitted by contributors. If chosen during the template configuration, reviewers can see forms in draft mode.
- Managers are able to edit template settings so that they apply to all forms created from that template.
Contributor Collaboration Mode
There are three contributor collaboration modes – single contributor, multiple contributors in sequence, and multiple contributors in parallel.
- Single Contributor: Use the single contributor model when you want each form to be created, filled out, and submitted by a single user.

- Multiple contributors in sequence: A form is assigned to multiple contributors. Only one contributor can edit the form at any time. The assigned contributor can fill it out, save, or submit it to reviewers.

- Multiple contributors in parallel: Multiple contributors can edit a form at any time. Any of the contributors can make changes, save, or submit it for review.
 Note: This mode is not available for PDF forms.
Form Email Notifications
You will receive an email notifying you with updates about relevant templates and forms in these instances:
- You were added as a contributor to a new template.
- You were assigned a form to complete or contribute to.
- A form that you are a reviewer for was submitted.
- A form report was exported and shared with you.
Submittals in Autodesk Build
Submittals are documents created for approval by the project’s stakeholders. They go through a formal reviewing process.
Submittals are usually: shop drawings, technical data, product specifications, or samples. Submittals group into:
- Items: Consist of a document or group of documents.
- Packages: Consist of items. Packages don’t require revision. They allow the bundling of related items to facilitate reviewing process.
For example, package items for electrical and mechanical components of one system. Submit the package for review. Packages allow reviewers to approve or reject individual items. Note: Only the Submittal Manager can add items to a package.
The PlanGrid Build app allows viewing the general information about submittals, including the Activity log. It’s impossible to modify submittals or view documents in-app.
Custom Review Workflow
Project Administrators and Submittal Managers can create and edit Custom Review Workflow for Submittal items. Custom Review Workflow allows:
- Adding multiple review steps
- Multiple reviewers per step
- Stepping back and reopening
- Closing or creating revisions at any time
To create Custom Review Workflow:
- Create or open a Submittal item
- Click
 button under Workflow Table
 - Add steps, required and optional reviewers
- Set review times
- Click Done button
Workflow Builder
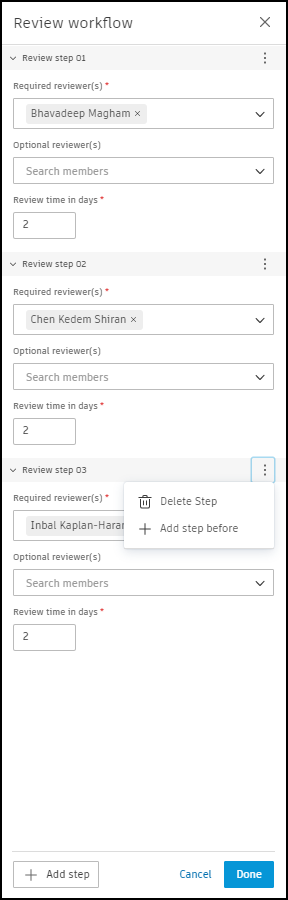
Custom Review Workflow will now be visible on the Workflow bar.

To edit Custom Review Workflow:
- Click
 button
 - Edit review workflow in Workflow builder
- Click Done button
Project Administrators assign the Submittal Managers and create custom submittal responses for the project using the Settings menu. Use the blue action button in the workflow bar to progress a submittal to the next person or step back.
Important: Reviewers can edit their response within a review step using the  button in Workflow Table.

Custom Review Workflow templates
Project Administrators and Submittal Managers can create, edit, and delete Custom Review Workflow templates for projects. Custom Review Workflow templates facilitate smooth work with submittals.
To create Custom Review Workflow template:
- Navigate to Submittals tool in {prodname}
- Open
 > Review templates
 - Click
 to open Workflow Builder
- Add template name
- Add steps, required and optional reviewers
- Set review times
- Click Save button
To apply the template to the submittal item click  and select the template by name. Note: Templates can also be applied when creating submittal items.
The participant roles:
1. Responsible Contractor
The primary subcontractor is responsible for submitting the documents or materials for approval.
- Creating submittal items (if necessary)
- Adding submittal items for review
2. Submittal Manager
The Submittal Manager (typically, General Contractor) is responsible for:
- Creating items and assigning them to the responsible contractor
- Creating packages
- Assigning items to the reviewer
- Defining review steps for every item / creating review workflow
- Sending the item to review
- Review on behalf of other reviewers (if needed)
- Set final response and select final response attachments when closing and distributing the item
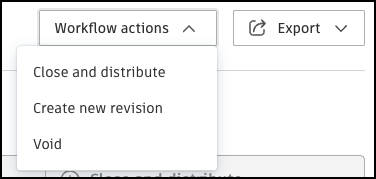
To Close and distribute items:
- Navigate to Workflow actions -> Close and distribute
- Select Attachments, Final Response, Responsible contractor and Publish date
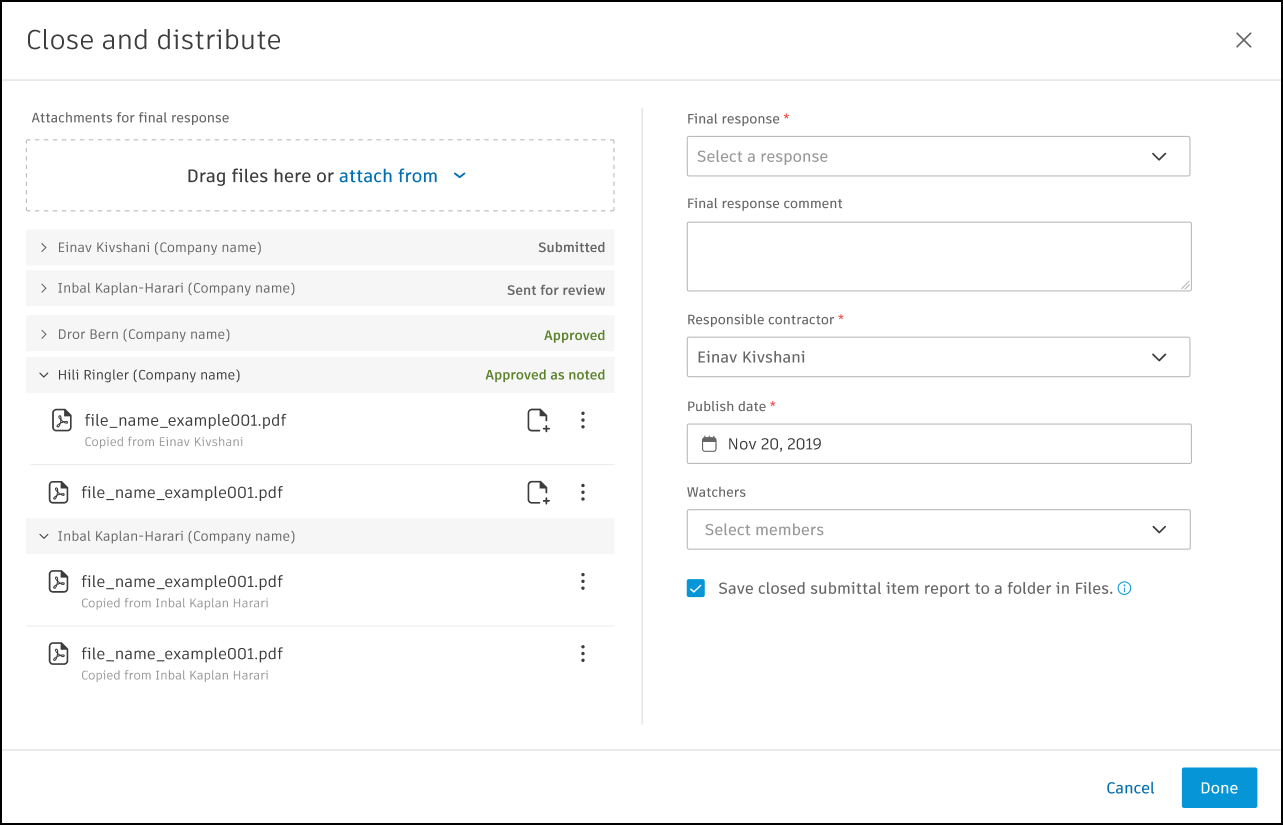
A closed item report can be saved to a folder in the Files tool. This allows for easy access and organization of reports for future reference. Important: When closing and distributing, Submittal Managers need to select attachments that are part of the final response and the final response.
The Final response and attachments appear at the top of the item page. Submittal Managers can be added through the menu. Use members, companies, or roles to add members.
Required Reviewers: The reviewer (typically, the Architect) is responsible for reviewing and approving or rejecting the submittal. Important: Once all required reviewers respond in a given step submittal item moves to the next step.
Optional Reviewers: Engineers and consultants asked for review/feedback. Note: Required and Optional Reviewers can respond and add attachments.
Watchers: Various stakeholders receive notifications on status changes.
Cost Management in Autodesk Build
Cost Management in Autodesk Build is a robust set of capabilities purpose-built for construction teams, centralizing all cost activities in the cloud. Cost Management helps to improve cost control and streamline workflows. It also provides real-time visibility into cost-related risk, allows for more accurate forecasting, and brings more predictability to cash flow and profitability projections.
In this topic, you’ll learn about:
- Cost Management’s key functionalities
- Getting started with Cost Management
- Where to find additional resources
Key Functionalities
- Home – Use the home page to control your project with an aggregated view of important dates in a calendar.
- Budget – Create and manage budgets, main contracts, and payment applications to track incoming and outgoing cash for your project.
- Cost – Create and manage contracts, expenses, and payment applications to track incoming and outgoing cash for your project.
- Change Order – Work with cost items and follow the change order workflow.
- Forecast – Visually schedule time-based allowances, such as general conditions. It also helps you understand how your budget and time interact with each other.
- Settings – Cost Management is flexible and customizable. Configurable features allow teams to customize the software to suit their needs and preferences. Learn more about setting up Cost Management.
Interested in learning more? Here are Top Things to Know about Autodesk Build.
INDUSTRIES: Architecture, Buildings, Construction, MEP Engineering, Structural Engineering