


Manage Construction Project Forms Using Autodesk Build
By Elizabeth Crofton | Collaboration, Data Management
The construction industry uses forms to collect and share information at every stage of a project. Traditionally on paper, these forms are now being converted into digital forms that enable workers to share information via mobile devices and tablets either at the construction office as well as the job site. There are many benefits of moving to a digital form rather than paper:
- Reduction in manual work and costs
- Greater business insights
- Data loss prevention
- Lowered risk and liability
- Better client and employee experience
Bringing the forms online is one step in digitization for construction firms and contractors, bringing information online into a secure cloud location for real-time and accessible data to use in reporting.
Customize forms and standardize data collection.
Set up your quality and safety forms to fit your construction project’s needs and ensure all crucial project information is captured.
Connect your workflows.
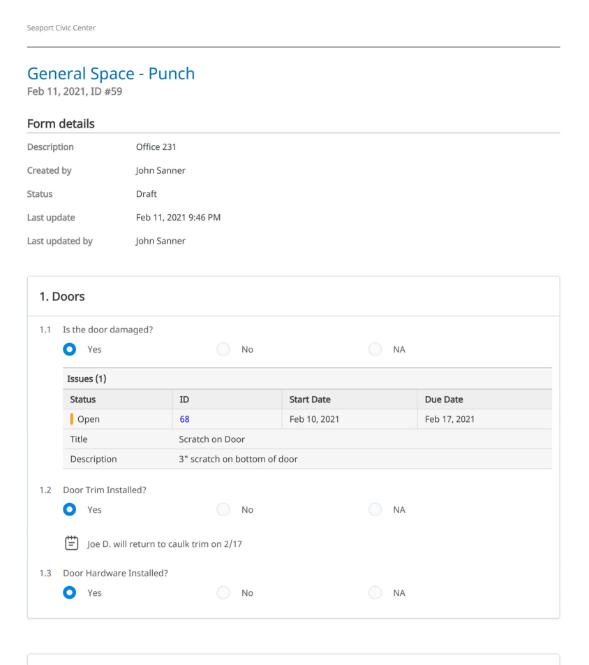
Save time and increase transparency by connecting forms with issues and RFIs. Create an issue directly from a form, and if needed, escalate that issue to an RFI right away.
Generate and share reports with the team.
Export completed forms in PDF or Excel and easily share them to keep everyone up to date on project status. Include the photos and documents added to the forms in your report to provide further context.
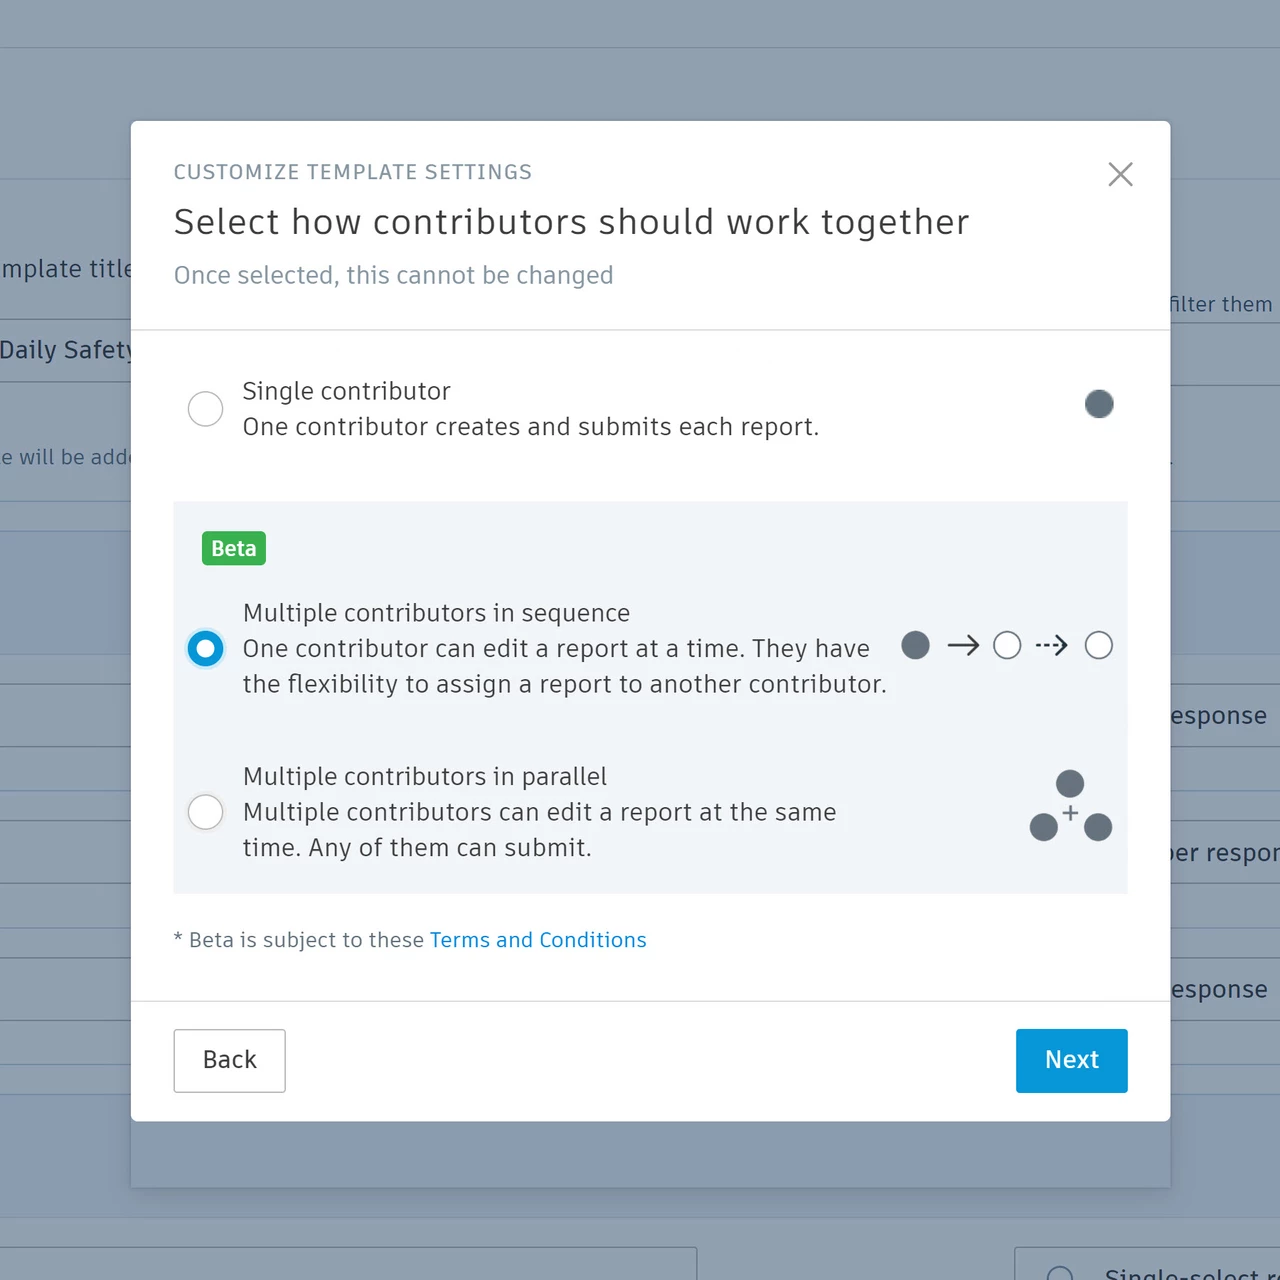
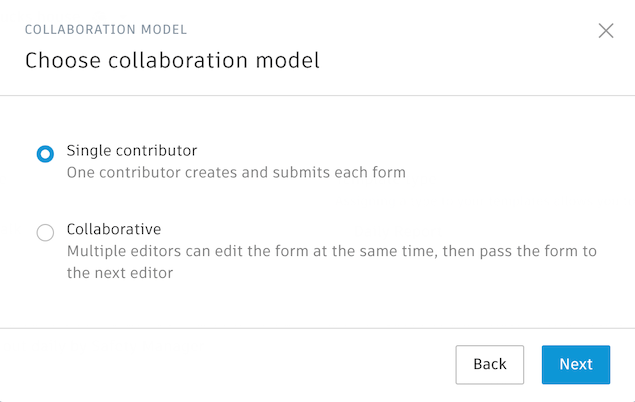
Decide how the team should collaborate.
Whether it’ll be only one team member or several working on the same form, choose the collaboration setting that best suits your workflow. Add contributors and reviewers to increase accountability.
Customize forms to your project’s needs.
Use pre-built templates, import PDFs, or create daily reports and quality and safety checklists from scratch. Make signatures and specific fields required to ensure accountability and data accuracy.
Provide crucial context.
Connect essential pieces of information to your forms so project members get the full picture. Add documents, notes, and jobsite photos and tie your form to a location on a sheet or to a markup.
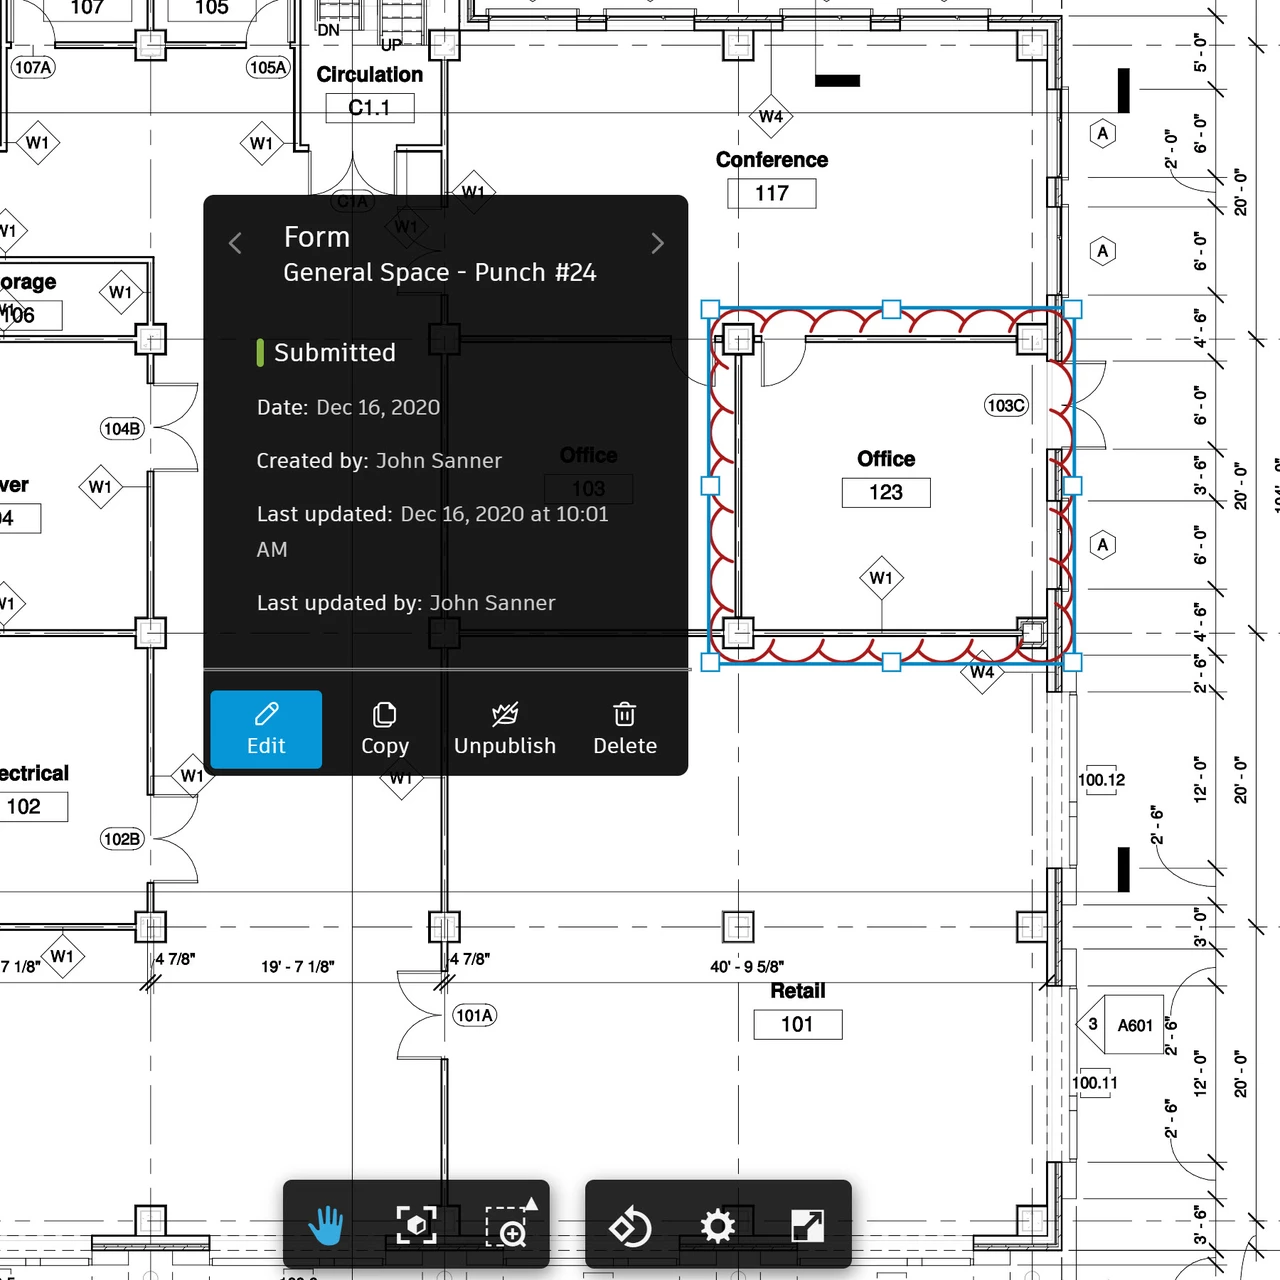
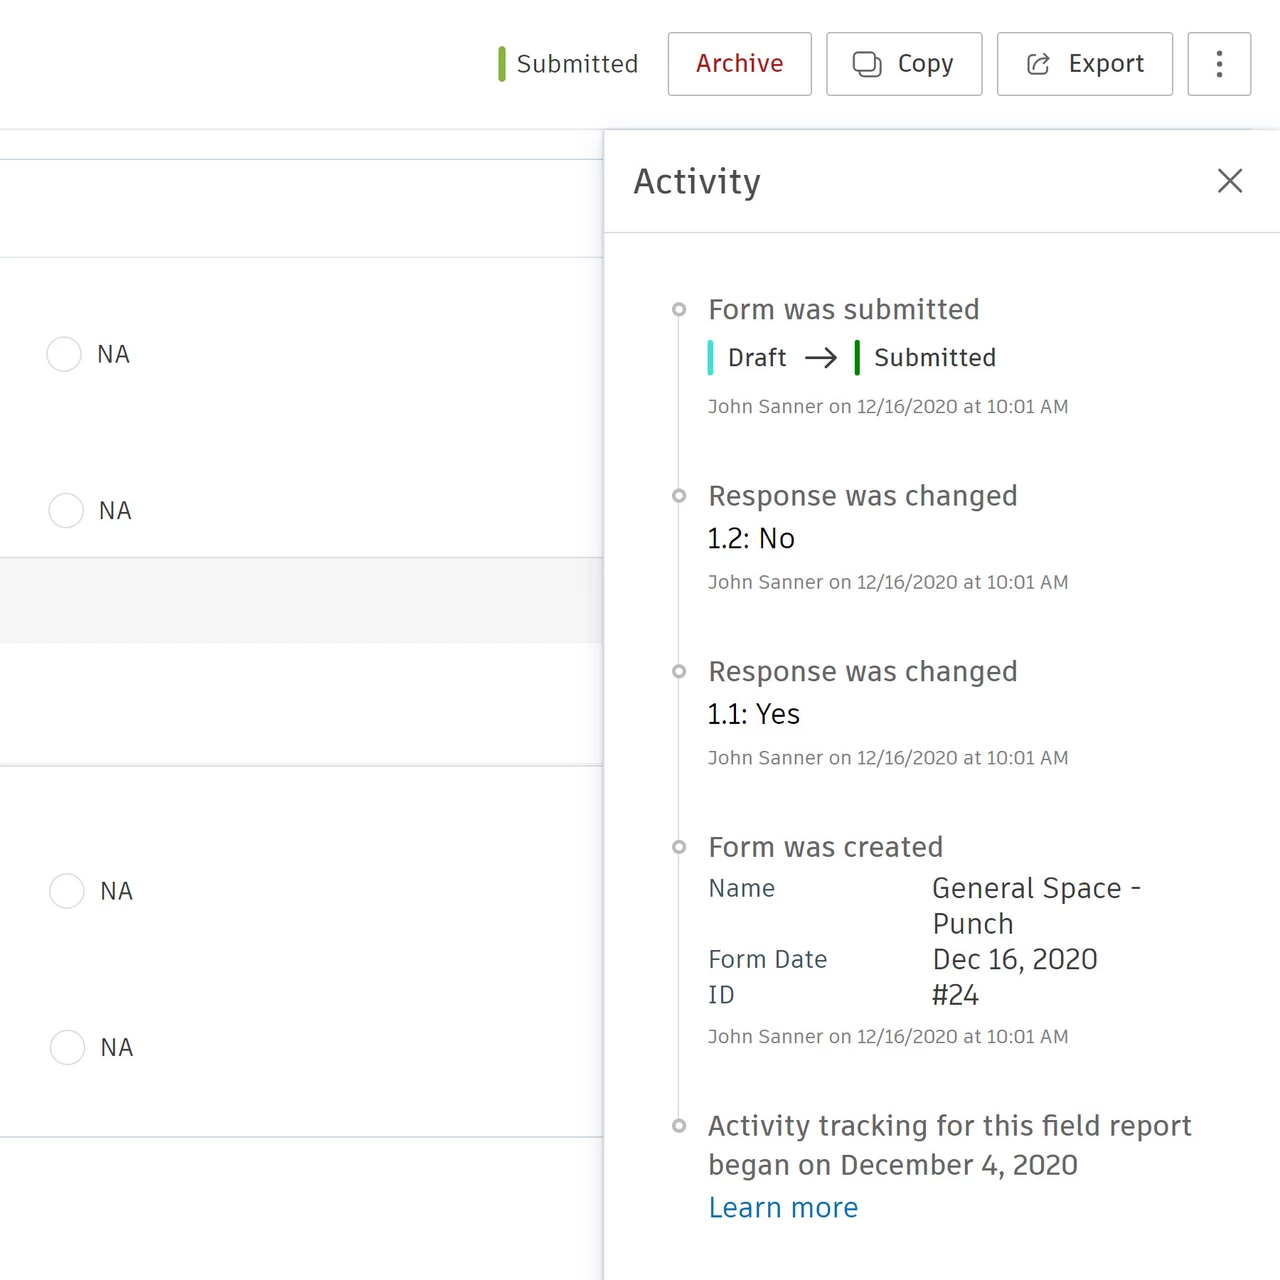
Track all changes in the activity log.
Get a transparent audit trail of all updates made on a form at a glance. Easily identify the latest update. See assignee changes, added documents, photos, team member signatures, and more.
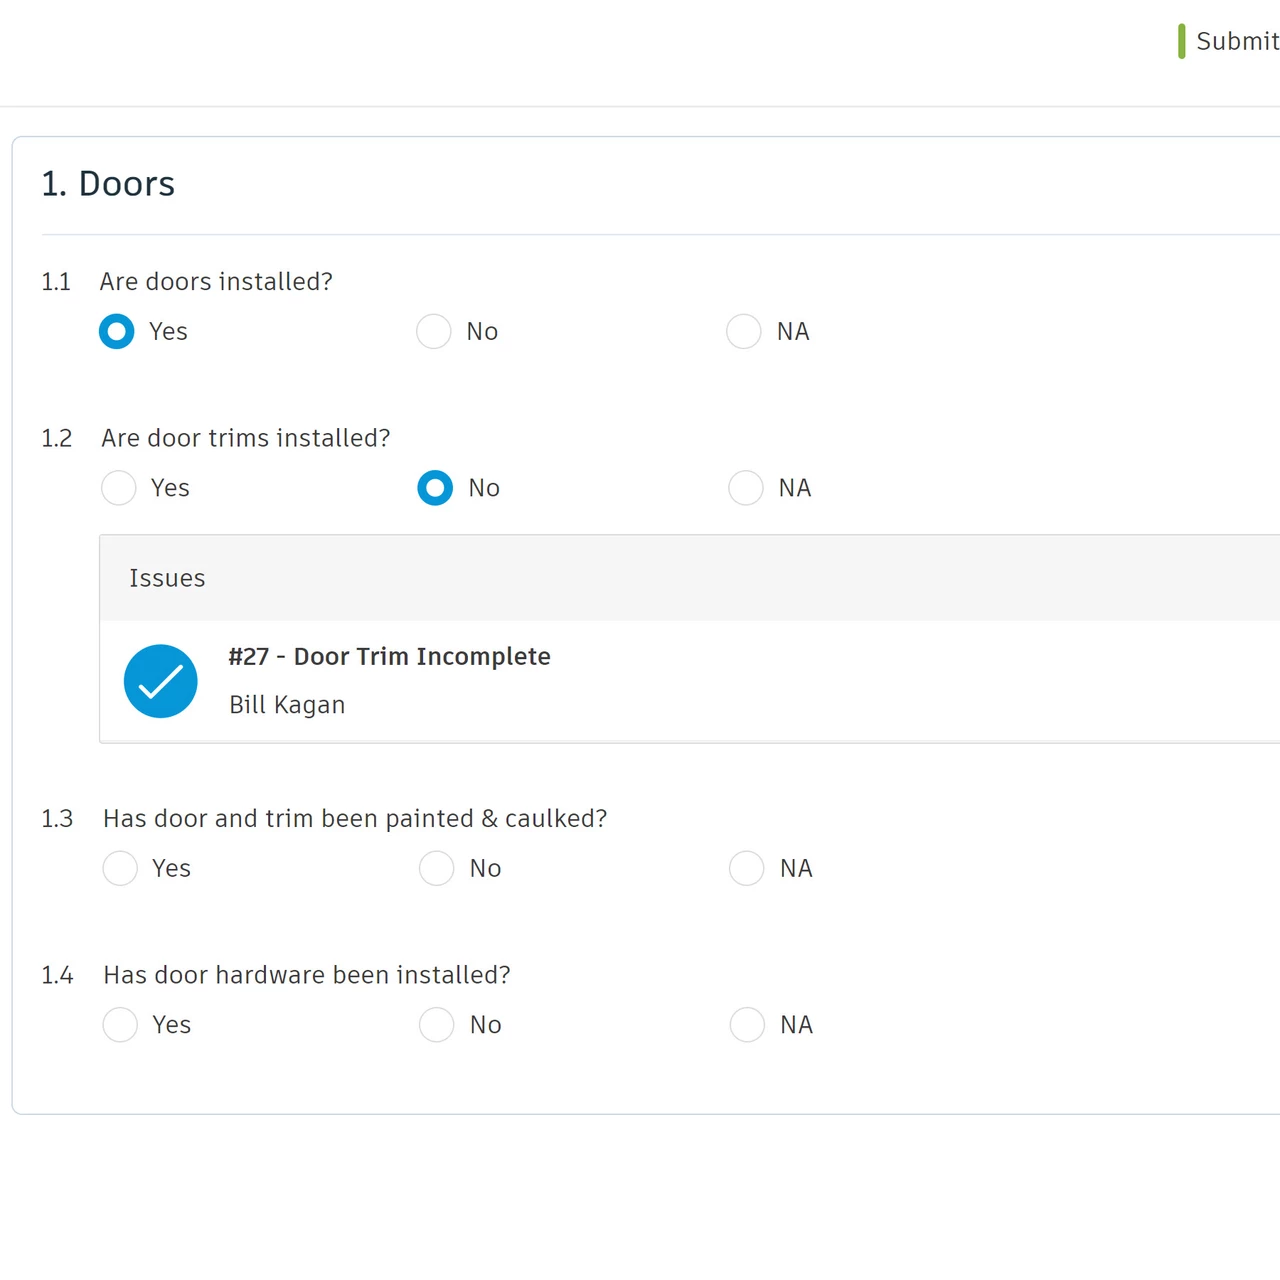
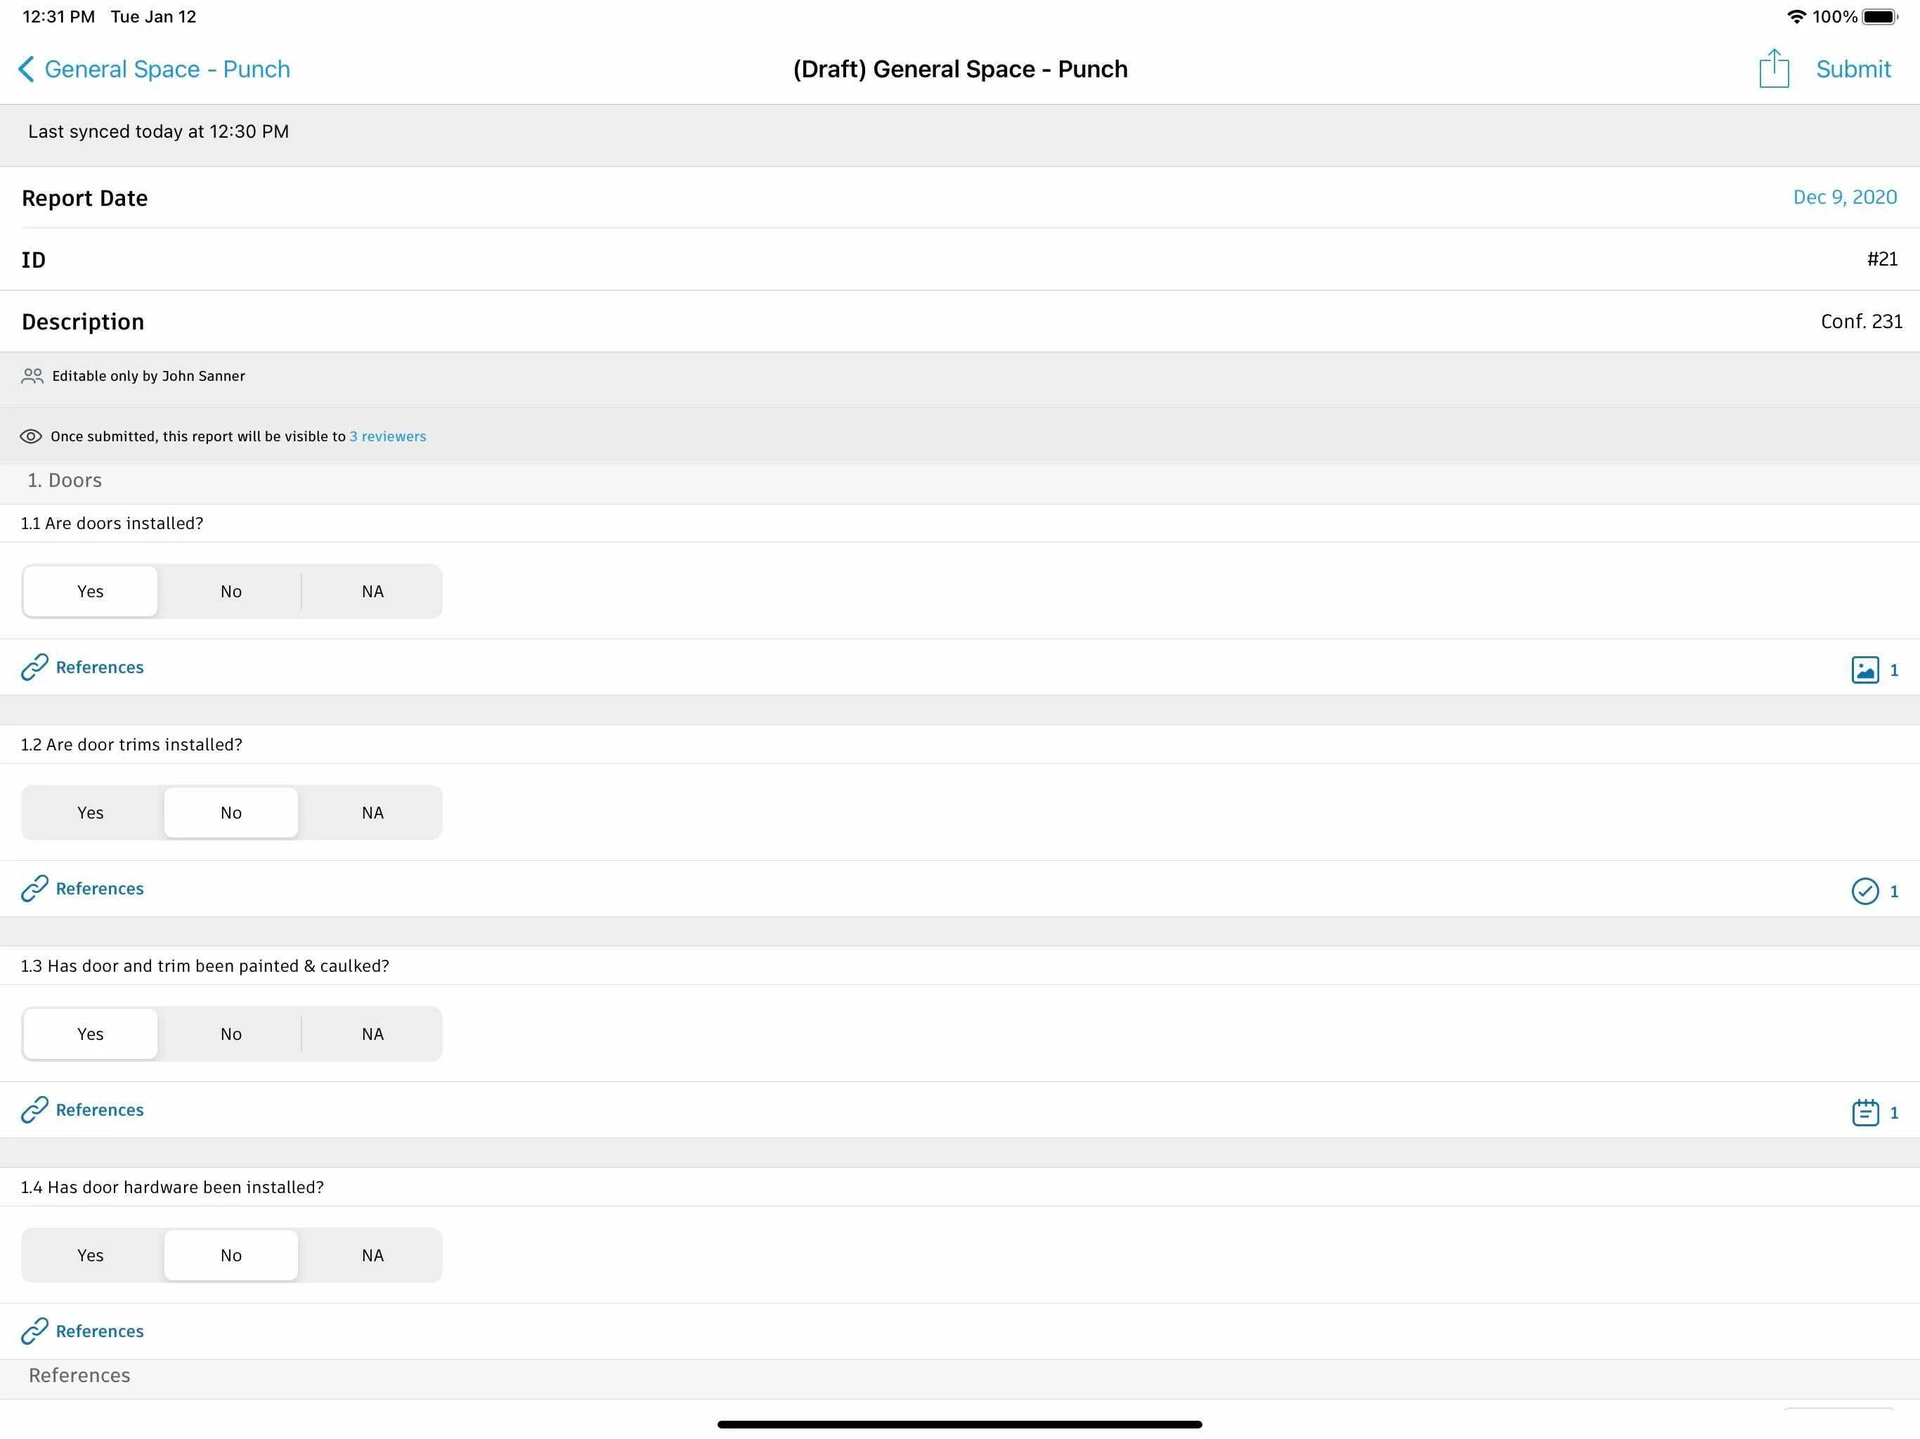
Fill out checklists on mobile.
Use our intuitive mobile app to create and to edit forms on the jobsite, even when you’re offline. Thanks to the robust sync, you’ll always have the most up-to-date project data in your hands.
In this article we will cover
- Overview of Autodesk Forms and its benefits for construction projects
- Importance of customizing forms and standardizing data collection
- Setting up quality and safety forms to capture crucial project information
- Connecting workflows and integrating forms with issues and RFIs
- Generating and sharing reports with the project team
- Collaborative settings for form completion and accountability
- Customization options for forms to align with project needs
- Adding crucial context to forms through documents, notes, and photos
- Tracking changes and updates in the form’s activity log
- Filling out checklists on the mobile app for on-site usage
- Introduction to the Forms tool in Autodesk Build and its features
- Creating form templates using the Template Builder, importing PDFs, or using preconfigured templates
- Form email notifications for relevant updates and submissions
- Managing and editing form templates, including options for customization and deletion
- Archiving and restoring form templates for record-keeping or temporary hiding
- Resources for further exploration and support
About Forms
The Forms tool in Autodesk Build enables your team to fill out, review, and manage project forms. This provides a single secure point to coordinate data collection, photos, and follow-up documents.
How to Use Forms
Create templates for checklists, daily logs, or other forms for your team, and anyone can complete the forms on site through our Autodesk Construction Cloud mobile app or at the office on the web.
To help you get started right away, Autodesk® Build comes with a set of preconfigured form templates. However, you can also import templates or create a brand new template.
Form Email Notifications
You will receive an email notifying you with updates about relevant templates and forms in these instances:
- You were added as a contributor on a new template.
- You were assigned a form to complete or contribute to.
- A form that you are a reviewer for was submitted.
- A form report was exported and shared with you.
If you used PlanGrid Field Reports and have your PlanGrid and Autodesk accounts linked, some of your email notifications settings will carry over to Forms in Build.
If you disabled the following notifications in PlanGrid, you will not receive those notifications for Build projects:
- You are added as a contributor to a new template
- A form that you are a reviewer on was submitted
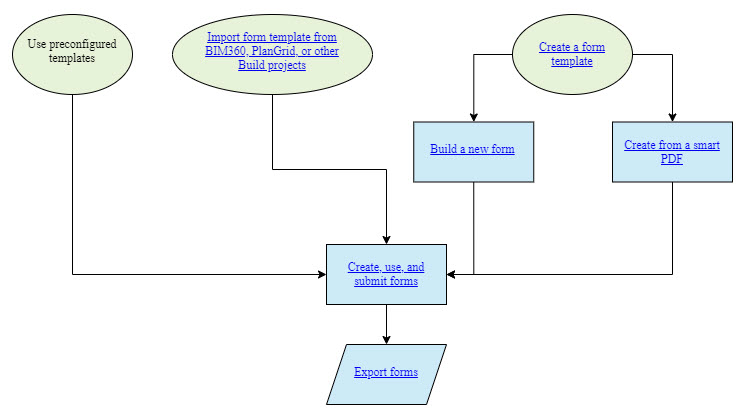
Create Form Templates
You can always use the preconfigured templates in the Forms tool. However, setting up your own custom form templates will give you and your team more control over your forms.
You can create form templates by:
- Using the Template Builder
- Uploading a smart PDF
- Importing templates from other Build projects, BIM 360, or PlanGrid
Once you create a form template on the web, you can create forms from it.
The templates will also sync to and can be used in the Autodesk Construction Cloud mobile app.
Learn more in Forms on iOS or Forms on Android.
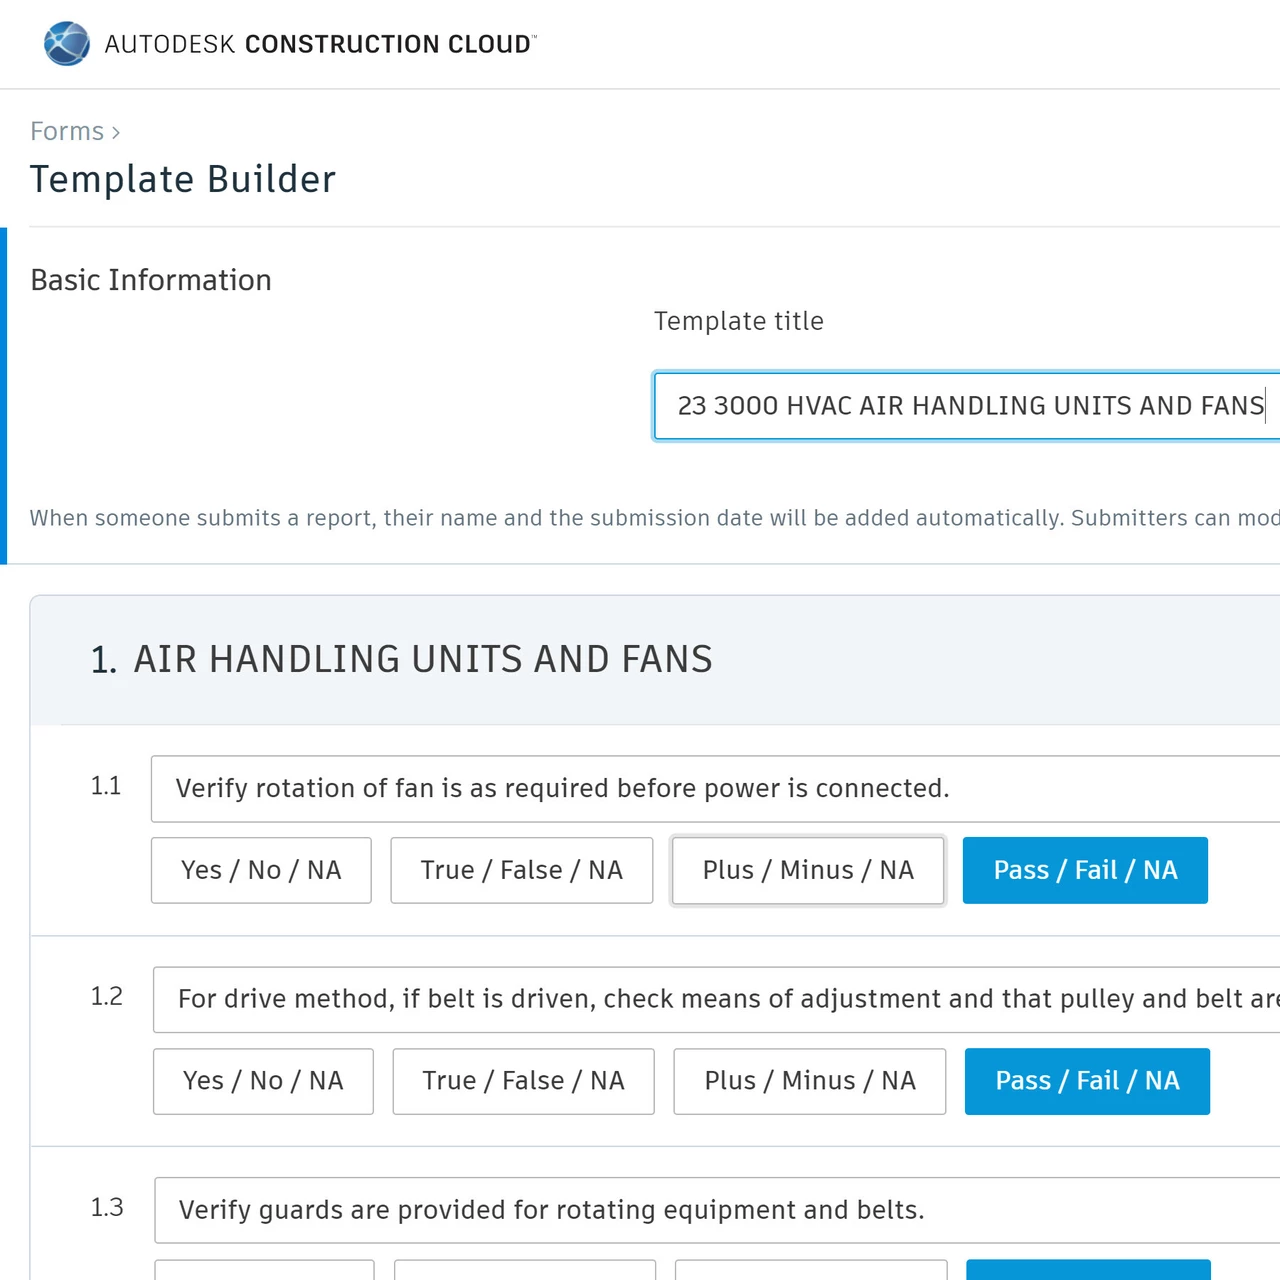
Create a Form Template using the Template Builder
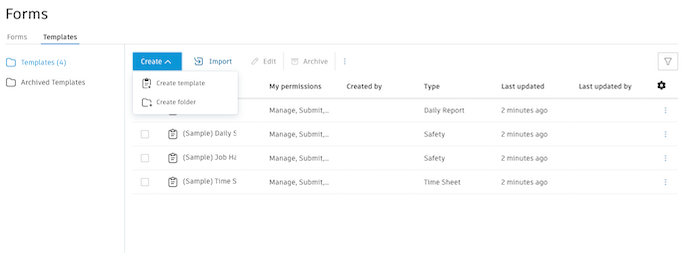
To get started, navigate to the Templates tab in the Forms tool.
Click Create, and select Create template.
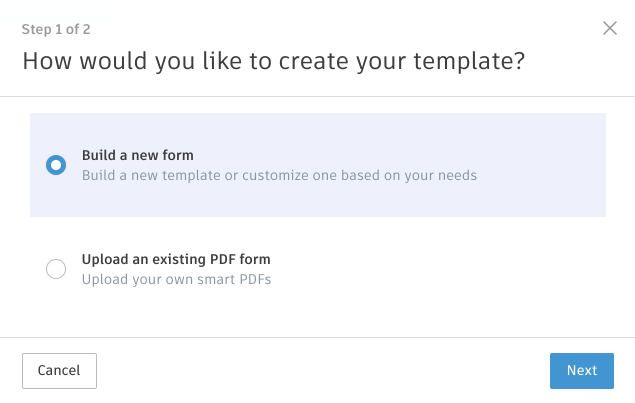
Select Build a new form and click Next.
You can learn about uploading an existing PDF form in Create a Form Template from a Smart PDF.
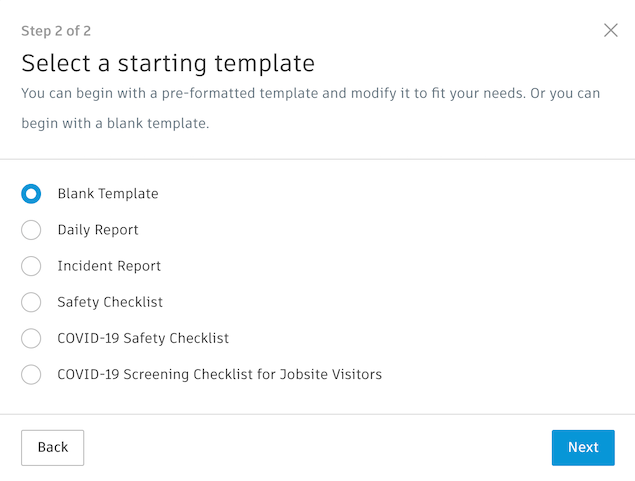
Now you can select a preconfigured template to customize or begin with a blank template.
Select an option and click Next.
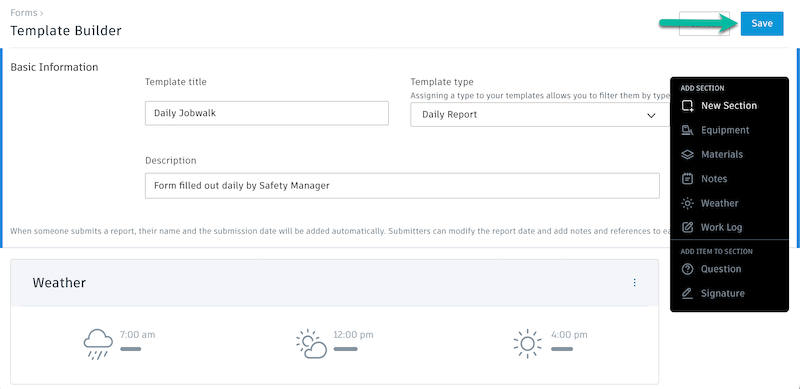
Start by giving your template a name.
You can also select a template type and add a description.
You can later filter forms by template type, which is useful when your project has many forms.
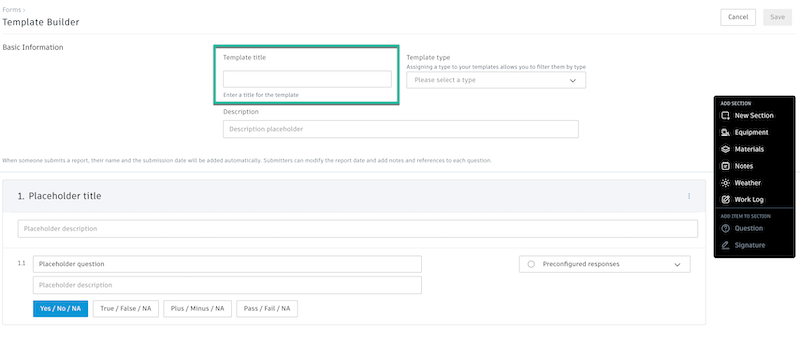
Whether you chose a blank or preconfigured template, you can start customizing the titles, questions, type of responses, and more.
Use the menu on the right side to add more sections or items to sections. There are eight sections and items available.
See the following sections for details on each:
There are character limits and limits to the number of sections that you can have within a form.
See the Forms section in Product and Tool Limitations.
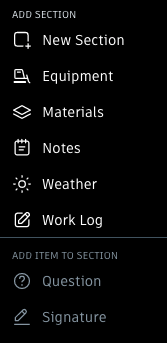
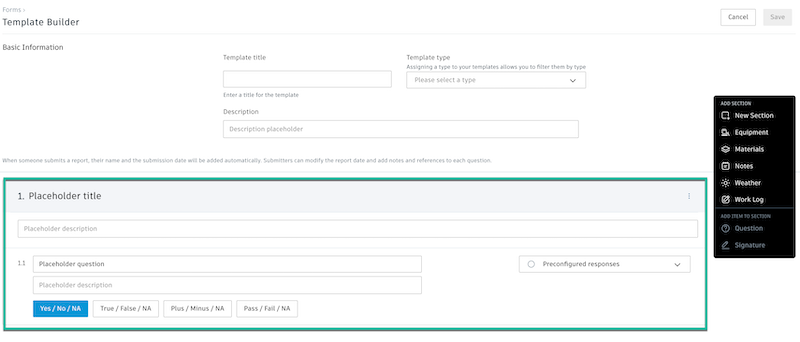
New Section
This adds a section where you can add one or more questions with different answer types for contributors to respond to.
Reference the numbers on the following image to learn more about each aspect of a section you can customize:
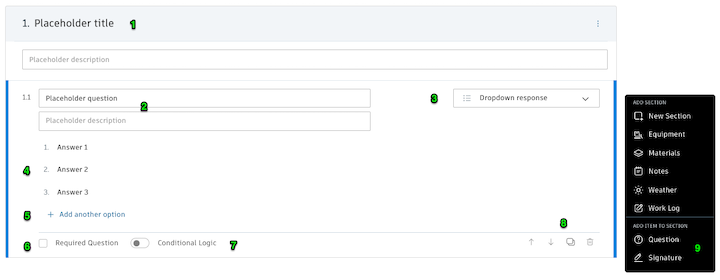
Section title and description
Question and description
Response type
-
-
- Preconfigured responses
- Text response
- Number response
- Single-select response
- Dropdown response
- Multiple-select responses
- Date
-
Answer options (if available for the chosen response type)
Add more response options (if available for the chosen response type)
Response requirement
Conditional Logic:
- Forms support conditional logic when creating a form template. With conditional logic, you’re able to have the person filling out a form complete an extra action if they select a certain response.
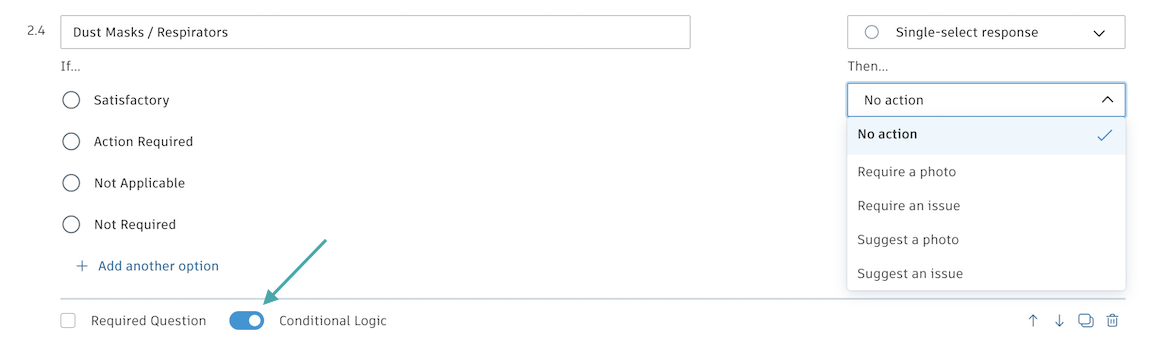
Conditional logic is available for the following response types:
- Preconfigured responses
- Single-select response
- Dropdown response
To use conditional logic, select one of the supported response types and then enable the conditional logic toggle.
Then you can map an if-then statement to each response.
For each response, select a Then… action. This action will be visible to a member if they select your specified response.
The following Then… actions are supported:
-
-
- No action
- Require a photo
- Require an issue: You can select an issue type so that the required issue can only be of that specific type. For example, if the question relates to a safety concern, you may want the form editor to create an issue of the Safety type.
- Suggest a photo
- Suggest an issue
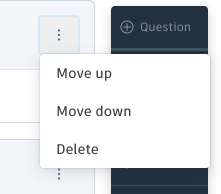
- Section tools—reorder, copy, or delete questions
- Add another question or add a signature request on this section. You must be working on a section title or question for these options to become active.
- Signature: You can request or require users filling out a form to apply a signature. Use the text input field to indicate who should sign the form. Select Required if you’d like a signature to be required to submit a form.
-

- Equipment: This adds a section with the Add equipment option to allow your team to track equipment use. If needed, you can change the title.

- Materials: This adds a section with the Add materials option to allow your team to track materials. If needed, you can change the title.

- Notes: This adds a section for your team to add notes to any form. Notes will always appear at the bottom of your template.

- Weather: The weather section will always appear at the top of your template. This section uses your project’s address to automatically gather weather data. It will display the weather data for 7am, 12pm, and 4pm local time for your jobsite. If you haven’t added an address to your project, you’ll be prompted to provide an address when you add this field.

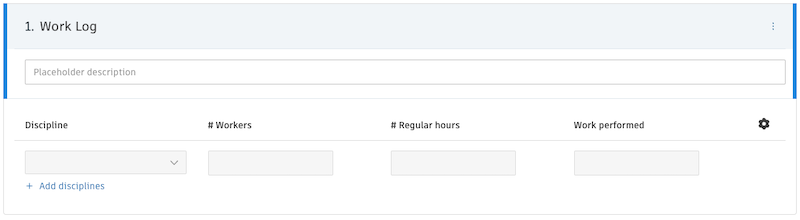
- Work Log: This section allows you to track work by disciplines such as concrete and electrical. You can specify what disciplines will be available and what information you ask about them like # of workers, company name, and more.
-
- Click the cog icon
 to select which information you want filled out on forms from this template.
 - Click Add disciplines.
- In the pop-up window, click Add discipline option.
- Type the name of the discipline. Press Enter to add another.
- To reorder disciplines, click the relevant discipline and use the arrows to the right to move it accordingly.
- To remove a discipline, click it and click the “x” icon on the right.
- Click Save.
- Click the cog icon
To move or delete sections, click the more menu in the upper-right corner. Then select whether to move it up or down or to delete it.
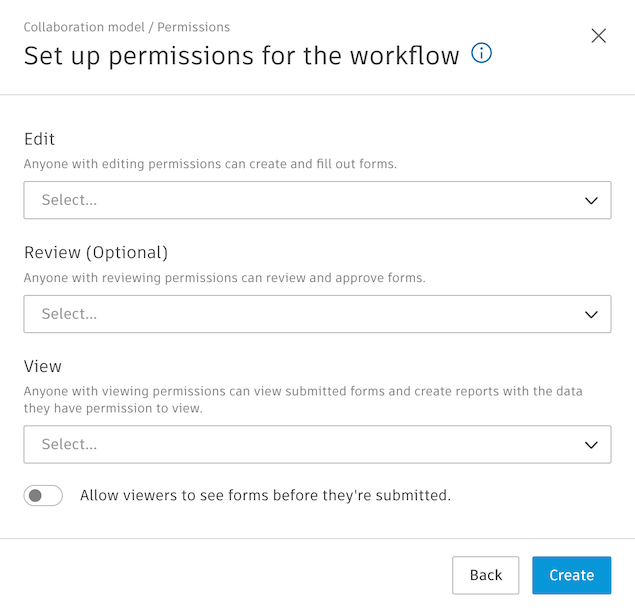
When your template is fully configured, click Save. You will need to then choose how contributors will use the template and finalize it.
Choose how contributors will use and submit forms created from your template and click Next.
Select editors, reviewers, and viewers and toggle on any options. Click Create.
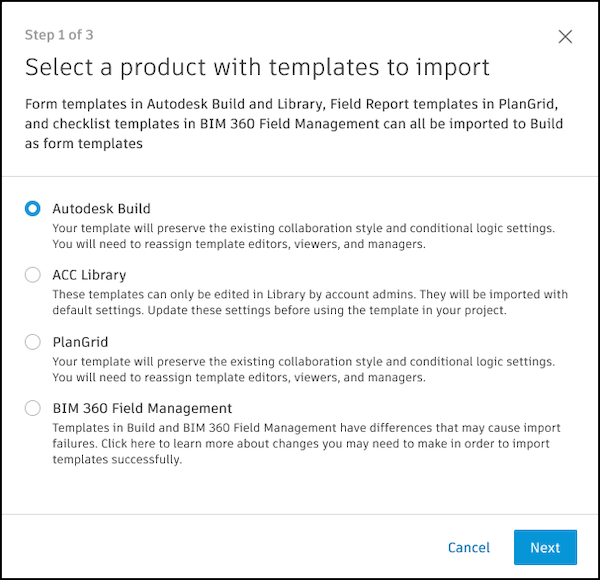
Import Form Templates
While you can create custom form templates at any time, with the Forms tool in Build, you can also import form templates.
This allows your team to quickly bring in form templates to your project that you may already have.
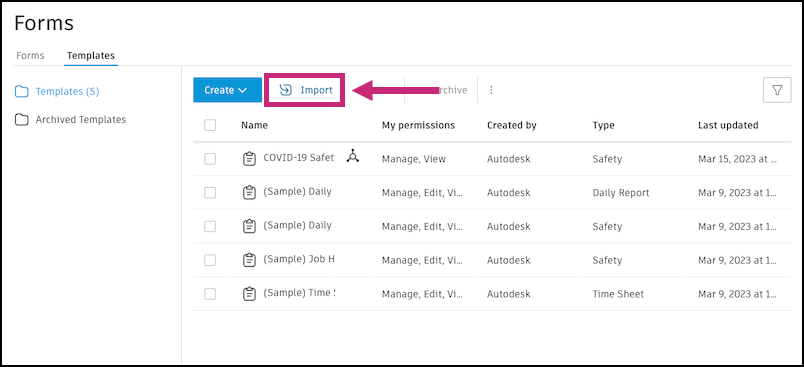
Templates can be brought in from:
- Other Build projects
- Field Reports in PlanGrid
- BIM 360 Field Management
Note: Once you import templates from BIM 360 or PlanGrid into a project, you can import them in to the Library tool in Account Admin, to standardize the form templates for all your projects. See Form Templates in Library.
Manage Form Templates
If you are a Manager on form templates, you can edit, archive, and delete the templates you manage.
Edit or Delete Form Templates
In the Forms tool, navigate to the Templates tab.
- To edit a single template: Click the relevant form template and a flyout panel will appear.
- To edit multiple templates: Click the checkboxes next to each relevant template.
- Click Edit in the top header and a flyout panel will appear.
-
Note: The panel differs depending on the types of form templates that you select.
-
If you do not see a certain field or are unable to edit a field, we suggest editing the templates individually instead.
Edit Form Templates Built Using the Template Builder
In the Templates tab of the Forms tool, when you select a form template built in Autodesk Build using the Template Builder, you can edit the following:
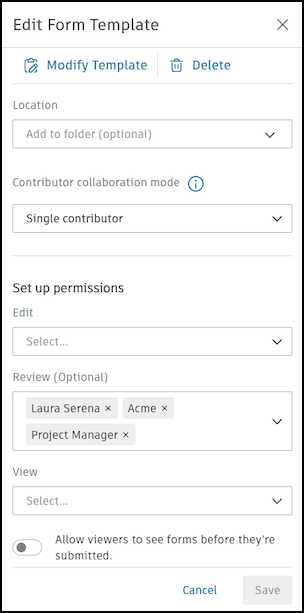
- Modify Template – This is only available when a single template is selected.
- Click Modify Template at the top of the panel.
- The template will open for you to make edits. You can edit the contents like adding sections or editing questions.
- To delete the template, click Delete at the top of the panel.
- When you delete a template, all forms made from that template will also be permanently deleted.
- To maintain forms, you can archive instead. See Archive Form Templates.
- Location – This is optional. Click the drop-down field to create a “New folder” to organize your template into, or select no folder.
- Contributor collaboration mode: You can learn about the different available options in Collaboration Models for Forms
- Set up permissions: Adjust the members, roles, or companies assigned as editors, reviewers, viewers, and managers.
- Each of these permissions levels can perform certain actions depending on the status of the form. Learn more in Form Statuses and Permissions.
- Note: You cannot remove all the reviewers on a form template that originally had reviewers.
- There must be at least one reviewer selected. Therefore, if you do not want reviewers, you will have to recreate the form template.
Edit PDF Form Templates
In the Templates tab of the Forms tool, when you select a form template created from a PDF form, you can edit the following:

- To delete the template, click Delete at the top of the panel. When you delete a template, all forms made from that template will also be permanently deleted.
- To maintain forms, you can archive instead. See Archive Form Templates.
- Form template name
- Location – This is optional. Click the drop-down field to create a “New folder” to organize your template into, or select no folder.
- Template type: This can help you organize your templates and make it easier to find certain types.
- PDF Form – Click Replace PDF to upload a new PDF for this template.
- Form Components – Add or remove Weather and Notes sections from the template.
- Contributor collaboration mode: You can learn about the different available options in Collaboration Models for Forms
- Set up permissions: Adjust the members, roles, or companies assigned as editors, reviewers, viewers, and managers.
- Each of these permissions levels can perform certain actions depending on the status of the form. Learn more in Form Statuses and Permissions.
- Note: You cannot remove all the reviewers on a form template that originally had reviewers.
- There must be at least one reviewer selected. Therefore, if you do not want reviewers, you will have to recreate the form template.
Rename, Move, and Delete Form Template Folders
In the Templates tab in the Forms tool:
- Select the checkbox next to the folder that you want to edit.
- Click Edit and a flyout panel will open.
- Edit the name or change the location of the template.
- Click Save.
For deleting form template folders, see Archive Form Templates.
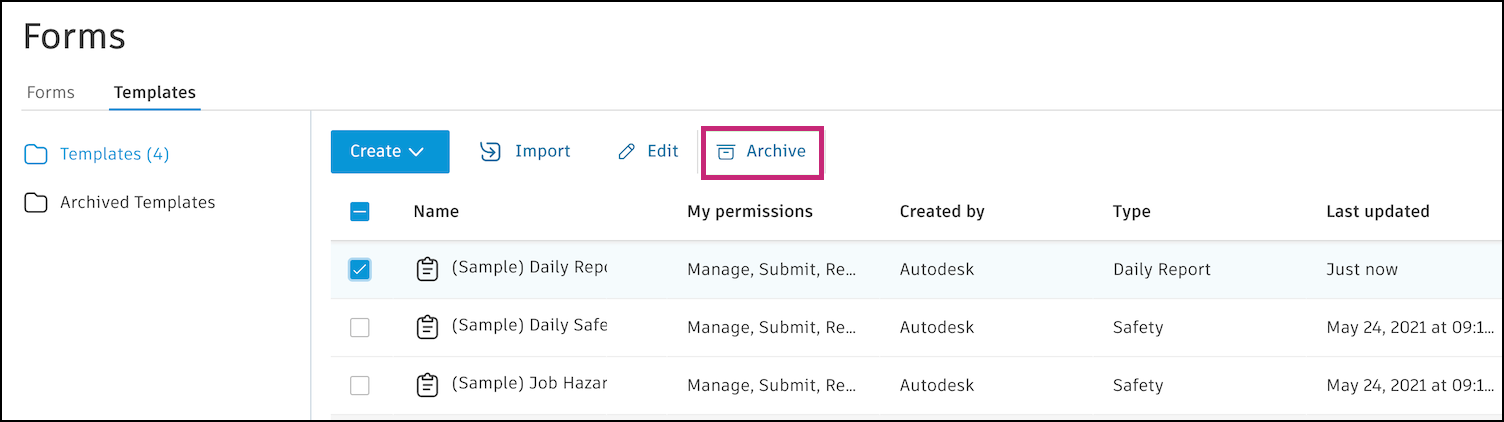
Archive Form Templates
You can archive form templates to keep them for record or to temporarily hide them so that they cannot be used.
When you archive a form template, the forms that were created from that template also get archived.
These forms will no longer be available in your project’s forms. They can be restored by unarchiving the form template that these forms were created from.
- In the Forms tool, navigate to the Templates tab.
- Click the checkbox next to the relevant form templates or folder.
- Click Archive.
Restore Archived Form Templates
- In the Templates tab of the Forms tool, navigate to the Archived Templates folder.
- Select the template that you would like to restore.
- Click Restore.

See Forms in Action.
Comprehensive field and project management software that delivers a broad, deep, and connected set of tools for builders.
Check out Autodesk Build and learn more about managing forms.
Still have questions?

INDUSTRIES: Architecture, Buildings, Civil Engineering, Civil Infrastructure, Construction, Infrastructure, MEP Engineering, Structural Engineering