


Virtual Reality Headset for Enscape Software
By David Spergel | Virtual Reality, Visualization
What is the best VR headset for Enscape and why? If you want to use Enscape to render your design projects in real-time, you’ll need a powerful VR headset. However, not all headsets in the market are ideal to use with Enscape. You’ll have to use headsets with certain features that meet Enscape’s requirements. Read this article to find out the hardware requirements, best practices, ways to prevent nausea, and what to look for in buying a headset for virtual reality.
Hardware Requirements
We recommend at least an NVIDIA RTX 3070 graphics card or an AMD equivalent GPU (eg. Radeon RX 6700 XT) with at least 8GB or more for a smooth VR experience with Enscape! For less complex projects the official requirements might suffice though.
- Official Oculus Rift and Rift S hardware requirements*
- Official HTC Vive and Vive Pro hardware requirements
- Official Samsung Odyssey hardware requirements
- Official Windows hardware requirements for Mixed Reality Headsets
- Please ensure you have the latest available graphics driver installed. NVIDIA drivers can be found here, for AMD graphics cards drivers can be found here.
*NOTE: The Oculus Quest 2 is currently NOT officially supported.
Please choose your preferred VR device to read about Setup & Movement:

Windows Mixed Reality (all devices)
Setup
- In order to run Enscape with the Samsung Odyseey or any other Windows Mixed Reality Headset, the following software needs to be installed and running: Steam, SteamVR and Windows Mixed Reality for SteamVR. If you are new to the Windows Mixed Reality, this guide will provide you with helpful information about Windows VR.
- When SteamVR signals everything is green and ready to go, you can go ahead and enable Enscape’s VR mode via the Enable VR Headset button in the Enscape ribbon (Fig 1.2)
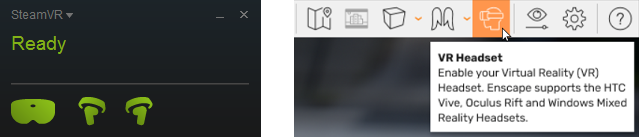
Fig 1.2 SteamVR indicates the headset and controllers are ready, enable VR mode in the Enscape ribbon
Movement & Controls (Fig 1.3)
- When activating a view or starting Enscape you will be placed on the next valid position on the floor if possible.
- You’re then able to explore your surroundings within the previously defined play-area freely by simply moving around.
- The laser-pointer lets you control the settings which can be opened on the left controller, use it like the left mouse button.
- Optionally you can also move around by using the stick. However, this is only recommended for users with a certain amount of VR experience, as it often causes nausea.
- The track-pad of the right-hand controller allows you to elevate.
- If you prefer to remain standing in a fixed location you may also navigate using the X-Box Controller.
- Teleportation functionality is described here.
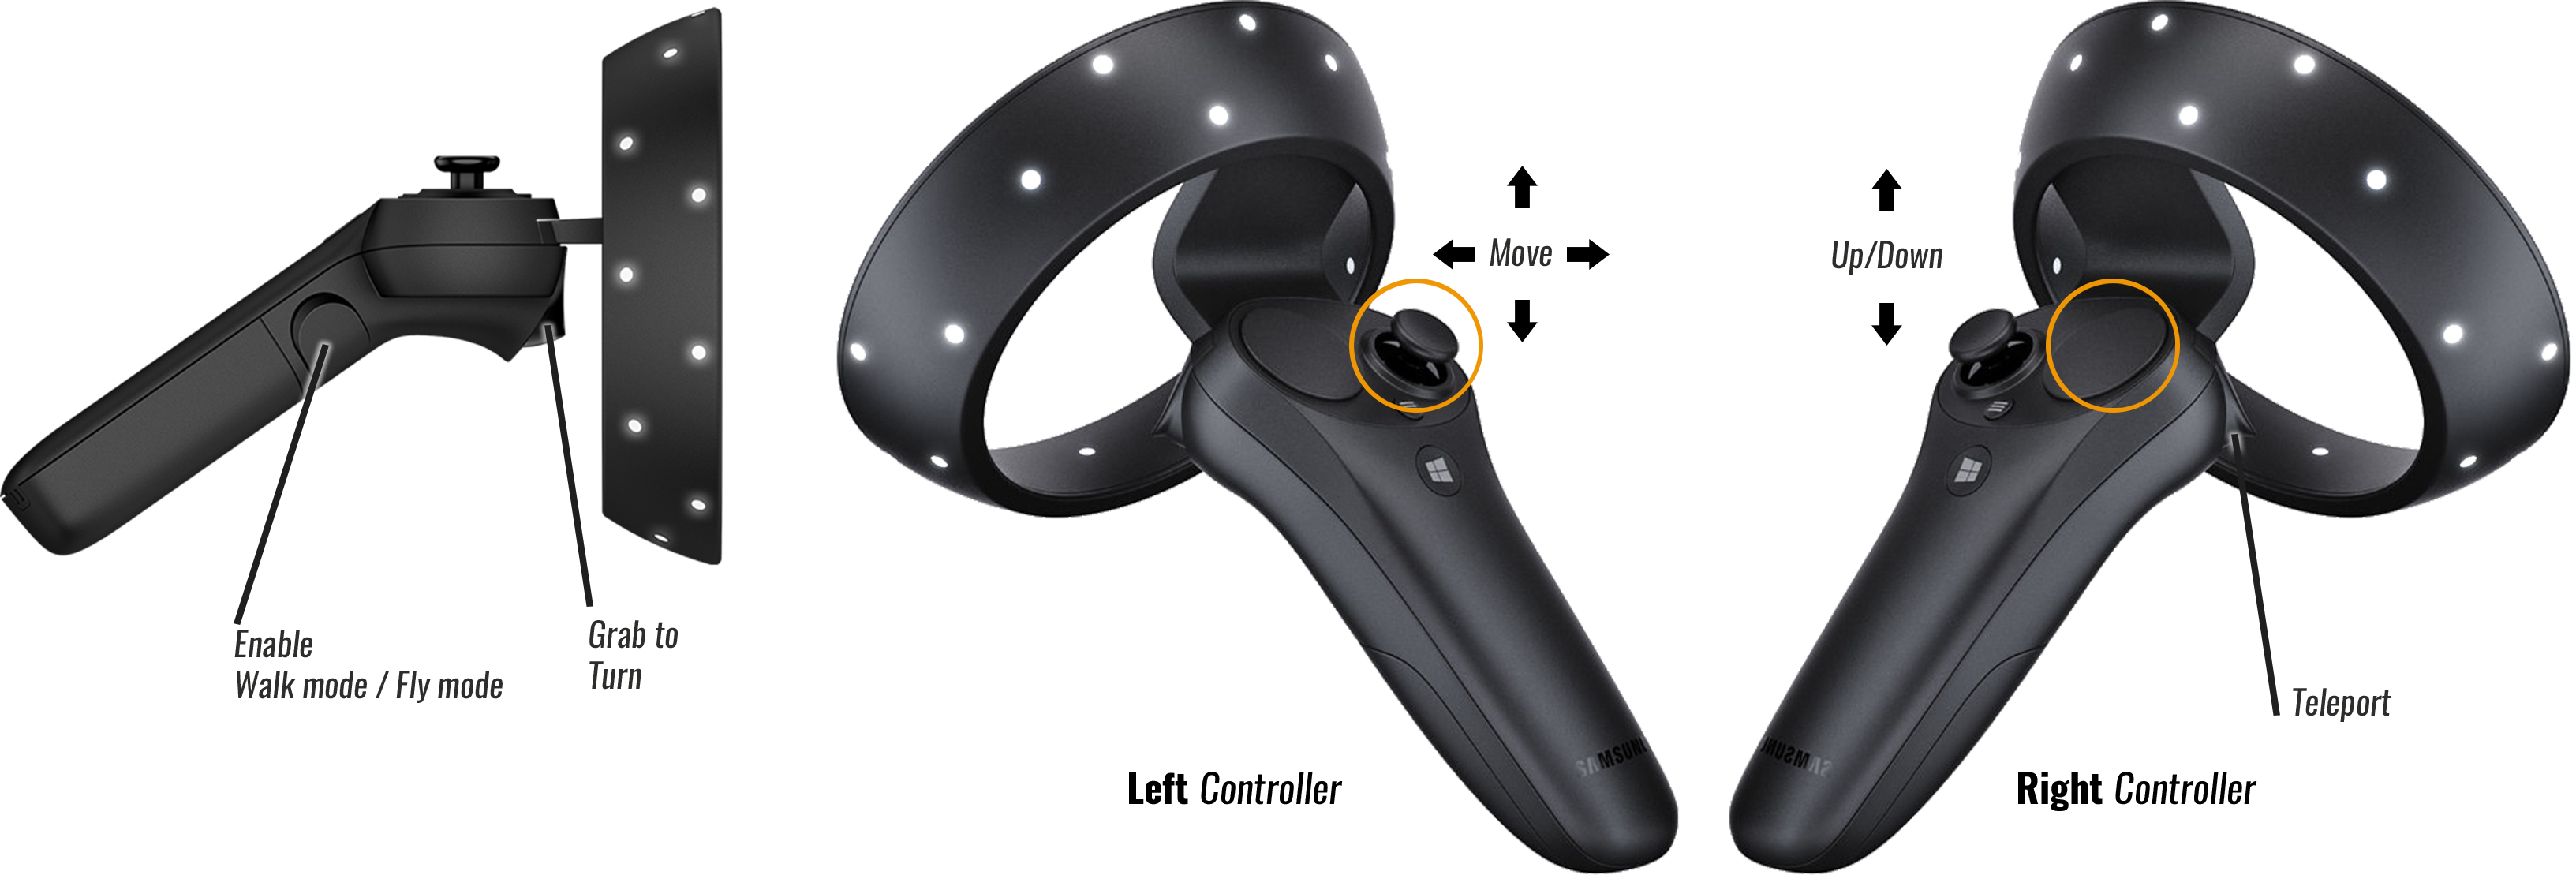
Fig 1.3 Windows Mixed Reality Controllers
Best Practice
Due to its higher resolution (1440 x 1440 per eye) compared to the HTC or Oculus headsets, please refer to the Hardware Requirements that we recommend when using Windows Mixed Reality VR headsets. If you cannot meet the recommended requirements then we advise that you lower the rendering quality to medium or even draft which will allow for a smoother VR experience.
If you get distortion in VR, and you are using a high end graphics card, this may be due to SteamVR setting the resolution to 100%, which now forces super-sampling. This needs to be changed to 50%. To adjust this please perform the following:
- Start your CAD
- Start Enscape
- Start VR in Enscape
- Open Steam VR
- Open the SteamVR Settings (Fig.1.4a) window.
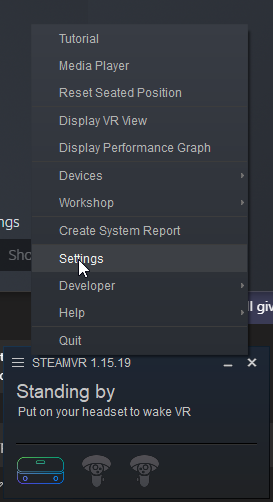
Fig 1.4a Open SteamVR Settings
In the following dialog, select the ‘Video’ option, and then click on ‘Per-Application Video Settings’ (Fig 1.4b).
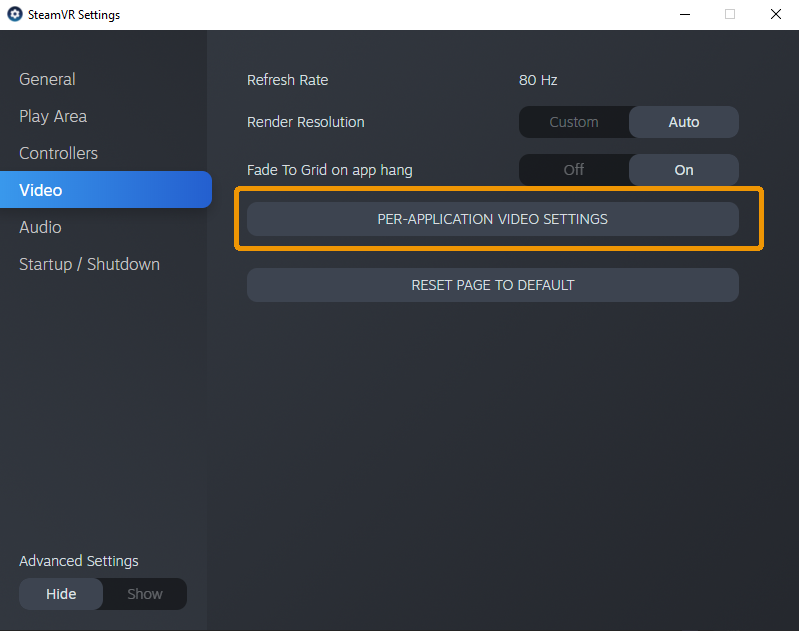
Fig 1.4b Per-Application Video Settings
In the following dialog use the slider directly below the ‘Custom Resolution Multiplier’ so that it shows 50%, or lower if acceptable (Fig 1.4c). Anything lower than 50% may also result in a performance increase, although the image quality may decrease which should be expected.

Fig 1.4c SteamVR Video Custom Resolution Multiplier slider
HTC Vive and Vive Pro
Setup
- In order to run Enscape with the HTC Vive / Vive Pro, you’re required to have Steam, including SteamVR, installed and running. All required software will be installed by the official Vive Setup.
- Once installed SteamVR will guide you through all the setup steps needed to prepare your room scale VR experience (Run Room Setup).
- When SteamVR signals everything is green and ready to go, you can go ahead and enable Enscape’s VR mode via the Enable VR Headset button in the Enscape ribbon (Fig 1.5).

Fig 1.5 SteamVR indicates the headset and controllers are ready, enable VR mode in the Enscape ribbon
Movement & Controls (Fig 1.6)
- When activating a view or starting Enscape you will be placed on the next valid position on the floor if possible.
- You’re then able to explore your surroundings within the previously defined play-area freely by simply moving around.
- Optionally you can also move around by pressing the track-pad of the left-hand controller. However, this is only recommended for users with a certain amount of VR experience, as it often causes nausea.
- The track-pad of the right-hand controller allows you to navigate vertically.
- The time of the day may be manipulated by pressing the grip buttons on the left- and right-hand controllers.
- If you prefer to remain standing on a fixed location you may also navigate using the X-Box Controller.
- Teleportation functionality is described here.
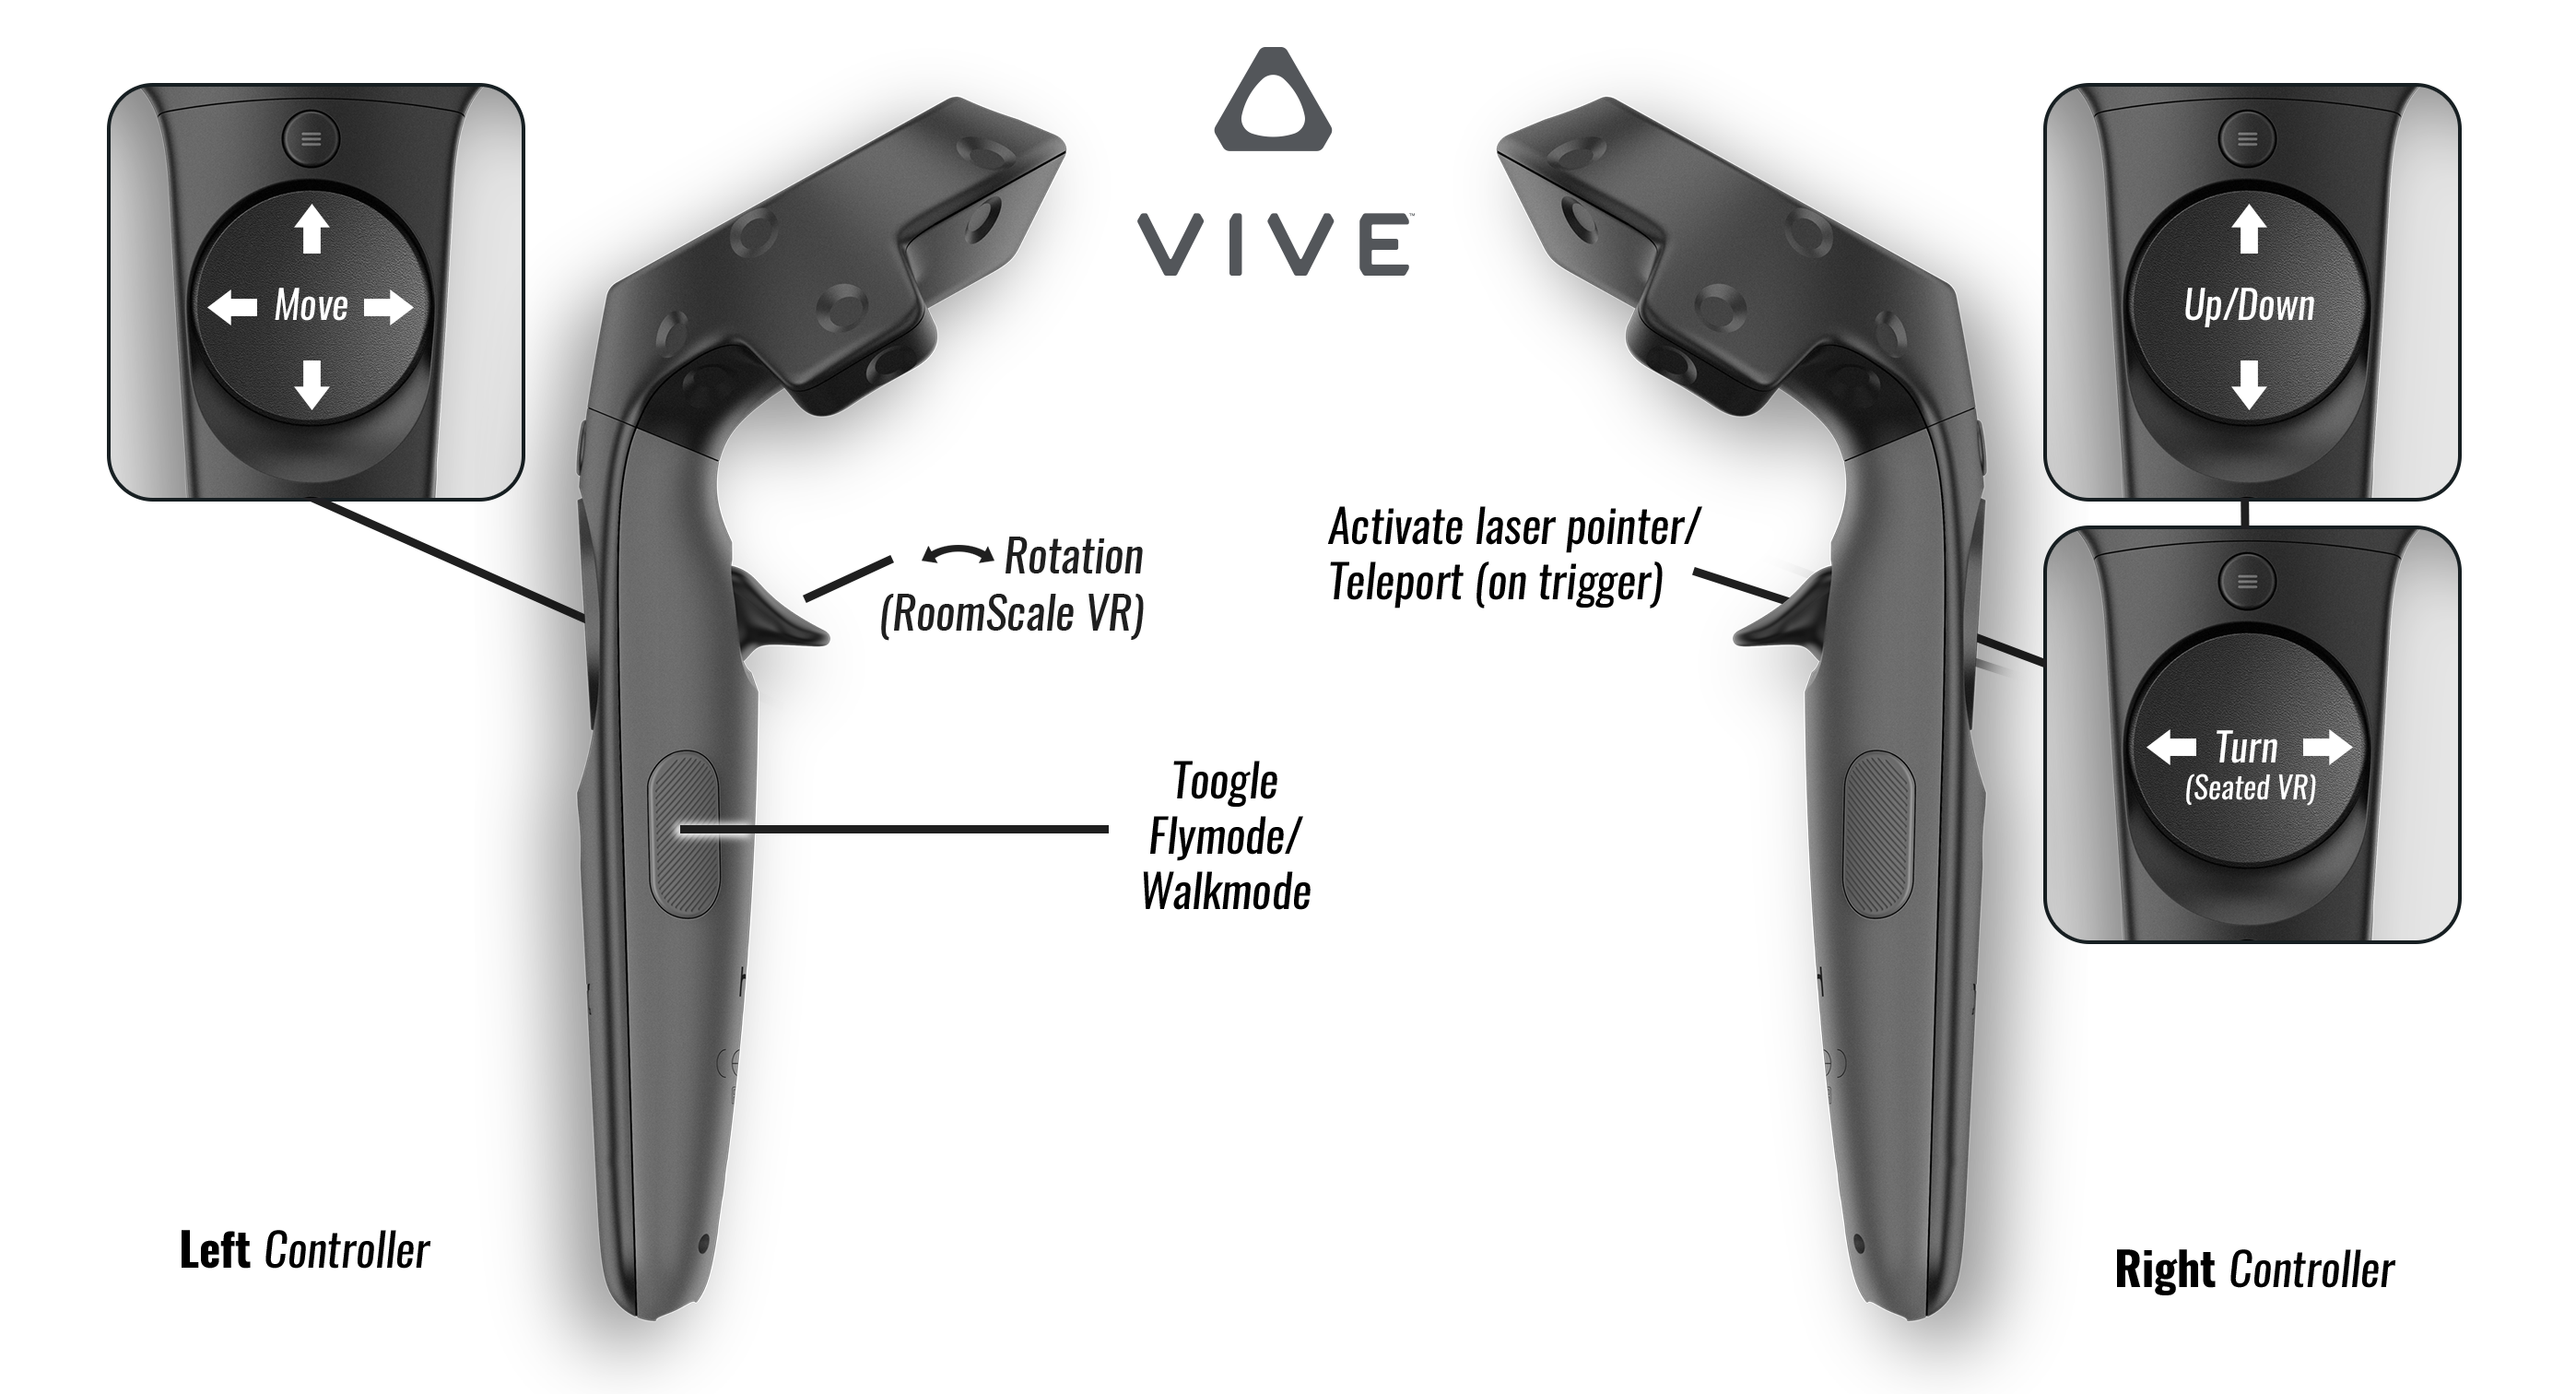
Fig 1.6 HTC Vive Controllers
Best Practice
If you cannot meet the recommended requirements then we advise that you lower the rendering quality to medium or even draft which will allow for a smoother VR experience.
If you get distortion in VR, and you are using a high end graphics card, this may be due to SteamVR setting the resolution to 100%, which now forces super-sampling. This needs to be changed to 50%. To adjust this please perform the following:
- Start your CAD
- Start Enscape
- Start VR in Enscape
- Open Steam VR
- Open the SteamVR Settings (Fig.1.7a) window.

Fig 1.7a Open SteamVR Settings
In the following dialog, select the ‘Video’ option, and then click on ‘Per-Application Video Settings’ (Fig 1.7b).

Fig 1.7b Per-Application Video Settings
In the following dialog use the slider directly below the ‘Custom Resolution Multiplier’ so that it shows 50%, or lower if acceptable (Fig 1.7c). Anything lower than 50% may also result in a performance increase, although the image quality may decrease which should be expected.

Fig 1.7c SteamVR Video Custom Resolution Multiplier slider
Oculus Rift and Rift S
Setup
- Make sure that the latest Oculus runtime has been installed and you’ve followed all the required steps of the Oculus device setup.
- Open the Oculus App and select Settings. In the General settings section please activate the Unknown Sources option (Fig 1.8)
- When you turn on your Oculus you should now be able to see the Oculus Home Scene.
- Now you can go ahead and enable Enscape’s VR mode via the Enable VR Headset button on the Enscape ribbon. (Fig 1.8)
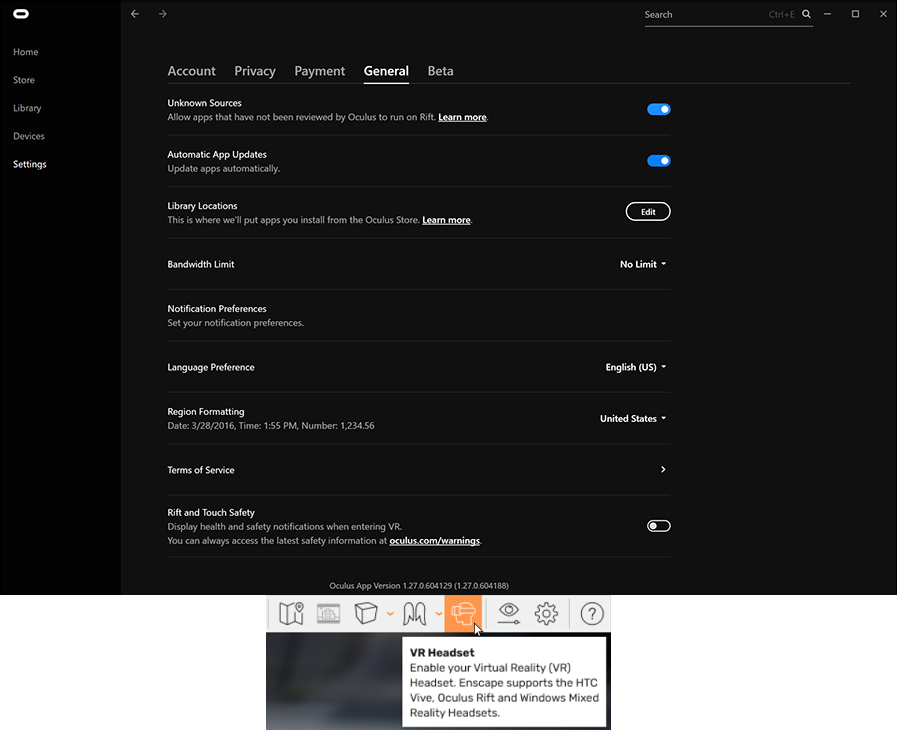
Fig 1.8 Oculus Rift Settings with Unknown Sources enabled, enable VR mode in the Enscape ribbon is now possible.
- After enabling the Oculus Rift you might not see your project and instead you may see a grey image. When you look around you’ll notice a Health & Safety Warning. Please press ‘A’ if using an Xbox-Controller or focus on the button below the warning message to acknowledge it and to proceed to Enscape.
To change the resolution of an Oculus VR HMD, this can be found in the Oculus native settings window and is to be found under the Devices -> Graphics Preferences option (Fig 1.8a).

Fig 1.8a Oculus Rift Resolution Settings
Movement & Controls (Fig 1.9)
- When activating a view or starting Enscape you will be placed on the next valid position on the floor if possible.
- You’re then able to explore your surroundings within the previously defined play-area freely by simply moving around.
- Optionally you can also move around by pressing the track-pad of the left-hand controller. However, this is only recommended for users with a certain amount of VR experience, as it often causes nausea.
- The track-pad of the right-hand controller allows you to navigate vertically.
- The time of the day may be manipulated by pressing the grip buttons on the left- and right-hand controllers.
- If you prefer to remain standing on a fixed location you may also navigate using the X-Box Controller.
- Teleportation functionality is described here.
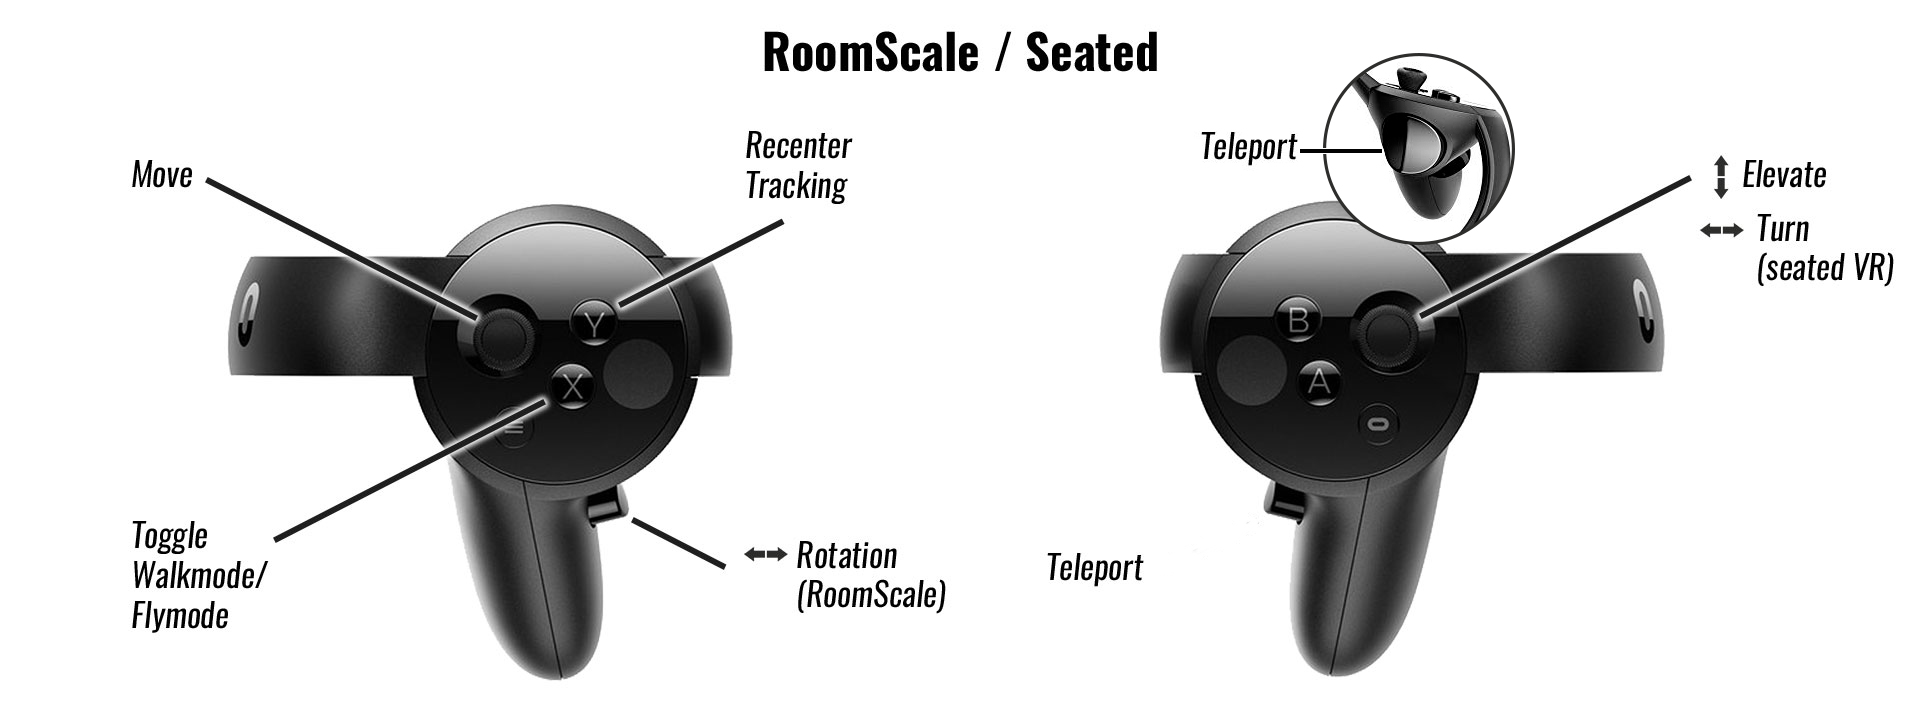
Fig 1.9 Oculus Touch Controllers
Best Practice
- If you’re experiencing stuttering in VR even though your hardware meets the mentioned requirements, you might want to reduce Enscape’s Rendering Quality in the Enscape settings window. Quality level Ultra is not recommended for VR unless you’re running on a Nvidia GTX1080 or better.
- If you have two graphics cards installed make sure either one of them is disabled prior Oculus usage or ensure that Oculus and Enscape are executed on the same graphics card.
Interaction
To interact in the Enscape VR world, Enscape provides you with a Menu Ribbon (Fig 1.10), that is always visible, above the left-hand controller in VR.
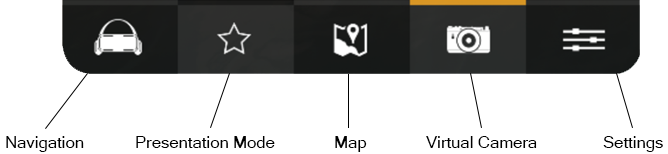
Fig 1.10 The Enscape Menu ribbon in VR
When any of these symbols are selected in VR, an associated panel will slide out of the top of this strip displaying the related options for each menu item. You will also notice that the selected menu option is indicated with an orange bar above the selected symbol (Fig 1.10).When the left-hand controller is not in focus, after a short period of time, the menu panel will slide back down into the Menu Strip and disappear.
Teleportation
Teleportation functionality uses two distinct stages in its operability, and these should be observed to get the best experience from this function.
Holding the trigger (but not pressing the trigger fully down) displays the Teleportation Target Indicator (Fig 1.11).
Pressing the trigger down completely will then execute the Teleportation, if the location is available(Fig 1.12).
So, the right-hand controllers trigger will allow you to select and teleport to almost any destination visible.
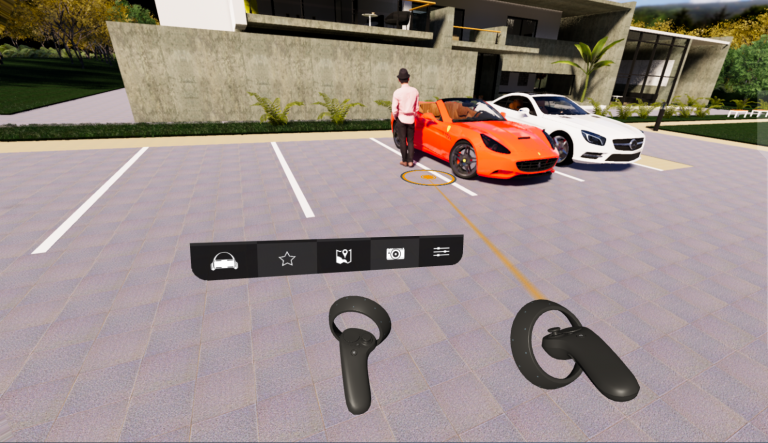
Fig 1.11 The Teleportation Target Indicator, before fully pressing down on the controllers trigger, showing an available destination.
The Teleportation Target Indicator is able to penetrate doors and (some) windows (curtain wall windows are not supported yet), so you can easily reach the areas behind them.
If the pointer turns red with an X symbol when holding down the trigger and pointing at a location, this indicates that the destination is not available to teleport to (Fig 1.12).
NOTE: Teleportation does have a threshold of roughly 10 km, with an offset of some 500 meters.
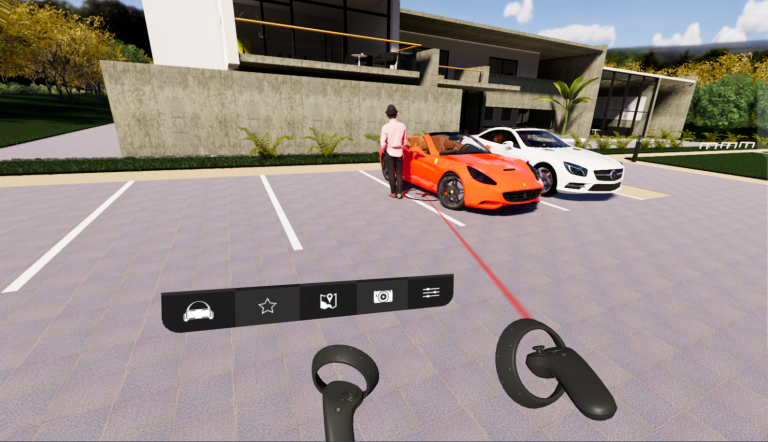
Fig 1.12 The Teleportation target indicator, before fully pressing down on the controllers trigger, showing a destination that is not available.
Navigation
The Navigation panel (Fig 1.13) contains five possible options.
- Roomscale – Sets the VR mode to operate within your SteamVR Boundary settings, along with using your actual ‘real world’ height as the spectator height in VR.
- Seated – Sets the VR mode to operate in the Seated mode which means that a certain spectator height (defined in the settings) is assumed when in Walkmode.
- Walkmode – Your position is set to be bound to the ground plane, whilst also colliding with geometry.
- Flymode – Allows you to freely move around without being bound to the ground plane.
- Recenter Tracking – Will recenter your tracking origin to your current position within the ‘play area’.
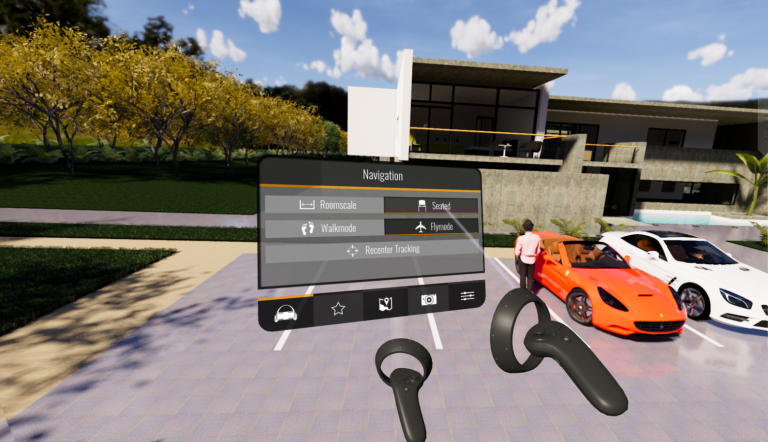
Fig 1.13 The Navigation Panel
To further clarify the functionality of the Recenter Tracking option, consider the following use cases:
- You’re in Seated mode in VR, but in Real World (RW) you’re standing up, and the VR tracking center has been calibrated for a seated position (this is initially defined during VR Setup).This has the effect that your virtual self will be way too tall (by the offset of your standing height to the calibrated seated position). Now, press Recenter Tracking in order to rectify the discrepancy. This will result in your virtual height being corrected and, once again, matching the defined spectator’s height.
- In Roomscale VR Recenter Tracking is only relevant in Walkmode. This is due to the fact that your collision will be based on the calibrated center. So, if you’re walking several steps sideways in RW, and then try to move through a door using the controller in Walkmode, your collision will be off. Recenter Tracking fixes this.
Presentation Mode
Any views that have been created and have been marked as a Favorite (Fig 1.14) will then become available under the Presentation Mode menu in VR (Fig 1.15).

Fig 1.14 ‘Mark as Favorite’ Views in Enscape
In VR select the Presentation Mode symbol and the Presentation Mode panel will appear (Fig 1.15). This is a carousel menu containing thumbnails of all the Views that were highlighted in the View/Manage Views menus. Use the right hand controller’s trigger to scroll through and also to select the thumbnail of the View you want to display. Once selected you will be instantly teleported to that saved View location, whilst the Time of Day, associated with the View, will also be updated.
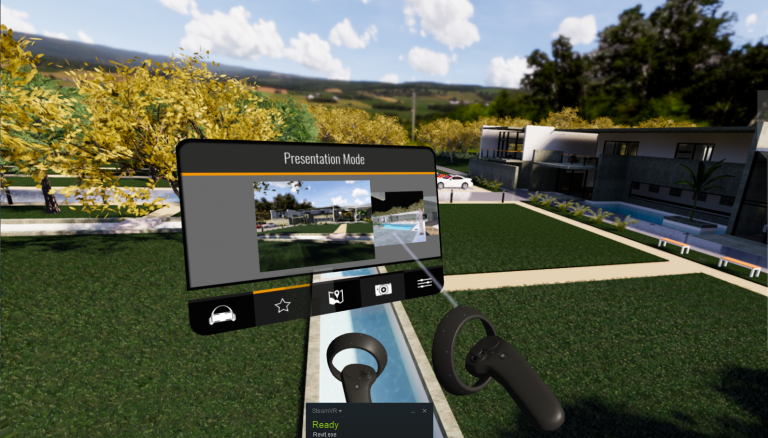
Fig 1.15 The Presentation Mode settings panel in VR
Mini Map
On selecting the ‘Map’ symbol from the VR Menu, a Mini-map is displayed (Fig 1.16). This is a top elevation map using True North as its orientation, which allows you to quickly select, with the right-hand controller’s laser pointer, a location to instantly transport to within your project.
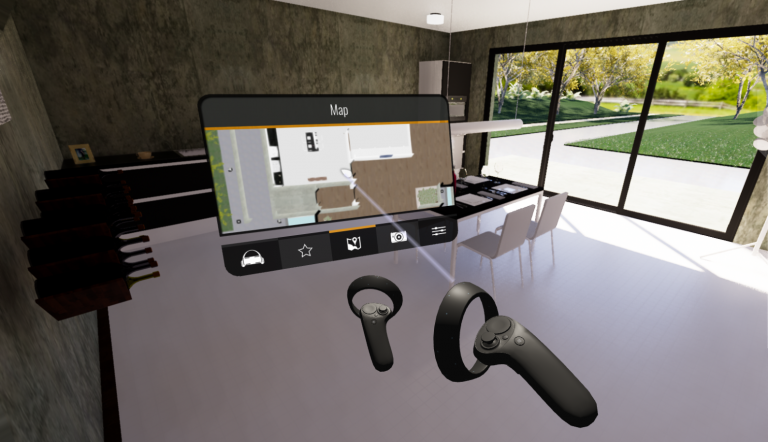
Fig 1.16 The Map panel is displayed in Enscape VR. This is the ground floor of the building.
If you have a multi-story building, the related levels floor plan will be shown in the Map panel. For instance in Fig 1.17 the same position is shown as in Fig 1.16, but in Fig 1.17 we are one floor higher.
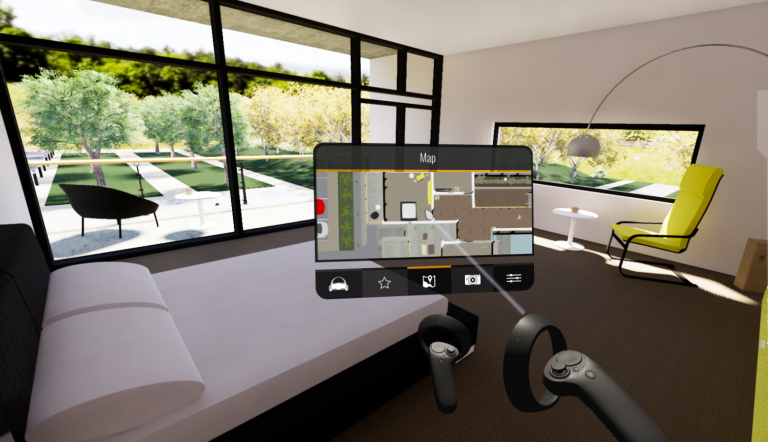
Fig 1.17 The Map panel showing the first floor of the same building as in Fig 1.16
Virtual Camera
The Virtual Camera settings panel allows you to capture an image of the screen in VR. There are two types of screen capture that can be produced:
- Eye View (Fig 1.18)
- Screenshot (Fig 1.19)
Eye View
In Eye view you can capture exactly what you are seeing in the VR window, so when you are happy with the position you are in, press the right trigger on your control module to capture exactly what you are seeing in VR – but note the quality will not be the same as an actual rendering as the Eye View function is designed to facilitate a way to add notes from VR.
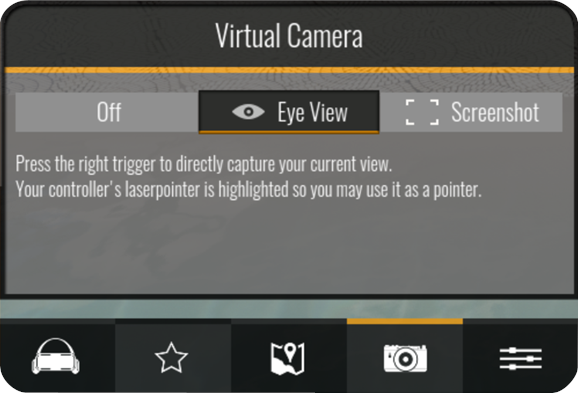
Fig 1.18 The Virtual Camera Settings Panel showing the Eye View as the selected method of screen capture
Screenshot
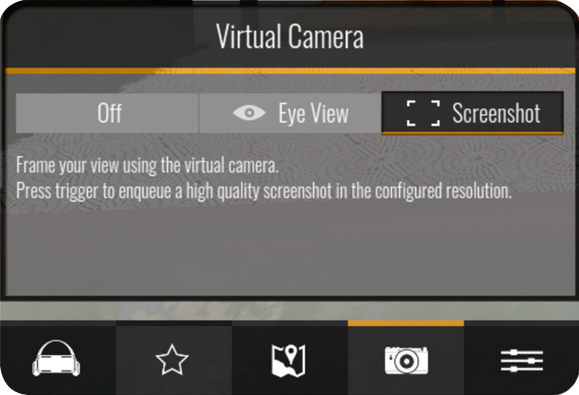
Fig 1.19 The Virtual Camera Settings Panel showing Screenshot as the selected method of screen capture
The second method allows you to capture high quality images whilst also allowing the framing of the screenshot through the adjustable aspect ratio of the capture Resolution to be specified in the Enscape’s Visual Settings Output tab (Fig 1.20).
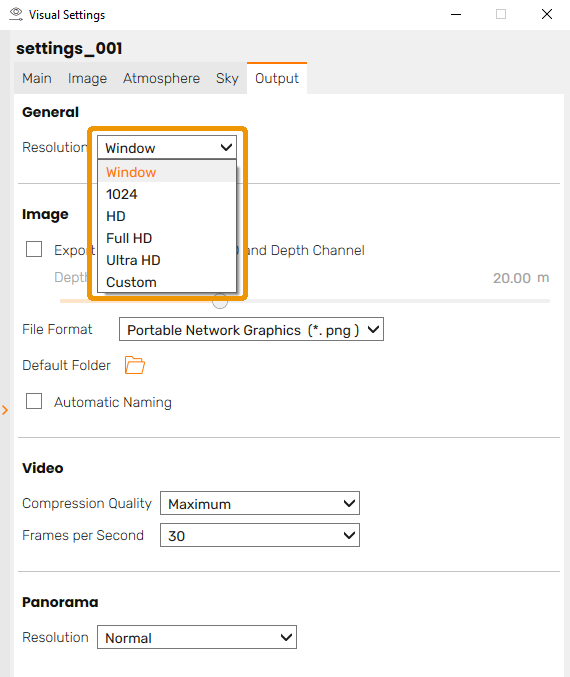
Fig 1.20 Enscape Settings Output tab, where the capture resolution can be set for the Screenshot to be taken
You can then frame your view by moving the virtual camera.
A Preview window will show you the area you are going to capture as a lower resolution, grayscale image (Fig 1.21).
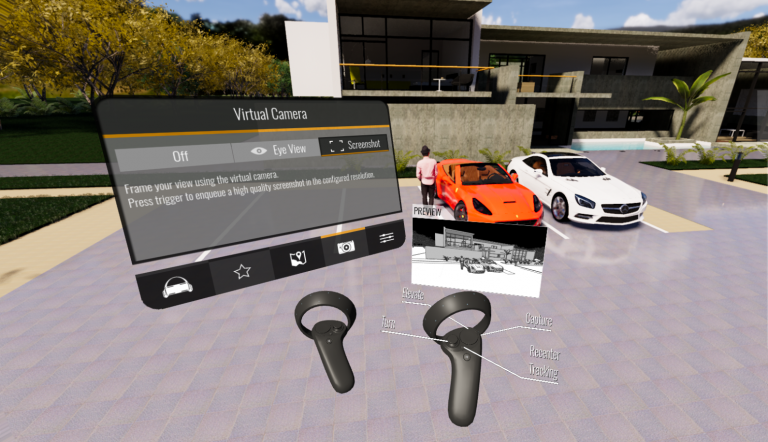
Fig 1.21 Screenshot method showing the Preview window
You can take as many screen captures as you want and not leave VR but please note that the preview quality is NOT the same quality as the final rendering. Also, the final renderings are being generated only upon VR being disabled in the Enscape ribbon.
Once you disable VR in the Enscape ribbon, only the last settings in the Enscape Settings window will be applied. You can adjust the settings after making the screen capture by opening the Enscape Settings window from the Enscape ribbon. Once VR is disabled, Enscape will render your captured images at the resolution set in the Enscape Settings window.
Screenshots will be saved to the location specified in the Enscape Settings, which, by default, is the Pictures folder.
Settings
Opening the settings screen will allow you to change three aspects:
- White Mode – everything, apart from transparent materials is turned white (Fig 1.22)
- Outlines – Displays geometry with outlines, the thickness can be adjusted in both Normal and White Mode (Fig 1.23)
- Time of Day – adjust to set the time of day you require.
When using VR via the Standalone Executable, please refer to this article for the location of the VR settings which will also allow you to toggle the VR option on / off.
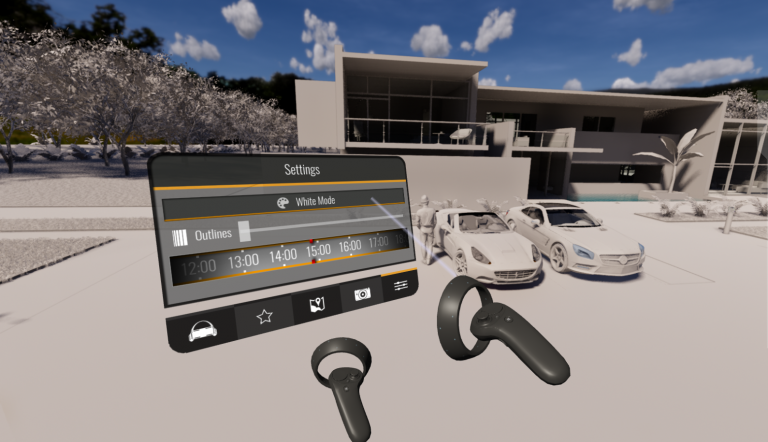
Fig 1.22 White Mode is enabled
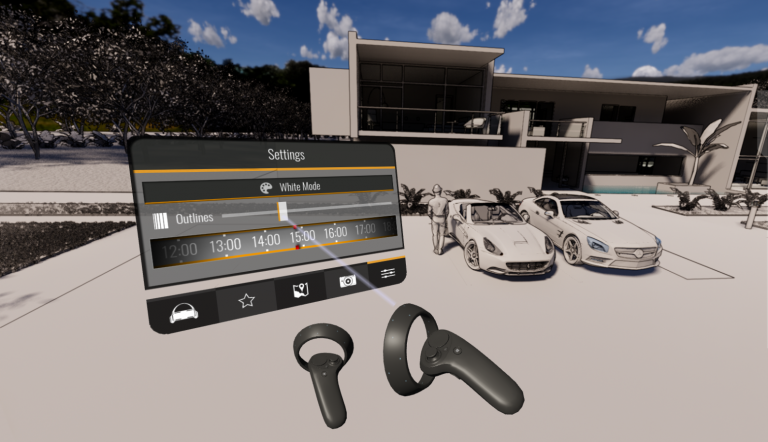
Fig 1.23 Outlines are set to full thickness with the slider
Need more information about Enscape?
Click here to learn more about Enscape, or to contact our visualization experts at enscape@microsolresources.com.
INDUSTRIES: Architecture, Buildings