


Revit Color Scheme
By Roger Liucci | BIM
Revit is an excellent tool for creating detailed architectural models, and one of its key features is the ability to apply a color scheme to your project. A well-designed color scheme can make your model look more visually appealing and help communicate design intent to clients and stakeholders.
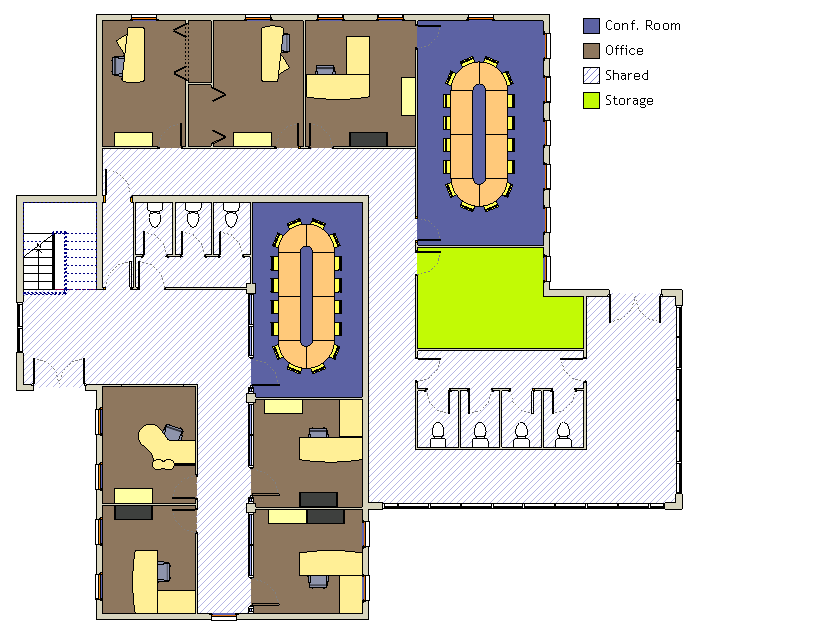
By applying custom color schemes to the rooms, walls, and other elements of your model, you can easily differentiate between different types of spaces, such as living areas or utility rooms.
I often use this feature to swiftly color-code different rooms in a floor plan based on their area or name. In this blog post, I will show you how to create a Revit color scheme that will enhance your architectural models.
Adding the building components
Your first step is to create the area where you want to apply the color scheme. This can be done by using bounding elements, which are building components such as walls or floors that enclose a space.
If you already have an enclosed space, bounded by walls or columns, you can simply select the Room tool in Revit and click on the space to create a room. This will automatically create a room that fits into the bounding elements. If you do not have any bounding elements, you will first need to create them before proceeding.
Once you have the bounding elements and rooms in place, you can further delineate the space using room separation lines, which will allow you to delimit areas without a physical element. For example, you can use a room separation line to create a divider between the living and dining areas in an open-concept space.
Room separation lines allow you to create different color schemes for each room or section within a larger space, making it easier to distinguish between different areas visually.
Set the visualization to “Color Fill”
Once you have your rooms and room separation lines in place, you can start setting up the color scheme. In the Categories tree, under the Visibility tab, make sure the Color Fill option is selected. This will allow you to see the Revit color scheme applied to your model.
Steps for creating a Revit color scheme
Now that you’ve set up the basic elements, you can follow these steps to create your custom color scheme:
Select a color-fill legend
The first step in creating a color scheme is to select a color-fill legend. This will act as the base for your color scheme and determine the overall color palette for your model.
Click on the Architecture tab> Room & Area panel drop-down> (Color Schemes) and then click on the Edit Scheme option to create a new scheme or modify an existing one.
Select a color scheme category
In the Edit Color Scheme dialog, you’ll be asked to select a color scheme category. This will determine which categories of building components you want to apply the color scheme to.
You’ll need to pick from the following options:
- Rooms: applies the color scheme to rooms bounded by walls or columns
- Areas (Rentable): This option is useful for commercial spaces, where different tenants may have different color schemes.
- Areas (Non-Rentable): This applies the color scheme to areas that are non-rentable, such as hallways or stairwells.
- Ducts, HVAC Zones, Pipes, and Spaces: These options allow you to apply the color scheme to mechanical or electrical components.
Select an existing scheme to modify
If you already have an existing color scheme, you can select it from the list and modify it according to your needs. This is useful if you want to make small changes or add new colors without starting from scratch.
You can also right-click and click Duplicate to create a copy of the existing scheme and make changes to it without affecting the original. Or you can create a new scheme by clicking on the New option and naming your scheme.
Create a title for the color-fill legend
Under the Scheme Definition field, you can add a title for your color-fill legend. This will help identify the scheme and its purpose. You’ll see this title above the legend when you apply the color scheme to your model.
Select the parameter to use as the basis of the color scheme
Under the Color list, you can choose a parameter to base your color scheme on. You can add to or change these parameters later via the Properties Palette.
If you want to color by a specific parameter value or by a range of values, you can select the By Value or By Range options.
Modify your color scheme definition values
There are nine values that define how a color appears in the scheme, including:
- At least: Sets the low-end range value.
- Less than: Sets a read-only value.
- Caption: Edits the legend text.
- Value: This value appears when you select By Value.
- Visible: This indicates if the value is displayed with color in the legend for color fill.
- Color: Allows you to select the color option for the value.
- Fill Pattern: Allows you to specify the fill pattern for the value
- Preview: This option shows a preview of the color and fill pattern if selected.
- In Use: This indicates whether the value is in use in this specific project.
Modifying these values will allow you to customize the color and appearance of each value in your color scheme.
Click Ok
With all your color scheme values set, click OK to save your changes and create your custom color scheme.
Apply the newly created color-fill legend
Once you’ve created a color fill legend, you can apply it to your model by following these steps:
- Right-click the floor plan view or section view in the Project Browser and select Properties.
- Click on the Color Scheme cell. This will open the Edit Color Scheme dialog.
- Under the Schemes tag, you will be able to select a category and the color scheme you just created.
- Click OK
- Back on the Properties palette, click on Color Scheme Location and select either Background or Foreground. This will determine whether the color scheme is applied to the background or foreground of your model.
- Click OK to apply the color scheme.
Your model should now be visually enhanced with your custom Revit color scheme, making differentiating between different areas and sections easier.
INDUSTRIES: Architecture, Buildings, Construction, MEP Engineering, Structural Engineering