Menu

3D Rendering in Autodesk Revit

By David Spergel | Virtual Reality, Visualization

Deliver Efficiency and Accuracy with Revit Rendering

Autodesk Revit is a building information modeling software where users can design buildings and structures in 3D. A popular tool amongst AEC professionals is commonly used by architects, landscape architects, engineers, as well as designers, and contractors.

Rendering in Revit can offer a quick turnaround time, quality performance, and user-friendliness. It can help drive efficiency and accuracy throughout the design process as updates to floor plans, elevations, and sections can be made as the model develops.

It can also be a powerful collaboration tool across different teams and disciplines. The visualizations created in Revit can be presented as walkthroughs to communicate designs, ideas, and concepts to team members and clients.


3D Revit Rendering with Enscape

Revit users can use Enscape with their favorite modeling software. As a plugin to Revit, using Enscape as a real-time rendering tool won’t disrupt your design workflow. Enscape allows you to explore your Revit project in a high-quality, real-time environment. This is especially useful for client presentations and design processes.

Enscape’s ease of use is a huge benefit for Revit users. There is no special training needed to master Revit renderings and visualization with Enscape, and there is ample information available via video presentations and our TECH Resources page for anyone looking for expert tips and tricks.

Rendering for Revit with Enscape gives you the option to experience your designs through virtual reality. With just one click, you can start virtual reality directly from your project. This enables you to navigate and experience your model easily and immersively.

How to Render in Revit

Using Enscape as the rendering software for Revit will provide users with a photorealistic snapshot of their 3D model. Onceinstalled, you will see Enscape as a top-level menu option. The Enscape ribbon will become visible once you click the menu option.

In Revit, you can render a single image, or you can perform batch rendering, which is a set of Named Views or Favorite Views.The benefit of performing batch rendering is that time can be saved when creating quality renders.

Changes made in Revit will instantly appear in Enscape.Thanks to simultaneous editing and visualization, project changes are immediately available to evaluate in Enscape. If your client, for example, wants to see something different in the design, their feedback can be implemented,and the changes will show up in real-time.

Revit users can utilize the Enscape Asset Library for their renders. With over 1,900 assets to choose from, projects can be brought to life. Techniques such as lighting and exposure, tint, and filters can be used to boost your designs.


Revit and Enscape Rendering screenshot


Revit Rendering Tips

For the best quality Revit rendering results, here are some best practices to follow: 

  • Natural lighting works best when you go to the Manage tab, click on Location, and type in the address. Revit will choose a weather station closest to the location you’ve put in. 
  • For better speed and performance of your renders, make sure the elements that aren’t in use are turned off. 
  • Ensure your models are clean and there are no overlapping surfaces to avoid flickering or artifacts when rendering.
Please watch this tutorial on how to get started with Enscape.

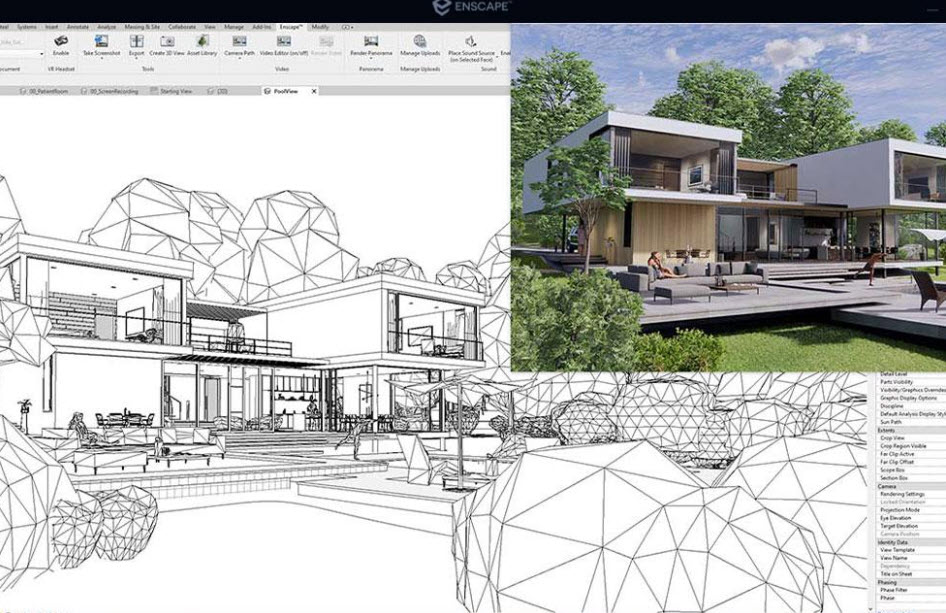
For more tips on how you can get the best Revit rendering experience with Enscape, visit our TECH Resources.

Need more information about Enscape?

Click here to learn more about Enscape, or to contact our visualization experts at enscape@microsolresources.com.

INDUSTRIES: Architecture, Buildings

Published on May 16, 2022 in .

About the Author

David Spergel is an Applications Specialist at Microsol Resources and specializes in emerging visualization technology for architecture and construction industries. He provides training, and consulting service, and supports Microsol’s clients using software applications from Bluebeam Revu to McNeel’s Rhino, Chaos Group’s V-Ray, and Enscape. He is a Bluebeam Customer Success Representative, a Bluebeam Certified Instructor, and a 3D printing specialist. David holds a Bachelor of Science in Manufacturing Engineering from Boston University.

BACK TO TECH RESOURCES