


Bluebeam Gateway User Guide
By Michael Schmidt | Data Management
Bluebeam Gateway is a web portal that lets you view and manage the Enterprise and Open Licenses for Bluebeam products. This blog post reviews how the Bluebeam Gateway is used for managing Enterprise Licenses and Open Licenses for your Bluebeam products, as well as performing other account-related tasks, including:
- Creating Your Account
- Managing Your Licenses
Enterprise Licenses
Open Licenses - Adding Administrators
- Additional Functions
Creating Your Account
To create an account, you must be the primary or secondary account contact for an Enterprise License or Open License. Once you’ve confirmed this, you can follow the steps below to register for a Bluebeam Gateway account.
- Go to https://portal.bluebeam.com and click Register Now.
- Enter your information in all the fields.
NOTE: The email address must match the one listed on the License Certificate or the email you received when the software was first purchased. Along with this, it’s important to make sure you enter it using the same address format. - Accept the Terms of Service Agreement by clicking the checkbox, and click Submit. A message appears letting you know that a confirmation email has been sent to the name and email address listed in the Account Summary.
NOTE: If the email doesn’t arrive in your inbox, please check your spam or junk email folder. - Open the email and click Confirm. This takes you back to a page on the Bluebeam Gateway, where you will see an “Email Confirmed” notification. Use the Click Here To Log In button to begin working with your Enterprise or Open Licenses as an administrator.
NOTE: This is a very important step. Your account can’t be created without this verification.
Troubleshooting Registration Errors
- Check for spaces, letters, and numbers.
- A Serial Number is a 7-digit number. It should not have any spaces, i.e. 1234567
- A Product Key contains letters and numbers, and appears in this format: XXXXX-XXXXXXX
- When registering, make sure that you are using your primary or secondary contact
Managing Your Licenses
Logging in to the Bluebeam Gateway takes you to the Licenses page, where you’ll see a list of all your products and serial numbers, as well as an overview of the current license usage.
NOTE: The Licenses page is a list of products and serial numbers associated with the information you entered while creating your account. If you’re expecting to see a product or license that isn’t listed, please contact us for further assistance.
This is where you can click a product name or serial number to begin viewing and managing the seat allocation for the licenses, or export a licensing report as a CSV file.
Enterprise Licenses
To start managing your Enterprise licenses, open the Enterprise License Details page by clicking a product name listed under the Enterprise License category.
In addition to the contact information, Serial Number and Product Key, this page includes an Export to Excel function on the right side for generating a license usage report, as well as a Registered and Revoked tab.
Registered Tab
This tab displays a list of registered computers, along with the product version number, IP address, original registration date, and Last Ping, which is the last time the software was used by the machine.
If you need to “un-register” one of the computers, place a checkmark in the corresponding checkbox on the left, click Revoke, and then click Continue on the next page that opens to confirm the revocation.
NOTE: The Revoke feature for Enterprise Licenses is available for Revu 2015.5 and above.
Revoked Tab
The Revoked tab contains a list of “un-registered” computers, along with the Computer Name, Version number, Revoked By, Revoked Date, and Last Ping (the last time the software was used by the machine).
You can cancel a Pending revocation by placing a checkmark in the corresponding checkbox on the left, clicking Cancel Pending, and then clicking Continue on the next page that opens. Machines will need to be re-registered manually once the Status has changed to Revoked.
Open Licenses
If you have Open Licenses that you need to manage, you can go to the Open License Details page by clicking one of the serial numbers listed on the Licenses under the Open Licenses category.
NOTE: Open Licensing for Bluebeam Revu requires Revu eXtreme, version 2015.5 or above. The Licenses page displays the products and serial numbers associated with your account. If you’re expecting to see a product or license that isn’t listed, please contact us for further assistance.
In addition to the contact information, Serial Number and Product Keys, the Open License Details page includes a Reporting feature with a graph of license usage. Below that, there is a table displaying information about Active, Registered, and Revoked Devices.
Reporting
The Reporting feature allows you to visualize data trends and examine license access in greater depth. There are a few options here that you can use:
- Showing: This field displays the current range of dates displayed on the graph.
- Show Denied: Check this box to display the number of Denied users in the graph.
- Download User Data: Click this link to download an Excel spreadsheet containing detailed information about user access to the Open License. The date range included in this spreadsheet is determined by the dates displayed in the Showing: field.
- Date dropdown: Use this dropdown to change the data that appears in the graph, and in the user data spreadsheet mentioned previously. There are multiple preset date ranges, as well as an option to create a Custom Date Range.
To create a custom date range:
- Click on the downward arrow above the graph. A dropdown menu will open.
- Select Custom Date Range at the bottom of the list.
- A dialog box will display over the graph. Click the date field on the left to select a start date.
– A calendar will appear once you click. Click on a day, or use the arrows to jump between months.
– You can also click on the month name to see the yearly view. The arrows will now jump from year to year.
– The dialog box will automatically close once you select a day, and your desired date will appear in the left field. - Next, click on the field on the right to select an end date using the calendar.
- Click Apply.
- The graph and the Showing: field will update with your new date range. You can now examine the new data set using the directions below, or download the data as a spreadsheet by clicking Download User Data.
The graph illustrates trends based on three statistics:
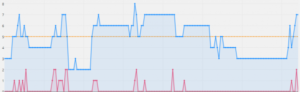
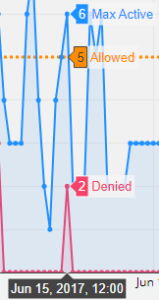
- Allowed – The number of users allowed to access Revu at the same time. This number is represented by a yellow dotted line.
- Denied – The number of users denied access to Revu at a particular time, indicating that the number of Allowed users was exceeded. This number is represented by a red dot. Make sure the Show Denied checkbox is selected if you want to display this information.
- Max Active – The total number of users who accessed Revu at a particular time. This number is represented by a blue dot.
You can also interact with the graph to see more detailed information:
- Hover over the graph to see exact numbers for a particular time. A tooltip adjacent to the dot you are indicating will display the exact numbers in their associated colors. A tooltip will also display the indicated time at the bottom of the graph.
- To view a smaller data set, click and drag over your intended range, then release. The graph will zoom in on that range. Double-click on the graph to zoom out.
Devices
The Devices table displays information about the devices which have accessed the Open License. Click the Download Registered Devices link to download a spreadsheet of the information listed here.
Active Tab
The Active tab displays a list of the computers that are currently running the software. This is where you can temporarily release a seat that’s currently being used by one of these computers. This is useful in a situation where the program was left open on a machine that’s been locked with a password, and you urgently need to free up the seat for someone else to use.
Please note: Releasing a seat doesn’t revoke the license registration for the computer, and it will still appear on the Registered tab.
Registered Tab
Just as it does for an Enterprise License, this tab displays a list of registered computers, along with the product version number, IP address, original registration date, and the last time when the software was last used by the machine.
If you need to un-register one of the computers, place a checkmark in the corresponding checkbox on the left, click Revoke, and then click Continue on the next page that opens to confirm the revocation.
Revoked Tab
The Revoked tab contains a list of un-registered, computers, along with the Version number, Status, the date the license was Revoked, and the time when it was last used.
You can cancel a Pending revocation by placing a checkmark in the corresponding checkbox on the left, clicking Cancel Pending, and then clicking Continue on the next page that opens. Machines will need to be re-registered manually once the Status has changed to Revoked.
Adding Administrators
If you’d like to have a colleague help with your license administration, you can add them to the account as either a Global or Site Administrator.
Global Administrators are able to view all licenses under the account, as well as add or remove other Global and Site Administrators.
Site Administrators can only work with licenses that a Global Administrator gives them access to. They aren’t able to add, remove, or modify administrators.
To Add an Administrator:
- Log in to your account and click Users from the navigation bar. This opens the Manage Users page.
- Click Invite User.
- Enter and confirm the email address of the person you’d like to add as an administrator, choose either the Global or Site administrator role for them, and click Invite.
If you select the Site Administrator role for them, additional choices will appear that let you select which of your available licenses you’d like them to manage.
Additional Functions
While you’re logged in to the Bluebeam Gateway, you can access additional features by clicking on your username, which is located in the upper-right corner of the page. When you do this, a drop-down menu appears that offers the following choices:
- Sign Out – Logs you out of your account.
- Change Password – Lets you change the password for your Bluebeam Gateway account.
- Downloads – Takes you to Bluebeam’s Updates and Installation page, where you can download the latest Bluebeam Software product updates.
- Contact Us – Takes you to the Contact Us page, where you can send a message to our Account Services or Technical Support team.
You can always contact Dan Mertz directly by email at bluebeam@microsolresources.com.
INDUSTRIES: