
Bluebeam Revu is an extremely powerful tool for the architecture, engineering, and construction (AEC) community that allows users to markup, takeoff, organize, and collaborate PDF files easier than before. Annotating and measuring is now faster than before and the new studio features allow you to collaborate in real-time.
Tools are only as good as our ability to use them. That’s why we want to help you power up your knowledge of Bluebeam Revu. This article is a Revu Tool Kit — a collection of useful tips, tricks, and keyboard shortcuts to supercharge your Bluebeam Revu workflows.

Here are some tips & tricks that will help you extract even more out of Revu.
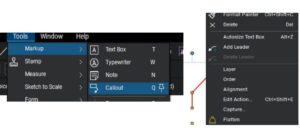
Place the Callout tool on the PDF, then right-click the arrow and select “Add Leader” to draw additional leader lines. Repeat the steps to point to multiple locations on your drawing.
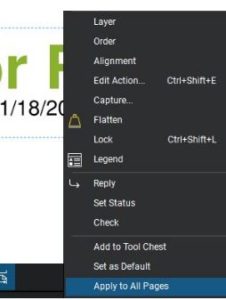
Right-click your markup and select “Apply to All Pages” to place that markup at the same location on every page in your document.
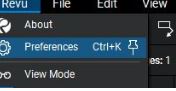
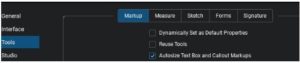
If you always want your text boxes to be perfectly sized for the text they contain, go to Revu> Preferences> Tools > Markup and select the checkbox “Autosize Text Box and Callout Markups”. Or use keyboard shortcut Alt + Z to auto-size a single markup.
Optimize your dual monitor workspace! If you frequently access tabs and panels like the Tool Chest and Markups List, you can click and drag them over to your second monitor so that they are always in view. Then you can also make them as large as you’d like.
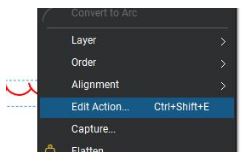
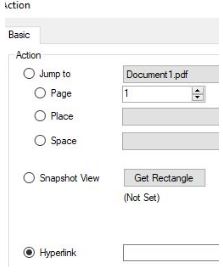
To add a hyperlink to any markup, right-click the markup and select “Edit Action” from the context menu, then choose the hyperlink option. You can also use the keyboard shortcut Ctrl + Shift + E.
Clicking a hyperlink in Revu will take you from your current document into the linked content. However, if you’d like to stay where you are and open the link in a new document tab, simply hold down the Ctrl key while clicking the link.
For a simple way to tell if a new file is a vector or scanned, zoom into the drawing-think 800%+. If it begins to pixelate, it’s scanned. If it stays crisp, it’s a vector.
You can also try highlighting the text in a document. Vector documents will allow for text to be selected, whereas scanned documents will only recognize text if OCR has been run. Vector files allow you to snap to content to quickly get the most accurate measurements, so we recommend asking for vector files instead of scans whenever possible.
Note: Some vector content may not be selectable, such as SHX font.
You can bring your PDF back to Microsoft® Word Or Excel® by going to File > Export and then pick your preferred export file type. This is especially useful if you need to make any changes to a text-based document but only have the PDF version.

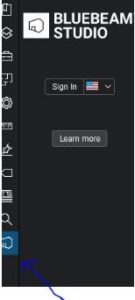
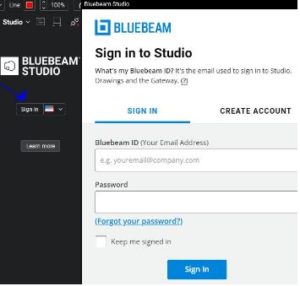
To get started, click on the Bluebeam Studio icon on the Panel Access and create a new account. Once logged in, you can use Studio Projects or Studio Sessions. Studio Projects is a single centralized location to store documents in the cloud. Studio Sessions let project teams review, mark up, and update the same files at the same time, allowing partners worldwide to connect on the same set of documents.
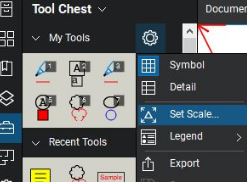
Go to the Tool Chest panel, choose the toolset you’d like to create a scale for, and select Properties > Set Scale. This allows your tools to automatically scale in relation to any calibrated drawing or viewport they are placed in. For example, a symbol in a toolset configured with a baseline scale of 1″ = 1′ becomes proportionately smaller when placed on a document set to 1″ = 10′ scale.
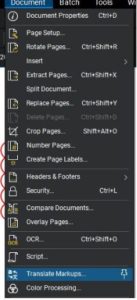
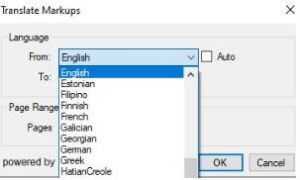
To translate markups, go to Document > Translate Markups. Choose the original language and the language you’d like to translate to, then click OK.
If you need to translate text that is in the original PDF, you can either select the text and copy and paste it into a text box, then follow the translation process above. Or, follow Tip # 9 followed by the translation process, and the translated text will appear in your Markups List summary report.
A longtime favorite: Hold down the Shift key to draw a perfect line. square or circle when using the relative markup tool.
To quickly create a copy of any selected markup, hold down the Ctrl key, then click and drag the markup to the side. If you’d also like to paste it in the same place on another PDF, copy the markup and use Ctrl + Shift + V when you paste on the new page.

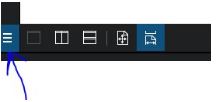
To minimize the Panel Access and have access to more screen real estate, click on the blue bar. Simply click on the blue bar again to bring it back.

Share a file from a Studio Project with anyone by using Share Link, which will provide a link that you can send to your collaborators. Simply right-click the file in your Studio Project and select Share Link.
The file can be password-protected and set to expire either at the end of the project or after 24 hours. As long as the link is valid, it will always contain the latest version of the document that has been updated within the Studio Project.
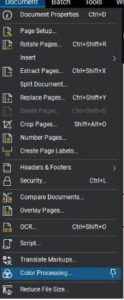
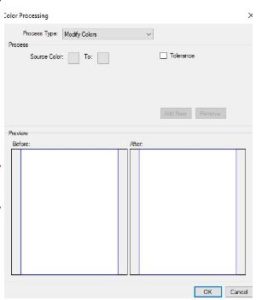
This is a great option for CAD drawings! Go to Document > Color Processing to change the colors of PDF content. Color processing can also convert colorful PDFs to monochrome or grayscale.
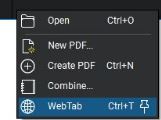
Did you know that you can open a web page within Revu? Simply right-click next to your current document tab and select WebTab from the context menu.
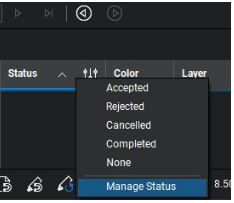
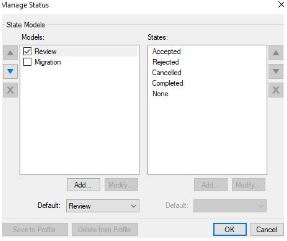
Did you know that you can give markup statuses, such as approved or rejected? Then you can easily visualize the status of markups by color-coding them so that the colors change automatically as you change the status of the markup. This works really well with Punchkeys.
To color-code, a markup, go to the Status column in the Markups List, click on Manage Status, select a state (such as approved, rejected, etc.), and then select Modify to choose a color for that state.
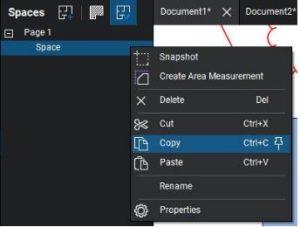
Spaces, the feature in Revu for defining regions of a drawing, can be copied across other pages and files in Revu. This is a great way to save time from individually recreating each space if you are working on files with duplicate floors, such as health care or hospitality projects.
Go to the Spaces panel, right-click your selected Space name in the list and select “Copy”. You can also select multiple Paces in the list by holding down the Shift key while making your selections, and then choose Copy. Paste it into your selected document.
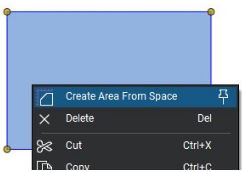
You can get area measurements directly from Spaces. Just right-click on the Space and select “Create Area from Space.”
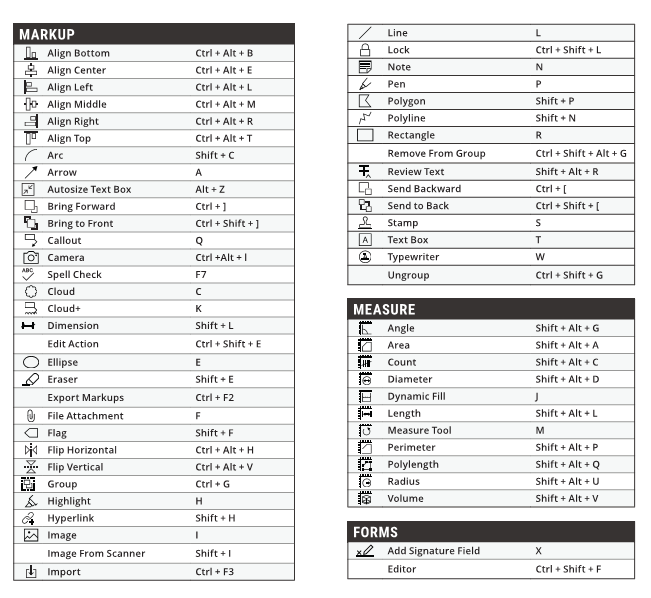
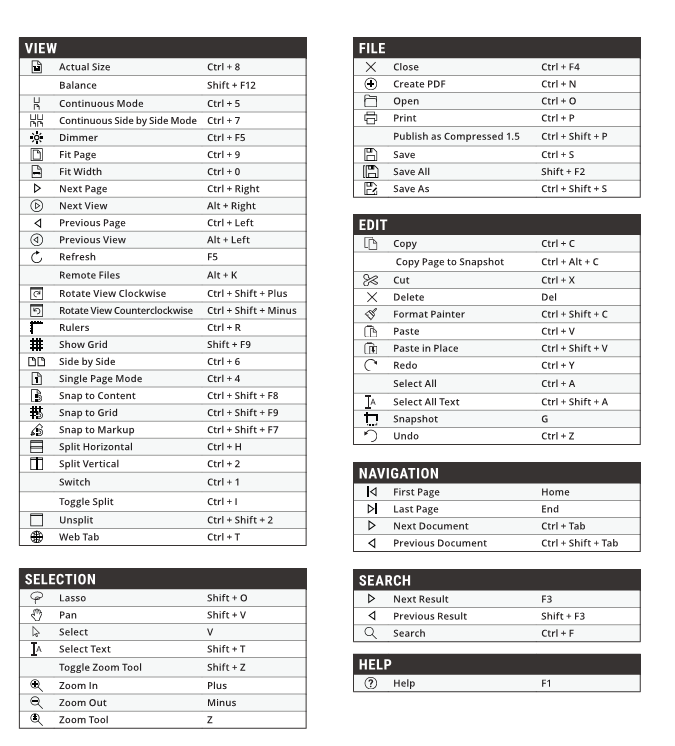
Revu keyboard shortcuts can now be customized! So you can remap existing Revu shortcuts to match similar functions in other programs you already use or add new shortcuts to create your own personal list of frequently used commands. New customizable shortcuts include batch tools, sketch tools, cut content, erase content, and lots more.
How to create custom keyboard shortcuts
Select Revu on the Menu bar and click Keyboard Shortcuts. In the Keyboard Shortcuts window, select the tool or command you want to shortcut, enter the keystroke in the Shortcut field, and click Add. To use a shortcut already assigned to another tool, click Reassign.
All shortcuts listed in the Revu menu system will be automatically updated once a new shortcut has been assigned, making them easier to find and remember.

Ready to try Revu?
Click here to get your free 30-day Bluebeam Revu trial today.
Want to purchase your Bluebeam Revu licenses?
Go visit our Online Store.
If you have any questions about Bluebeam, please contact bluebeam@microsolresources.com.

Profiles in Bluebeam Revu provide an easy way to store your favorite toolbars, menus, and other display settings so that the tools you find most useful are readily available each time you open Revu.
Profiles can also be used to shape the User Interface of Revu for particular job functions within an organization. For example, a simplified interface for users who view, but do not need to edit, PDFs can be created by turning off most of the toolbars and tabs within Revu and maximizing viewing space.
A profile like that could be easily tweaked by turning back on some basic markup toolbars and tabs, without the more advanced editing functions, to create a profile for users who need some basic markup capabilities.
Read on to learn how to choose a preloaded Profile or create your own as well as how you import or export Bluebeam Revu profiles.
Revu comes preloaded with several Profiles that are geared toward specific jobs and functions, including:
Revu: For users who prefer a basic, streamlined interface. Appropriate for most users.
Revu Advanced: For users who would benefit from a more robust interface. Users upgrading from Revu 2017 or earlier might find this layout more familiar.
Quantity Takeoff: For estimators and specifiers who need to view plans and specs, conduct quantity takeoffs or add markups to their PDF files.
Field Issues: For users completing a punch process.
Go to Revu > Profiles to see a list of available Profiles. The Profile that is currently active will be checked. To change Profiles, simply select another one from the menu. Once selected, the Revu interface will update based on the settings defined in the new Profile.
You can customize the Revu interface and save your configuration as a Profile. There is no limit to the number of custom Profiles you can create.
To create a custom Profile:
To save changes to a Profile:
When a Profile is exported from one computer and imported into another, they are not linked in any way, so updates made to one will not affect the other. The imported Profile is merely a copy of the exported Profile; each may be changed independently.
To share a Profile among multiple users, so each will be affected by changes to the Profile, see Managing Profiles (below).
Profiles are typically exported in order to share them with other users, though they might also be exported for other reasons (to save a backup, for example). Exporting a Profile is a simple process.
Go to View > Profiles or click Profiles on the Navigation Bar to open the Manage Profiles dialog box.

Profiles that are to be imported must have a .bpx extension and must be saved on a local or network drive that you can access. They can also be sent to you directly. For example, a colleague might send you a Profile they have exported as an email attachment; just save the attachment to your local drive and import it.
You cannot import a Profile that has the same name as one of your current Profiles. So, for example, if you are trying to import a copy of somebody else’s Simple Profile that they have exported and sent to you and the file is called “Simple.bpx”, you will need to do one of two things: delete your Simple Profile or rename their “Simple.bpx” file to something else.
If you decide to delete your Simple Profile, it might not be a bad idea to export it to save as a backup first; otherwise, the latter is recommended.
The simplest way to import a Profile is to double-click the .bpx file. It will be automatically imported into Revu.
You can also import Profiles through the Revu interface:
Go to View > Profiles or click Profiles on the Navigation Bar to open the Manage Profiles dialog box.
Revu comes preloaded with several Profiles that are geared toward specific jobs and functions, including:
Advanced: For users who need a broad range of advanced markup features and precise control over markups and measurements and their properties.
Construction: For construction professionals who work with large drawing sets and smart documents and need robust markup, editing, and collaboration tools.
Design Review: For users who need an interface tailored for design review and collaboration with customizable toolsets that contain essential features for drawing navigation, markup, and measurement.
Office: For users who review and proofread documents and need the most frequently used markup and editing tools with a simplified interface.
Oil & Gas: For users working with piping & instrumental designs (P&IDs) and process flow diagrams (PFDs) who need specialized toolsets geared toward those tasks.
Punch: For users completing a punch process.
Simple: For users who need to maximize screen space for viewing PDFs but also want to access the Command bar and document tabs for quick navigation between files.
Tablet: For tablet PC users, this Profile reorients the interface vertically and exposes only key markup and editing tools to maximize screen space while panning, zooming, writing, and drawing with a tablet PC stylus.
Takeoff: For estimators and specifiers who need to view plans and specs, conduct quantity takeoffs or add markups to their PDF files.
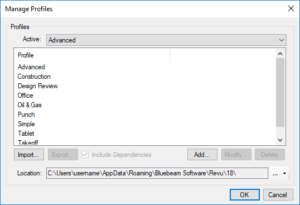
There are several functions available from the Manage Profiles dialog box, including renaming existing profiles, adding new profiles, importing and exporting profiles, and deleting profiles.
Go to View > Profiles or click > Profiles on the Navigation Bar to open the Manage Profiles dialog box.
Active: Switch between active profiles by selecting from this dropdown list.
Import: Click to import an existing profile saved on a local or network drive. See Importing and Exporting Profiles instructions above for more information about importing Profiles.
Note: Double-clicking a .bpx file from Windows Explorer will automatically import it.
Export: Click to export a selected profile. This option is only available when a profile is selected from the Profile list. See Importing and Exporting Profiles for more information about exporting Profiles.
Include Dependencies: Embeds toolsets, bookmark Structures™ (eXtreme only), hatch patterns, and line style sets in the exported Profile.
Add: Click to name the current configuration and add it as a profile. See Creating Custom Profiles (above) for more details.
Modify: Click to rename a selected profile. This option is only available when a profile is selected from the Profile list.
Delete: Click to delete a selected profile. This option is only available when a profile is selected from the Profile list.
Location: Define the location of shared, centralized profiles. Click the ![]() button to the right of the field to browse to the centralized location. Any new or modified profiles stored in this location will be immediately available. They cannot, however, be permanently modified by individual users: any changes a user makes to a shared profile only affect that user and are lost when Revu is closed.
button to the right of the field to browse to the centralized location. Any new or modified profiles stored in this location will be immediately available. They cannot, however, be permanently modified by individual users: any changes a user makes to a shared profile only affect that user and are lost when Revu is closed.
When going offline, users can continue to use the shared profile that was active when they went offline. The user would not receive updates to the profile until they went back online, however. Similarly, other shared profiles would be available to an offline user but might have reduced functionality (notably, some toolsets might be unavailable).
Note: Users can save modified, local copies of shared profiles by clicking Add. Such profiles will not be available to other users and will not benefit from updates made to the centralized profile.

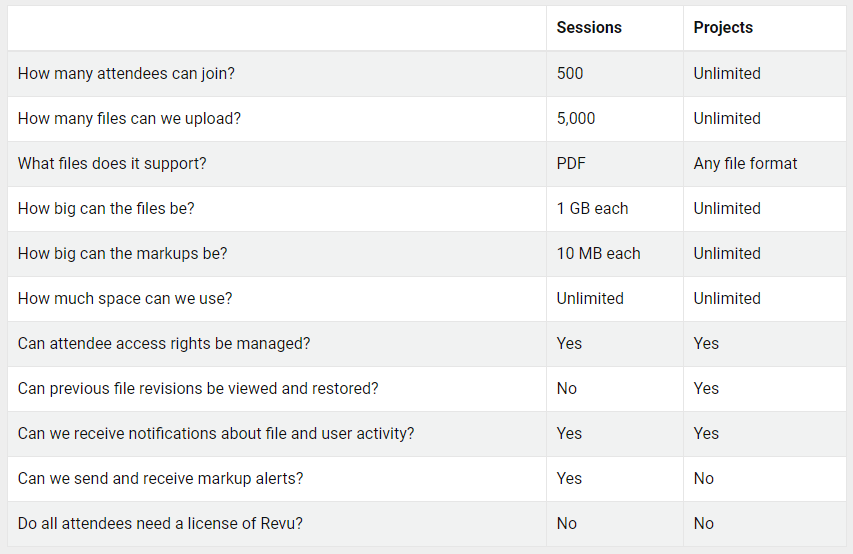
Bluebeam offers two different versions of Studio. Although both versions provide the same core functionality for sharing and marking up documents with your co-workers, each of them has different administrative functions.
Bluebeam Studio is the free cloud-based version included with every copy of Bluebeam Revu.
Built into Bluebeam Revu, Studio enables powerful document management and real-time collaboration.
Studio Projects give you a single centralized location to store documents—even entire building projects—in the cloud. And Studio Sessions let project teams review, mark up and update the same files at the same time.
Sessions enable document-based online real-time collaboration. They are accessible through the Revu interface. Only the host needs a Revu license to initiate a Studio Session, and all invited attendees can participate in the Session through Revu or Revu for iPad. If collaborators do not have a license of Revu, they can use Revu in View Mode or Vu for iPad.
Studio Projects enable streamlined document management by allowing you to store and manage your project files, including PDFs and other file types, in one place through the Revu interface. Teams can work with Project files regardless of internet access—simply sync files locally from a Project before going offline and re-sync any updates once you reconnect.
Collaborators who do not own a license of Revu can access the files using Revu in View Mode or Vu for iPad. Or, you can send them password-protected Share Links, which allow them to download a local copy of the files.
Bluebeam Studio—which includes options for organizations to have more administrative control over their Sessions and Projects—offers varying levels of permissions, from limiting the level of collaboration for internal users to managing participants outside of the organization. Learn more here.
You can access Studio and unlock the industry-standard markup tools in Revu without owning a license of the software. Download a trial of Revu to use in View Mode, or download the free Vu app for iPad.
Studio Prime is a subscription-based cloud solution, offering administrative functions and access to external applications using the Bluebeam Studio API.
Studio Prime is a subscription that gives companies additional administrative and user management control over their Studio Projects and Sessions. Administrators can access Studio activity reports through the online Studio Prime Portal, as well as Folder Automations functionality and the Bluebeam Studio API for external application integrations.
No, you do not need to own a seat of Bluebeam Revu to manage a Studio Prime account. You can access the online Studio Prime Portal to control user access and pull reports on user activity.
A Studio Prime subscription makes it easier to collaborate with outside vendors and project partners, giving your organization more control over each Studio participant. There are two types of users within Studio Prime: Members and Collaborators.
Members are users who are invited to join your Prime account. They could be employees, joint venture partners or anyone who needs to become a managed user.
Collaborators are external users that Members invite to attend managed Projects and Sessions. Collaborators could be superintendents, subcontractors or anyone who needs access to a Studio Project or Session within the Studio Prime account. Prime Administrators can control Collaborators’ access to Members’ managed Projects and Sessions.
When invited to the Studio Prime account, Members give Administrators the ability to manage their Studio account and associated Projects and Sessions. Collaborators, on the other hand, maintain control over their personal Studio account when joining or leaving a Project or Session within the Prime account.
Administrators can access their Studio Prime account through the online Studio Prime Portal at studio.bluebeam.com.
The Bluebeam Studio API lets Studio Prime subscribers create applications to manage their Studio Projects and Sessions. These applications can leverage Bluebeam Studio in a number of ways, including:
Folder Automations is a feature in Studio Projects that allows Studio Prime subscribers to streamline repetitive PDF-based workflows across a large number of users. Subscribers can automatically perform a set of predefined actions to files in a Project folder, including:
If you have any questions about Bluebeam Studio or Bluebeam Studio Prime, contact us at bluebeam@microsolresources.com.
If you want to have additional information about Bluebeam Studio Prime, click here to review our product page.

Features the latest informative and technical content provided by our industry experts for designers, engineers, and construction firms and facility owners.
LEARN MORESTAY IN TOUCH
